Sidebar
Table of Contents
23.4.2.5 Colour spaces and colours
23.4.2.5.1 HSV colour space
The HSV colour space is a colour space in which the colour is defined using the hue (hue), the saturation (saturation) and the brightness value (value). The following parameters are used to describe the colour - or more precisely the colour location - in this colour space:
- Hue H as the colour angle in the interval [0°|359°] on the colour circle (e.g. 0°=red, 120°=green, 240°=blue),
- Saturation S in the interval from zero to one, where 1 represents a saturated, pure colour (without white component). In Gambas, the interval [0|1] is mapped to the interval [0|255].
- Brightness V in an interval from zero to one with 1 as the value for full brightness. In Gambas, the interval [0|1] is mapped to the interval [0|255].
23.4.2.5.2 RGB colour space
There is not just one red-green-blue colour space or RGB colour space (colour cube), but theoretically many. What they all have in common is the composition of a colour through the additive mixture of colour components of the three primary colours red, green and blue. These components are coded in Gambas as integer values in the interval 0 to 255 for the three colour components.
23.4.2.5.3 Alpha channel for transparency
In addition to the colour information, transparency information is also stored in the alpha channel. The alpha channel comprises 256 levels in Gambas. The value alpha = 255 corresponds to 'completely transparent' - in contrast to normal colour coding. Alpha = 0, on the other hand, corresponds to 'not transparent'.
23.4.2.5.4 Working with colours
The following sections show you examples of how to use the classes Colour (gb.image), Color (gb.qt4) and ImageStat (gb.image) to create
- determine (read out) colour values,
- to assign colours,
- mix colours,
- analyse colours by determining their red-green-blue colour components,
- analyse colours by determining their alpha value,
- determine colour information for a pixel of an image,
- to set the colour for a pixel of an image,
- convert colours from different colour spaces (RGB ↔ HSV),
- use colour constants,
- generate colour palettes or
- to use the ImageStat (gb.image) class to determine the colour depth of an image.
The order of the applications does not reflect any order of priority. Colour and colour value are used synonymously.
23.4.2.5.5 Determining colour values
The following classes have the colour properties Background and Foreground, which you can read or set:
Button, ButtonBox, CheckBox, ColorButton, ColorChooser, ColumnView, ComboBox, Container, Control, DateBox, DateChooser, Dial, DirChooser, DirView, DrawingArea, Editor, Embedder, Expander, FMain, FileChooser, FileProperties, FileView, FontChooser, Form, Frame, GridView, HBox, HPanel, HSplit, IconPanel, IconView, ImageView, LCDLabel, LCDNumber, Label, ListBox, ListContainer, ListView, MaskBox, MenuButton, MovieBox, Panel, PictureBox, ProgressBar, RadioButton, ScrollArea, ScrollBar, ScrollView, Separator, SidePanel, Slider, SliderBox, SpinBox, TabPanel, TabStrip, TableView, TextArea, TextBox, TextEdit, TextLabel, ToggleButton, ToolButton, ToolPanel, TrayIcon, TreeView, UserContainer, UserControl, VBox, VPanel, VSplit, ValueBox, Window, Wizard, _IconPanelContainer, _Split, _TabPanelContainer, _TreeView, _WizardContainer.
- iColor = ColorButton.Color
- iColor = PictureBox1.Picture.Image[Mouse.X, Mouse.Y]
- iColorHex = Hex(Color.Background, 6)
23.4.2.5.6 Assign colours
You can assign colours from the two colour spaces RGB and HSV directly or as safe inputs via ColorButton and ColorChooser or by calling the colour selection dialogue Dialog.SelectColor() directly. The use of colour constants is just as reliable. You can write the colour values (data type integer) as a decimal, hexadecimal or binary number. The hexadecimal number format must be preceded by the prefix & or &H or &h.
Textarea.Background = Color.SelectedBackground
Textarea.Background = &H86ABD9
Textarea.Background = 8825817
Textarea.Background = Color.RGB(134, 171, 217)' » Red: 86→ 134, Green: AB→ 171, Blue: D9→ 217
Textarea.Background = Color.HSV(213, 97, 217)

iBGColor = Color.RGB(134, 171, 217) '-- Generate colour value
Textarea.Background = iBGColor      '-- Assign colour value
Textarea.Foreground = Color.Red
23.4.2.5.7 Analyse colours
For colour analysis, both the colour value and the red-green-blue colour components and optionally also the alpha value are of interest. You can use the Color (gb.image) and ColorInfo (gb.image) classes to determine the listed colour information in the colour space of interest (RGBA and HSVA). if you use the ColorInfo class, it is a good plan to work with an object of the ColorInfo type. It is assumed that the colour to be analysed is provided in the variable iColor in the analysis procedure (→ ColorChooser) and the colour components in iRed, iGreen, IBlue, IHue, iSaturation, iValue and iAlpha.
Dim iColor As Integer
Dim hColorInfo As ColorInfo
Dim iRed, iGreen, iBlue, iHue, iSaturation, iValue, iAlpha As Integer

iColor = ColorChooser1.SelectedColor

'-- Variant 1 in the RGB colour space always helps ...
    iRed = CInt(iColor / 256 / 256) Mod 256
    iGreen = CInt(iColor / 256) Mod 256
    iBlue = iColor Mod 256

'-- Variant 2 - You use the [] operator of the colour class
    iRed = Color[iColor].Red       '-- Read out red colour component
    iGreen = Color[iColor].Green   '-- Read out green colour component
    iBlue = Color[iColor].Blue     '-- Read out blue colour component
    iAlpha = Color[iColor].Alpha   '-- Read alpha value
    iHue = Color[iColor].Hue
    iSaturation = Color[iColor].Saturation
    fValue = Color[iColor].Value

'-- Variante 3 – Klasse ColorInfo
    hColorInfo = Color[iColor] '-- A ColourInfo object is returned
    iRed = hColorInfo.Red
    iGreen = hColorInfo.Green
    iBlue = hColorInfo.Blue
    iAlpha = hColorInfo.Alpha
    iHue = hColorInfo.Hue
    iSaturation = hColorInfo.Saturation
    fValue = hColorInfo.Value

'-- Variant 3b
'-- If you do not want to create a variable for hColorInfo, it is also possible to use WITH
    With Color[iColor]
      iRed = .Red
      iRed += 20
'--Assignments also work as expected here
      .Red = iRed

'-- The changed colour can be assigned at the end
    ColorChooser1.SelectedColor = .Color

End
23.4.2.5.8 Generate colour palettes
A colour palette is a selection of specific colours from the available colour space. Two colour palettes and their generators are presented: Palette of shades of grey and a palette of web-safe colours. You generate the palette of grey tones with this source code, in which the RGB colour components always have the same value:
Public Sub btnSetGrayPalette_Click()
  Dim panStartX, panX, panY, iRow, iColumn, iCount As Integer
  Dim pPanel As Panel

  panStartX = 424
  panX = panStartX
  panY = 16
  iCount = 0

  For iRow = 1 To 16
      For iColumn = 1 To 16
          pPanel = New Panel(FMain)
          pPanel.X = panX
          pPanel.Y = panY
          pPanel.H = 12
          pPanel.W = 12
          pPanel.Background = Color.RGB(iCount, iCount, iCount)
          panX += 16
          Inc iCount
      Next ' iColumn

      panX = panStartX
      panY += 16

  Next

End
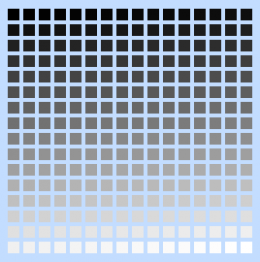
Here is the result:
Figure 23.4.2.5.1: Colour palette grey tones
The source code for the web-safe colours follows …
Public Sub btnSetWebFarbPalette_Click()
  Dim R, G, B, panStartX, panStartY, panX, panY, iCount As Integer
  Dim pPanel As Panel

  panX = 16
  panStartY = 16
  panY = panStartY

  For R = 0 To 255 Step 51
    For G = 0 To 255 Step 51
      For B = 0 To 255 Step 51
          pPanel = New Panel(FMain)
          pPanel.X = panX
          pPanel.Y = panY
          pPanel.H = 12
          pPanel.W = 12
          pPanel.Background = Color.RGB(R, G, B)
          panY += 16
      Next '-- Blue
      panY = panStartY
      panX += 16
    Next '-- Green
    panY = panStartY
    panX += 16
  Next   '-- Red

End
… and this is what the 216 (6x6x6) colours look like:
Figure 23.4.2.5.2: Web colour palette
23.4.2.5.9 Determining the colour depth of an image
According to http://www.e-teaching.org/, 'colour depth' is defined as follows: “The colour depth specifies how many different colour levels are available for each individual pixel of a graphic. As the “fineness” of the gradations depends on how much memory space is used per pixel, the colour depth is specified in bits. With 8 bits, for example, 256 colour nuances can be distinguished for one colour channel. A colour is created by mixing several colour channels of a colour space. In computer graphics, the RGB colour space is usually used, in which colours are created by additively mixing the three primary colours red, green and blue.”
Public Sub btnGetDepth_Click()
  Dim hImageStat As ImageStat

    hImageStat = ImageStat("Images/color.png") ' Bildpfad
    Print "Colour depth = " & hImageStat.Depth & " Bits"
    Print "Colour depth = " & ImageStat("Images/color.png").Depth & " Bits" '-- Class ImageStat (gb.image)
'-- Change of class!
    Print "Colour depth = " & PictureBox1.Picture.Image.Depth & " Bits"     '-- Class Image (gb.image)

End
23.4.2.5.10 Mixing colours
In chapter 23.4.2.1 Colour classes you will find further information on mixing colours and changing them:
Public Sub btnMerge_Click()
  Dim fWeight As Float

  fWeight = 0.3
  ColorButton3.Color = Color.Merge(ColorButton1.Color, ColorButton2.Color, fWeight)

End
Colour manipulations for an image pixelUse this source code to read colour information for an image pixel and set a new colour for the selected pixel. You can specify the new colour in a colour selection dialogue (ColorButton).
' Gambas class file

Public Sub Form_Open()

    FMain.Center
    FMain.Resizable = False
    ColorButton1.Color = Color.White

End

Public Sub GetSetPixelColor(x As Integer, y As Integer)
    Dim iColor, hColor As Integer
    Dim hImage As Image

'-- Print "Mouse.X = " & Mouse.X
'-- Print "Mouse.Y " & Mouse.Y
'-- GetPixelColor
    iColor = PictureBox1.Picture.Image[x, y]

' Print "Current pixel colour = " & iColor
' Print "Red content  = " & Color[iColor].Red
' Print "Green content = " & Color[iColor].Green
' Print "Blue content = " & Color[iColor].Blue

'-- SetPixelColor
'-- Convert to Image, as only the Image class allows access to pixels.
    hImage = PictureBox1.Picture.Image

'-- Set pixel colour -> block pixel from 9 pixels
    hColor = ColorButton1.Color
    If x > 1 And y > 1
       For i = -1 To 1
           For k = -1 To 1
               hImage[x + i, y + k] = hColor
           Next ' k
       Next ' i
   Endif

'-- Convert the modified image back into a picture and place it in the PictureBox
    PictureBox1.Picture = hImage.Picture

End

Public Sub PictureBox1_MouseDown()
    GetSetPixelColor(Mouse.X, Mouse.Y)
End

Public Sub PictureBox1_MouseMove()
    If Mouse.Left = True Then
       GetSetPixelColor(Mouse.X, Mouse.Y)
    Endif
End

Public Sub btnClose_Click()
    FMain.Close()
End
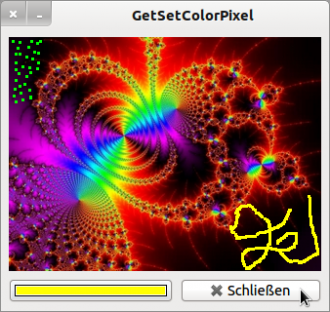
- You can recolour a pixel - more precisely a block pixel consisting of 9 individual pixels - with a mouse click (green dots), whereby the block pixel should only highlight the effect.
- Keeping the left mouse button pressed, you can paint on the image with a 3pixelx3pixel brush (yellow line).
- You can also display the (absolute) mouse coordinates (in relation to the PictureBox) and the colour information of the original pixel in the console.
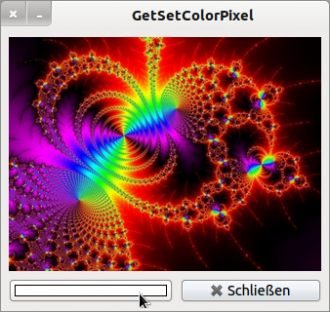
Figure 23.4.2.5.3: Original image and manipulated image


