Sidebar
Table of Contents
23.3.3 Drawing with Paint
23.3.3.1 Drawing areas
To draw with Paint in Gambas, you need an artboard and a pen or brush - just like in the real world. The following drawing areas (devices) are available to you:
- DrawingArea,
- ScrollArea as a specialised DrawingArea,
- Picture,
- Image and SVGImage or
- Printer.
23.3.3.2 Geometric shapes
You can draw these geometric shapes (lines or areas or text) in six categories on the drawing area:
- Point
- Line - distance as the shortest connection between two points
- Polygon (n-corner)
- Rectangle (special case square)
- Ellipse (special case circle)
- Ellipse arc - ellipse sector
- Circle arc - circle sector
- 3rd degree Bézier curves as curvilinear connection of two points
- Text
Yes, text is also drawn, whereby you must specify the font, the font colour and the (start) point at which the font is inserted into the drawing area after calling special methods.
23.3.3.3 Paint coordinate system
All artboards have a (non-visible) coordinate system to which all coordinate specifications in the properties or in the arguments of the methods of the Paint class refer. Please observe these notes:
- The coordinate origin O(0|0) of the Paint coordinate system is in the top left-hand corner of the Paint canvas.
- The positive x-axis points to the right.
- The positive y-axis points downwards - in contrast to the usual Cartesian coordinate system used in maths!
- Coordinates in Paint are always of the float data type.
- Each point on the drawing area is defined by a coordinate pair P(x|y).
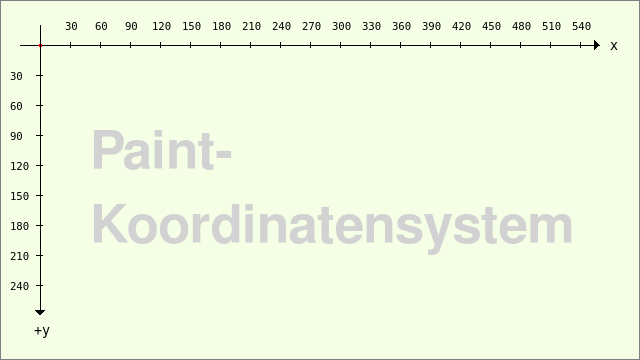
Figure 23.3.3.3.1: Paint coordinate system with shifted coordinate origin
In order to draw the names of the two axes and the values legibly if required, the coordinate origin of the coordinate system can be permanently shifted using the Translate method of the Paint class.
Paint.Begin(hPicture)
  Paint.Translate(40, 45) ' Verschiebung um +40.0 in x-Richtung und um +45.0 in y-Richtung
  ...
Paint.End
The shift does not change the direction of the two coordinate axes!
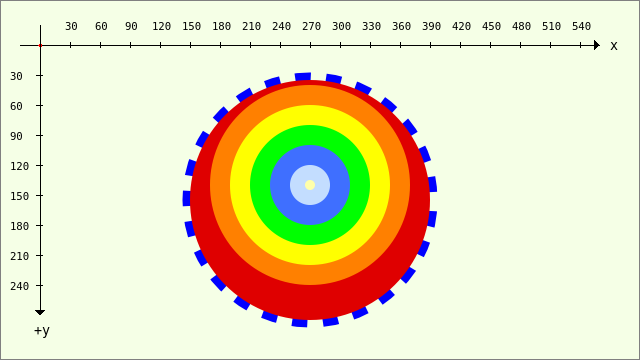
You could also omit the display of the coordinate system in the following illustration, as it has no influence on the effect of the image:
Figure 23.3.3.3.2: Paint image
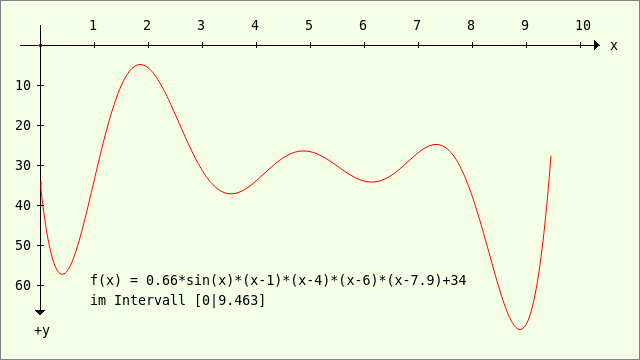
The next figure shows the correct image of a function in a shifted paint coordinate system with clearly legible designations:
Figure 23.3.3.3.3: Image of a function y = f(x)
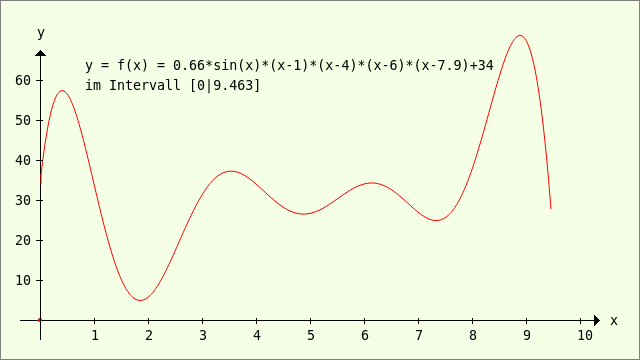
You will certainly recognise that the function has no zeros in the specified interval and also has a local high point in addition to the local minimum in the vicinity of 2. To realise the usual view, you can scale the coordinate system so that the positive y-axis points upwards. A translation of the coordinate origin O(0|0), combined with a mirroring of the y-axis at the abscissa - realised by using the scale method - can be implemented in this way:
Paint.Begin(hPicture)
  Paint.Translate(40, 45) 	'-- Shift by +40.0 in the x-direction and by +45.0 in the y-direction
  Paint.Scale(1, -1)	      	'-- The -1 causes the direction of the y-axis to be inverted → +y ▲
  ...
Paint.End
Figure 23.3.3.3.4: Image of a function y = f(x)
23.3.3.4 Drawing with methods of the Paint class
Admittedly, the concept of drawing geometric shapes with Paint takes some getting used to, as a geometric shape is always drawn in three steps on the drawing area used:
- First you assign suitable properties to the brush (Paint.Brush), such as fill colour or line colour, by calling Paint.Color, Paint.Image, Paint.LinearGradient or Paint.RadialGradient. You can define the line width separately if required.
- Then define the so-called drawing path, which is described by a start point and the specification of a geometric shape. You can define a start point using the Paint.MoveTo(..) method or use the end point of a completed drawing action. You define the shape using selected drawing methods such as Paint.LineTo(..), Paint.Rectangle(..) or Paint.Arc(..) with specific arguments.
- Finally, trace the drawing path with the defined brush on the drawing area (device), using the Paint.Stroke(A) method for a defined line and the Paint.Fill(A) method for an area. Normally, the last drawing path used is deleted after tracing (once). If you set the optional argument A to the value True, the drawing path is retained and can continue to be used.
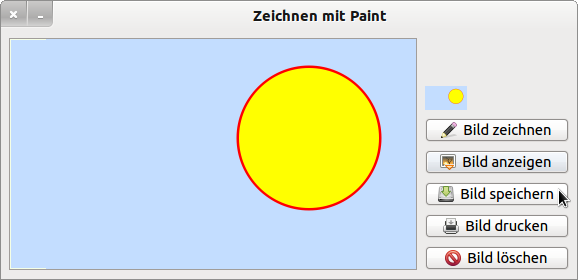
The following example takes up the last step with the reference to the optional argument A. A circle with a red border and yellow circle area is to be drawn on a picture (object) as a drawing area (device).
Public hPicture As Picture

Public Sub Form_Open()
  daCanvas.Cached = False '-- Standard for a DrawingArea
  hPicture = New Picture(daCanvas.Width, daCanvas.Height, True)
  hPicture.Fill(&HC3DDFF)
  PaintScriptCircle()
End

Public Sub PaintScriptCircle()
  Paint.Begin(hPicture)
    Paint.Translate(30, 300) 		     '-- Shifting the coordinate system
    Paint.Scale(1, -1)		             '-- Inversion of the direction of the y-axis → +y ▲
    Paint.Brush = Paint.Color(Color.Red)     '-- Colour arc
    Paint.LineWidth = 5                      '-- Thickness of the circular arc
    Paint.Arc(200, 150, 70)		     '-- Centre of circle M(200|150), radius 70
    Paint.Stroke(True)		             '-- (Re)draw arc → path is retained!
    Paint.Brush = Paint.Color(Color.Yellow)  '-- Colour circular area
    Paint.Fill()			     '-- Fill circular area with colour → Path is deleted
  Paint.End()
End
To see the result of the drawing, the picture - which is currently only in memory - is drawn in a DrawingArea (daCanvas) and thus becomes visible:
Public Sub daCanvas_Draw()
  Paint.Begin(daCanvas)
    If hPicture Then Paint.DrawPicture(hPicture, 0, 0)
  Paint.End
End
This flexible way of drawing has proved its worth. If you want to print the picture, the following additional lines are sufficient to draw the picture on the printer (myPrinter):
Public Sub myPrinter_Draw()
  Paint.Begin(myPrinter)
    If hPicture Then Paint.DrawPicture(hPicture, 0, 0)
  Paint.End
End
Start the printout of the picture after a printer dialogue with 'myPrinter.Print'.
If, on the other hand, you want to save the image and process it further, for example to present figures as data in a text, save the picture as an image file:
Public Sub btnSaveCurPicture_Click()
  Dim sPictureFileName As String

  sPictureFileName = Lower(cmbPictures.Text & ".png")
  hPicture.Save(sPicturePath &/ sPictureFileName)
End
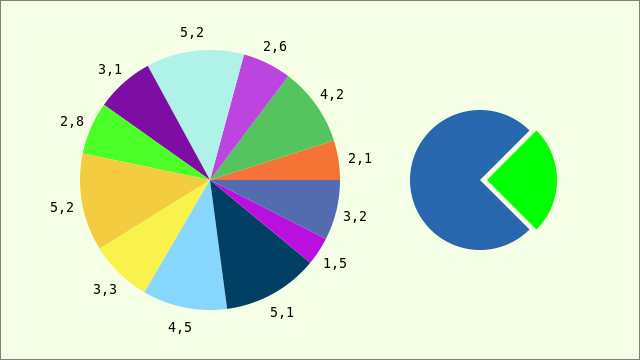
Figure 23.3.3.4.1: Pie chart with 12 values
In chapter → 23.3.4.1 Projects1, 11 further examples are presented in a project and commented on in detail.
If you are drawing with Gambas for the first time, please follow these instructions:
- Coordinates in Paint are always of the float data type.
- The coordinate origin O(0|0) is in the top left-hand corner of the Paint drawing area.
- The positive y-axis points downwards - in contrast to the usual Cartesian coordinate system used in mathematics!
- Each point on the drawing area is defined by a coordinate pair P(x|y).
- Always differentiate between the border (line shape) and the area within the border.
23.3.3.5 Default values
For drawing with Paint, there are fixed (default) start values that you can set:
- The line or fill colour or the font colour is opaque black - without an alpha channel in the colour. If the paint device is a DrawingArea, this is its background colour.
- The line width is 1.
- Edge smoothing (AntiAlias) is switched on.
- The default font in Gambas is the system font. You can change the default font in the Gambas settings (Interface → Fonts).
A test results in these values:
Print Paint.Background	     '-- 0 → black
Print Paint.LineWidth	     '-- 1
Print Paint.AntiAlias	     '-- TRUE
Print Paint.Font.ToString()  '-- Ubuntu, 11
23.3.3.6 Notes on the DrawingArea as a drawing area
The DrawingArea provides a drawing area that can be drawn on from the application in two modes. The key to drawing on a DrawingArea is understanding the relationship between the value of the DrawingArea.Cached property and the use of the DrawingArea_Draw() event.
- If DrawingArea.Cached = True, then the DrawingArea is switched to a 'canvas' mode: Everything that is drawn remains visible on the DrawingArea - as long as the drawing is not deleted using the DrawingArea.Clear method.
- However, if the DrawingArea.Cached property is set to False, the drawing only remains visible as long as the DrawingArea has not been covered or hidden by another window because the (volatile) image memory has been cleared. The image must be redrawn in order to be visible again. The draw event is triggered automatically at precisely these moments.
Conclusion: The Draw event is used or not used depending on the value of the DrawingArea.Cached property.
As the Draw class has been considered obsolete since Gambas version 3.4, you should only use the Paint class in future. This is why the DrawingArea.Painted property no longer exists in the Paint class!
It is interesting to take a look at the module Draw.module, which you will find in the Gambas source files. It reveals that the Draw class is redefined via the Paint class. This ensures that your existing drawing projects can still be used with the Draw class.
Figure 23.3.3.6.1: Start project
In the download area you will find a project that implements the above principle approaches 1:1. The view of the complete source code is particularly advantageous for those who are drawing with methods of the Paint class for the first time.
Source code:
' Gambas class file

Private hPicture As Picture
Private iPrinterDPI As Integer
Private fDesktopresolutionProInch As Float = (Desktop.Resolution / 25.4)
Private bPainted As Boolean = False

Public Sub Form_Open()
  FMain.Center
  FMain.Resizable = False
  pboxPreView.Stretch = True
  daCanvas.Cached = True '-- `daCanvas` is a DrawingArea
End ' Form_Open()

Public Sub PaintScriptCircle()
  Try hPicture = New Picture(daCanvas.Width, daCanvas.Height, True) '-- A new Picture object is created
  hPicture.Fill(&HC3DDFF)                                           '-- The picture gets a light blue background colour

  Paint.Begin(hPicture) 		        '-- The picture is now drawn on ...
    Paint.Translate(30, 200)                    '-- Shifting the coordinate system
    Paint.Scale(1, -1)                          '-- Inversion of the direction of the y-axis → +y ▼
    Paint.Brush = Paint.Color(Color.Red)        '-- Colour arc → red
    Paint.LineWidth = 5                         '-- Thickness of the circular arc
    Paint.Arc(270, 100, 70)                     '-- Centre of circle M(270|100), radius 70
    Paint.Stroke(True)                          '-- (Re)draw arc → path is retained!
    Paint.Brush = Paint.Color(Color.Yellow)     '-- Colour circular area → yellow
    Paint.Fill()                                '-- Fill circular area with colour → Path is deleted
  Paint.End

End

Public Sub daCanvas_Draw()
  Paint.Begin(daCanvas)
    If hPicture Then Paint.DrawPicture(hPicture, 0, 0) '-- The picture is drawn in the DrawingArea
  Paint.End
End

Public Sub myPrinter_Draw()
  Dim iDruckBreite, iDruckHoehe, iDruckrandLinks, iDruckrandOben As Integer
  Dim imgToPrint As Image

  iDruckrandLinks = 25 '-- Millimetre - tested value
  iDruckrandOben = 20  '-- Millimetre - tested value

  If Not hPicture Then
     Return
  Else
   '-- The hPicture converted into an image is assigned to the imgToPrint image
     imgToPrint = hPicture.Image
  Endif

'-- Automatic changeover from landscape to portrait format when Picture.W > Picture.H
  If imgToPrint.Width > imgToPrint.Height Then imgToPrint = imgToPrint.Rotate(Pi(0.5))
'-- Conversion from DA point unit to millimetre unit
  Paint.Scale(Paint.Width / myPrinter.PaperWidth, Paint.Height / myPrinter.PaperHeight)

'-- The values used, 170 (width) and 260 (height), have been tested for A4
  If PixelToMillimeter(imgToPrint.W) > 170 Then
     iDruckBreite = 170
     iDruckHoehe = CInt(iDruckBreite * (imgToPrint.Height / imgToPrint.Width))
     If iDruckHoehe > 260 Then
        iDruckHoehe = 260
        iDruckBreite = CInt(iDruckHoehe / (imgToPrint.Height / imgToPrint.Width))
     Endif
     Paint.DrawImage(imgToPrint, iDruckrandLinks, iDruckrandOben, iDruckBreite, iDruckHoehe)
     Return
  Endif

  If PixelToMillimeter(imgToPrint.H) > 260 Then
     iDruckHoehe = 260
     iDruckBreite = CInt(iDruckHoehe / (imgToPrint.Height / imgToPrint.Width))
     If iDruckBreite > 170 Then
        iDruckBreite = 170
        iDruckHoehe = CInt(iDruckBreite / (imgToPrint.Height / imgToPrint.Width))
     Endif
     Paint.DrawImage(imgToPrint, iDruckrandLinks, iDruckrandOben, iDruckBreite, iDruckHoehe)

     Return

  Endif

  iDruckBreite = PixelToMillimeter(imgToPrint.W)
  iDruckHoehe = CInt(iDruckBreite * (imgToPrint.Height / imgToPrint.Width))

'-- The image to be printed - now as Image imgToPrint - is printed in the printer
  Paint.DrawImage(imgToPrint, iDruckrandLinks, iDruckrandOben, iDruckBreite, iDruckHoehe)

End ' myPrinter_Draw()

Public Sub btnDrawPicture_Click()
  PaintScriptCircle() '-- The picture - circle with red border and yellow area - is drawn on the Picture
  bPainted = True
  pboxPreView.Picture = hPicture '-- Mini preview image, as the hPicture object only exists in memory!
End

Public Sub btnShowPicture_Click()
  If bPainted Then
     daCanvas_Draw() '-- The picture is drawn in the DrawingArea
  Endif
End

Public Sub btnSavePicture_Click()
  Dim sPictureFileName As String

  sPictureFileName = Lower("startfrei.png")
  If Exist(Application.Path &/ sPictureFileName) Then Kill Application.Path &/ sPictureFileName
  Wait
  If bPainted Then
     hPicture.Save(Application.Path &/ sPictureFileName) ' Das Picture wird als Bild-Datei gespeichert
     Wait
  Endif
  pboxPreView.Enabled = False
  Wait 0.3
  pboxPreView.Enabled = True

End

Public Sub btnPrintPicture_Click()
  If bPainted Then
     If myPrinter.Configure() Then Return '-- Printer dialogue
     Me.Enabled = False          '-- The form is deactivated
        Inc Application.Busy     '-- The programme no longer accepts any input ...
            myPrinter.Print      '-- The printout is started
        Dec Application.Busy     '-- The programme is accepting entries again...
     Me.Enabled = True           '-- The form is activated
  Endif
End

Public Sub btnClearPicture_Click()
  hPicture = Null '-- The Picture object is deleted
  daCanvas.Clear()
  pboxPreView.Picture = hPicture
  bPainted = False
End

' ---------------------------------------------------------------------------------------------------------

Private Function PixelToMillimeter(iPixel As Integer) As Float
  Return iPixel / fDesktopresolutionProInch
End

