Sidebar
k23:k23.3:k23.3.5:k23.3.5.2:start
23.3.5.2 Measuring instrument component
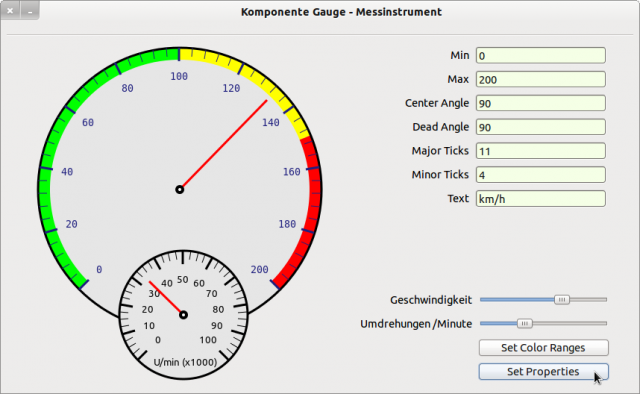
The component for displaying an analogue measuring instrument comes from Nelson Hoover:
Figure 23.3.5.2.1: Two measuring instruments
He has also authorised the source code of his component to be presented in the Gambas book. The component uses only methods of the Paint class for the drawings of the measuring instrument and the coloured outer areas. In the download area you will find the original source code of the component as well as another project that uses this component → Figure 23.3.5.2.1 Two measuring instruments.
Here you can see a source code snippet of the component:
Public Sub myGauge_Draw() '-- Gauge refresh handler
' First, check if we need to reinitialize the gauge
  If $fullRedraw Or (($width <> gaugeDisp.ClientWidth) And ($height <> gaugeDisp.ClientHeight)) Then
     InitializeGauge
  Endif
 ' Note: I'm not sure how much processing power it saves to skip drawing the background every time
 ' but with trying to use this on the Raspberry Pi, every little bit helps
 ' otherwise, just draw the needle over the previously drawn PictureBox
   If $value > $sMax Then $value = $sMax
   If $value < $sMin Then $value = $sMin
   $needleAngle = ScaleConv($sMin, $sMax, $startAngleDeg, ($startAngleDeg + $needleRangeDeg), $value)
   If $needleAngle > 360 Then
      $needleAngle = $needleAngle - 360
   Endif
   If $needleAngle < 0 Then
      $needleAngle = 360 + $needleAngle
   Endif

 ' Now convert degrees to radians and get the X Y coords
   $needleAngle = Rad($needleAngle)
   $needlePosX = (Cos($needleAngle) * (($width / 2) - 24)) + $xMid
   $needlePosY = (Sin($needleAngle) * (($height / 2) - 24)) + $yMid

   Paint.Begin(gaugeDisp)
     Paint.Brush = Paint.Color($needlecolor)
     Paint.LineWidth = 3
     Paint.MoveTo($xMid, $yMid)
     Paint.LineTo($needlePosX, $needlePosY)
     Paint.Stroke
     Paint.Brush = Paint.Color(Color.Black)
     Paint.Ellipse($xMid - 6, $yMid - 6, 12, 12,,, True)
     Paint.Fill
     Paint.Brush = Paint.Color(Color.White)
     Paint.Ellipse($xMid - 2, $yMid - 2, 4, 4,,, True)
     Paint.Fill
   Paint.End

End
Download
The website uses a temporary session cookie. This technically necessary cookie is deleted when the browser is closed. You can find information on cookies in our privacy policy.
k23/k23.3/k23.3.5/k23.3.5.2/start.txt · Last modified: 06.03.2024 by emma
Page Tools
Except where otherwise noted, content on this wiki is licensed under the following license: CC Attribution-Noncommercial 3.0 Unported


