Sidebar
Table of Contents
24.6.10 Development of web applications with Gambas
24.6.10.1 Special features of web applications
The advantage of web applications is that neither a specific operating system nor a special application is required to run them. All you need on the user side is a web browser. In addition, web applications are usually designed in such a way that several users can use them simultaneously.
As the various user platforms such as PCs, tablets or mobile phones differ greatly in their display options (screen resolution), this must be taken into account in a web application and the GUI must be adapted to these different environments. In addition to the basic design with HTML, the comprehensive formatting options of CSS (Cascading Style Sheets) must be utilised.
Another area that requires a rethink compared to desktop applications is the request-response paradigm of a website. There is only a short one-off process between a request and a response on a website, which is used to obtain and display the desired information. Background processes that continuously process data do not exist in this type of application. If necessary, separate applications must take care of such processes and provide the web application with the resulting data within the short request-response interval.
When developing Gambas web applications in the IDE, particular attention must be paid to the correct use of paths in the HTML elements. For example, it can happen that an application with the following HTML element works perfectly in the development environment with the embedded web server and the referenced icon, which is located in the “Public” project directory, is displayed:
"<img src=“icon.svg height='32px' width='32px'>"
However, if you have then compiled the application and start it on a server, the icon is not displayed. In order to harmonise the worlds of the development environment and a real web server, you should make it a rule to use the CGI root directory within an HTML element, which then looks like this, for example:
"<img src='" & Application.Root &/ "icon.svg" & "' height='32px' width='32px'>"
Here, the path has also been placed in inverted commas to avoid problems caused by spaces in the path.
24.6.10.2 Project types
Gambas is suitable for the development of dynamic websites (web applications) via the CGI interface (Common Gateway Interface) and provides three alternative project types for this purpose:
- Web form application,
- web application,
- web script application.
24.6.10.2.1 Web form applications
The web form applications project type makes it possible to develop applications in the IDE in a similar way to normal GUI applications using the gb.web.gui component. In addition to a web timer, forms and GUI elements are also available here. However, you have to adapt to the requirements of websites when defining the properties of the GUI elements. Although the gb.web.form component can be used as an alternative to gb.web.gui for this type of project, developers now advise against this.
Web form applications also use JavaScript. For them to work, JavaScript must be installed on the client and activated in the web browser.
24.6.10.2.2 Web applications
The web application project type has been available since Gambas version 3.1.0 and is also edited within the IDE. In contrast to web form applications, no timer and no GUI elements are provided in this project type. In this case, the developer is dependent on good HTML knowledge and must use this to design the user interface. In this way, a website developer retains all the usual freedoms and possibilities that HTML offers. On the other hand, this may require the use of JavaScript, as in the implementation of timer functions.
One of the advantages of editing the source code in the IDE is that the Gambas-specific elements of the source code are colour-coded, providing a better overview. For the development of more complex web applications, this form of development is highly recommended over that of “Gambas Server Pages”. As with web form applications, this type of project is compiled on a server before being used and given the file extension *.gambas. A Gambas web page consists of an HTML web form, which is saved as a *.webpage file, and a corresponding class, which is saved as a *.class file. The render() method is used to send the rendered *.webpage file from the compiler to the standard output.
The Webpage class uses a special syntax - based on ASP (Active Server Pages) - to insert Gambas source code into HTML.
| Syntax | Description |
|---|---|
| <%source text%> | Each Gambas source text is executed 'as is'. |
| <%=Expression%> | Assignment of a Gambas expression that was converted with the Html$ function. |
| <%–Comment–%> | This webpage comment is completely ignored, while an HTML comment such as '<!– HTML-COMMENT –>' is output in the HTML. |
| <%/%> | An abbreviation for <%=Application.Root%>. |
| «webpage» | Inserts the content of another web page into the current web page. |
| «Webpage arg1=“value1” arg2=“value2” … » | Fügt den Inhalt einer anderen Webseite mit (optionalen) Attributen in die aktuelle Webseite ein. Beispiel: «AstroWebpage name=“sterne” anzahl=“7”» |
| <%!arg_name%> | Returns the value of the attribute 'arg_name.' |
| «–CONTENTS–» | Identifies the boundary between the header and the footer within the embedded webpage. |
| «/Webpage» | Inserts the footer of an integrated web page. |
Table 24.6.10.2.1 : Webpage syntax
The web-specific area of web page programming is mainly based on the gb.web component, which has the following classes:
| Class | Use |
|---|---|
| Application | Returns information about the CGI application |
| CGI | For the management of the CGI interface |
| Request | For the management of an HTTP request |
| Response | For the management of an HTTP response |
| Session | For the management of sessions |
| URL | Provides static methods for URL strings |
| Webpage | For the creation of JSP-like dynamic web pages |
Table 24.6.10.2.2 : Classes in the gb.web component
Here is an example of a “Hello World” Gambas webpage - a mix of HTML and Gambas source code:
<%
Dim a as String = "Hello World!"
Dim b as String = "This is my first Gambas CGI program."
%>
<!-- Variable declaration must come before any HTML -->
<html>
   <head>
      <title><%=a%></title>
   </head>
   <body>
      <h2><%=b%></h2>
   </body>
</html>
24.6.10.2.3 Web script applications
Web script applications are not developed in the IDE and do not require compilation. The code is executed 'on the fly' by the interpreter. A simple text editor is sufficient for developing web script applications. The saved script file must have the extension 'gbw3' and it must be set to 'executable'. The Gambas3 scripter must be installed on the server platform for execution. You can read about the basics of the 'Gambas Server Pages' at https://gambaswiki.org/wiki/doc/serverpage
| Syntax | Description |
|---|---|
| <%source%> | Every Gambas source code is executed 'as is'. |
| <%=Expression%> | Assignment of a Gambas expression. |
Table 24.6.10.2.3 : Script syntax
Since Gambas Server Pages also use the gb.web component, the Session, Response and Request classes can also be used here. To integrate further Gambas components into the script, the following command is provided in the script:
  USE "ComponentName"
  Example:
  USE "gb.xml.html"
Here is an example of a “Hello World” Gambas server page:
#!/usr/bin/env gbw3
<%
Dim a as String = "Hello World!"
Dim b as String = "This is my first Gambas CGI program."
%>
<!-- Variable declaration must come before any HTML -->
<html>
   <head>
      <title><%=a%></title>
   </head>
   <body>
      <h2><%=b%></h2>
   </body>
</html>
The first line is a so-called shebang or hashbang, which informs the operating system with the character string #! that it is an executable script. The shell command /usr/bin/env starts the gbw3 interpreter and provides it with its own environment.
24.6.10.3 The Common Gateway Interface (CGI)
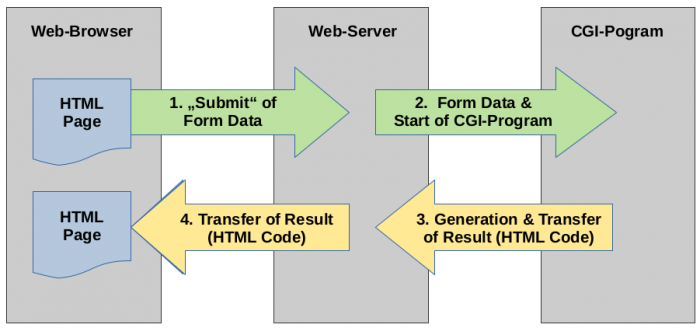
The Common Gateway Interface describes a protocol between HTML forms and a CGI script that basically works like this:
Figure 24.6.10.3.1: CGI protocol
The client sends entered form data to the HTTP server using either the Get or Post method, for example when a button of the type 'Submit' is clicked. The transmitted form data contains information about the form element and the value of the form element, among other things. The server then generates a series of environment variables and makes them available for access by the CGI programme together with the form data. The CGI programme is then started, which can access environment variables and form data for further processing.
The CGI program then generates HTML code as a result, which displays the result in a suitable manner. This HTML code is sent to the server, which passes the result on to the client. In this way, the website can be designed dynamically and interactively. Any programming language available on the server is suitable as a programming language for CGI. Those that make it easy to generate multi-line HTML code are preferred. The Common Gateway Interface (CGI) specification can be found at the following link: https://datatracker.ietf.org/doc/html/rfc3875.
The following example is intended to demonstrate the use of the CGI interface. To do this, it uses an HTML page with a CGI call and a Gambas web page application as a CGI application. The HTML page contains a form into which the two operands are entered and the operation is selected. After submitting the form data, the CGI application takes over the generated environment variables to carry out the simple calculation operations and present the results.
First create an HTML file with the following content using a text editor of your choice and save the file under the HTML directory of your server under the name calc.html. In this case the user directory is used. Information about the specified user directory can be found in section '24.6.10.9.3 Module UserDir'. Pay attention to the content marked red. Adjust the username and the path to the CGI script according to your environment:
HTML file (calc.html) with CGI call:
<html>
<head>
<Title>Calculator</Title>
<meta charset="UTF-8">
</head>
<body style="font-family:Arial,Helvetica">
<center>
<h1>"Super Computer"</h1>
</center>
<p>
<form method="post" action="http://localhost/~claus/cgi-bin/calc.gambas">
<center>
<p> <p>
<input type="text" size="15" name="op1" value="0.0">
<select name="op">
<option value="1">+ (Add)
<option value="2">- (Subtract)
<option value="3">* (Multiply)
<option value="4">/ (Divide)
</select>
<input type="text" size="15" name="op2" value="0.0">
<p>
<input type="reset" value="Reset Form">
<input type="submit" value="Show Result">
</center>
</form>
</body>
</html>
Now create the CGI application by creating a new project of type 'Web application' in the Gambas IDE and entering the following source code in the “Main.webpage” file:
CGI application with HTML output:
<%
Dim OP, OP1, OP2 As String
Dim sResult As String

'-- Get Request Parameters
OP1 = Request["op1"]
OP = Request["op"]
OP2 = Request["op2"]

'-- Calculate the result
Select Case OP
    Case 1
       sResult = Format(CFloat(OP1) + CFloat(OP2), "#,###,##0.######")
    Case 2
       sResult = Format(CFloat(OP1) - CFloat(OP2), "#,###,##0.######")
    Case 3
       sResult = Format(CFloat(OP1) * CFloat(OP2), "#,###,##0.######")
    Case 4
       sResult = Format(CFloat(OP1) / CFloat(OP2), "#,###,##0.######")
End Select
%>
<!-- Submit the result -->
<!DOCTYPE html>
<html lang="de">
  <head>
    <title>Result-HTML</title>
    <meta charset="utf-8">
    <style>
      body {background-color: #FFFFFF; font-family: Arial; font-size:10px; colo>
      h1 {text-align: left; font-family: Arial; font-size: 24px;}
    </style>
  </head>
  <body>
    <h1>The result is: <%= sResult%> </h1>
  </body>
</html>
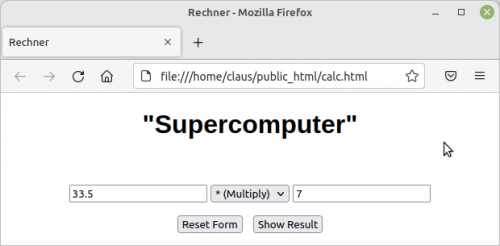
Then create the executable file “web_calc.gambas”. Save this in the CGI directory of your server environment; for example under /home/claus/public_html/cgi-bin. To start this “web calculator”, open the HTML file now (directly or via URL via the HTTP server):
Figure 24.6.10.3.2: HTML form
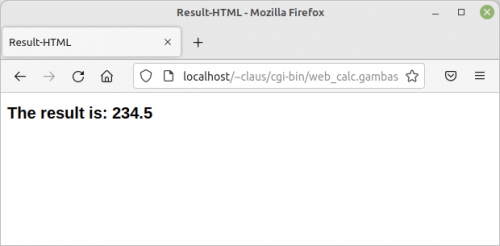
First, enter real numbers for the two operands. Then select the arithmetic operation. Finally click on “Show Result”. The calculation result should be displayed in another web browser window:
Figure 24.6.10.3.3: Results display
In order to be able to calculate the result, the web application calc.gambas reads the three values of the environment variable (op, op1 and op2) from the HTML website via Request.Post
<input type="submit" value="Show Result">
were passed via the CGI interface using the post method. The calculated result is shown here in a simple manner for demonstration.
24.6.10.4 Special features of the different script languages for dynamic websites
24.6.10.4.1 PHP
PHP (recursive acronym for PHP: Hypertext Preprocessor) is a widely used scripting language that can be embedded in HTML. It typically looks like this:
<!DOCTYPE html>
<html>
  <head>
    <title>Example</title>
  </head>
  <body>
    <?php
      echo "Hello, this is a PHP-Script!";
    ?>
  </body>
</html>
The PHP code is placed between the start instruction <?php and the end instruction ?>. Unlike JavaScript, PHP is executed on the server side and must therefore be installed there. For further information, the website https://www.php.net/manual/de/intro-whatis.php provides very helpful information in a variety of languages.
24.6.10.4.2 JavaScript
JavaScript should not be confused with Java and is one of the most widely used scripting languages. In contrast to Java, JavaScript is a language that is processed on the client side, i.e. by the web browser, using an interpreter. This requires the existence of a user-side JavaScript environment. This is available for all common operating systems under a BSD license. JavaScript features a C-like syntax and is object-oriented. Since HTML5, JavaScript code can also be embedded in HTML in the following form:
<!DOCTYPE html>
<html>
  <body>
    <h1>My First HTML Page</h1>
    <p>with a JavaScript Pop-Up Window.</p>
    <script>
      alert('Hello World!');
    </script>
  </body>
</html>
Alternatively, enter the path to an external JavaScript file in the <head>…</head> area:
<script src="js/set_time.js" charset="utf-8"></script>
You can test the above HTML code on the website https://www.w3schools.com/html/tryit.asp?filename=tryhtml_basic_document.
These pages offer comprehensive information to get to know JavaScript better:
24.6.10.4.3 Perl
Perl is also a widely used programming language that is processed via an interpreter and is used for web applications on the server side via the CGI interface. The interpreter is under GPL license and is available for all common operating systems. Unlike PHP and JavaScript, Perl script blocks are not included in an HTML page to create parts of the website. Perl scripts always take over the complete creation of a web page, whereby HTML code is simply output with a print command (here in the «Page;…Page block) as in the following example:
#!/usr/bin/perl
print <<PAGE;
<!DOCTYPE html>
  <html lang=\"de\">
    <head>
      <title>Hello World ...</title>
      <meta charset="utf-8">
      <style>
        body {background-color:#C3DDFF;font-family:Arial,Verdana,Courier;}
        h2 {color:blue;}
      </style>
    </head>
  <body>
    <h2>Hello World!<br />This is a very basic Perl CGI-Script.</h2>
  </body>
</html>
PAGE
24.6.10.4.4 Python
Due to its widespread use on common operating systems, the Python programming language is also often used on servers as a scripting language for the CGI protocol. The programs are processed by an interpreter. A simple example follows:
#!/usr/bin/env python3
# -*- coding: utf-8 -*-
# Import modules for CGI handling
import cgi, cgitb
a = """<html>
   <head>
     <title>Hello World</title>
   </head>
   <body>
     <h2>Hello World! This is my first Python CGI program.</h2>
   </body>
</html>"""
Print (a)
If you would like to get to know Python as a scripting language, you can learn the necessary basics on the following website: https://www.w3schools.com/python/default.asp.
24.6.10.5 Running and testing Gamba's web applications
24.6.10.5.1 The embedded web server
To execute the web form application and web application project types, you can use the so-called 'embedded server' as a web server as an alternative to an installed web server, which is provided with the IDE, or a real web server, which you can find below can install following description. It should be noted that the 'Embedded Server' may not display all functions of the web application correctly. The use of a real web server is therefore preferable.
The use of the IDE's 'Embedded Server' is disabled by default and must be enabled for use in the IDE's main menu under 'Debug > Configuration > Debugger > Use Embedded HTTP'.
24.6.10.5.2 Automatic transfer to a real server and starting the browser
Testing on real servers would normally involve first creating the Gambas executable, copying it to the server's CGI directory, then starting the browser and accessing the URL:
http://localhost/~claus/cgi-bin/wp_environment.gambas
This workflow can also be automated thanks to a very useful feature of the IDE and is described in the next sections.
Local server with a CGI directory under user rights
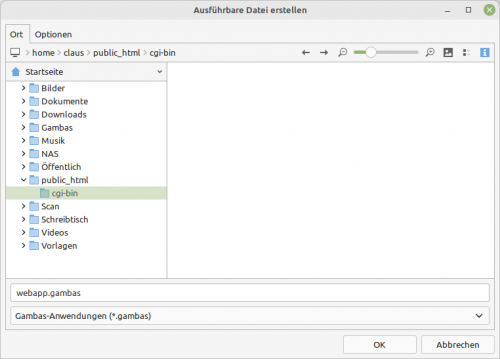
If you have a local test web server where the CGI scripts are saved under user rights, you can shorten the process by placing the executable Gambas file directly in the server's cgi-bin directory (e.g. /home/claus/public_html/cgi-bin) and not in the project directory as usual. To do this, open the dialog under Project/Create/Executable file…/Location and enter the path there, for example:
/home/claus/public_html/cgi-bin/webapp.gambas
Figure 24.6.10.5.1: Directory selection
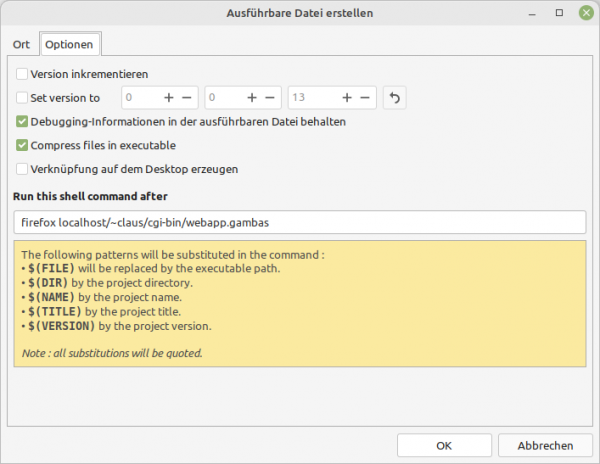
Now switch to the “Options” tab in the same dialog and enter the following project-specific command under “Run this shell command after”:
Syntax:	firefox localhost/~<UserName>/cgi-bin/<GambasAppName>
Beispiel:	firefox localhost/~claus>/cgi-bin/wepapp.gambas
Figure 24.6.10.5.2: 'Options' selection and command input
The IDE saves the command entered under the project. It will then be available permanently. If you now click OK, the Gambas executable file will be created and the web application will automatically be launched in the Firefox browser.
Local servers with a CGI directory under root privileges
If you use the standard directory /usr/lib/cgi-bin on your local server for CGI scripts, which requires root rights, the web browser will automatically start and open after the Gambas executable file has been created URL possible. To do this, select the usual project directory for creating the Gambas file under the “Location” tab in the above dialog, for example
/home/gambas/webapp/webapp.gambas
Under the “Options” tab, enter the following example line in the dialog box, using the name of your distribution's terminal and specifying the path to the Gambas application.
Gnome/Cinnamon-Desktop:
gnome-terminal --working-directory=$(DIR) -- sudo cp $(FILE) /usr/lib/cgi-bin ; firefox localhost/cgi-bin/webapp.gambas
Mate-Desktop:
mate-terminal --working-directory=$(DIR) -- sudo cp $(FILE) /usr/lib/cgi-bin;  firefox localhost/cgi-bin/webapp.gambas
If you now click OK, the executable Gambas file will be created in the normal project directory and after entering the root password in the terminal, the executable file will be copied to the cgi-bin directory and the website will be automatically opened in the Firefox browser.
Debugging web applications
Debugging Gambas web applications has to be done differently in many areas than with desktop applications. The following practice has proven useful:
- Validation of HTML code e.g. at https://validator.w3.org/#validate_by_input.
- Validation of CSS code e.g. at http://www.css-validator.org/validator.html.de.
- Firefox browser with extensive developer functions for a wide range of purposes.
- Use of the embedded web server, especially when programming Gamba's web form applications, which must be activated from version 3.17.2.
- Use of a real web server, especially for the Gambas web applications project type.
- Output the HTML code to the IDE console, but this requires disabling the embedded web server.
24.6.10.6 Directory structure for web applications
The directory structure of web applications in the Gambas IDE does not have to be different from that of other Gambas applications.
The decisive factor for the directory structure is that the web application and data have to be transferred to a server somehow. Of course, this is easiest if you are dealing with as few packages as possible. This can be achieved for all forms of web applications if the following rules are taken into account:
- All files that most likely do not need to be exchanged, such as icons, are kept as usual within the project folder (e.g. in Public or its subdirectories) and thus become part of the compiled Gambas file.
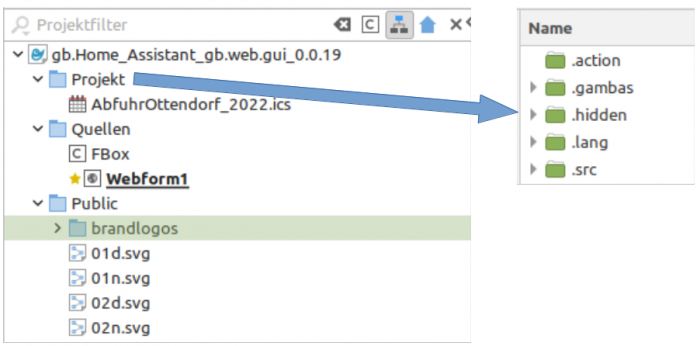
- All files with data that should be interchangeable, such as databases, are stored within the project in the .hidden directory (or in subdirectories of .hidden). Files stored there do not become part of the executable Gambas file generated - but must then also be transferred to the server. These files/directories can be found in the 'Project' directory in the IDE's project directory.
Figure 24.6.10.6.1: Directory structure
So you only have to deal with 2 packages that have to be transferred to a server:
- The Gambas executable and
- the .hidden directory, whose directories/data the web application accesses.
Since several web applications can be used on a web server, it is recommended to copy the files of the different applications into separate folders, for example:
/usr/lib/cgi-bin/app_name1
/usr/lib/cgi-bin/app_name2
/usr/lib/cgi-bin/app_name3
or if stored in the home directory:
~/public_html/cgi-bin/app_name1
~/public_html/cgi-bin/app_name2
~/public_html/cgi-bin/app_name3
To save the copying process for the executable file, you can also create the Gambas executable file directly in the server's directory during compilation. Transferring files to servers that are on another platform but within the home network is described under 'Remote access to the Lighttpd server'.
24.6.10.7 Use of Cascading Style Sheets (CSS)
When developing web applications, there is an extension compared to normal GUI applications that must be taken into account separately. These are Cascading Style Sheets, or CSS for short, which are a powerful and indispensable tool for formatting websites. Gamba's web applications can also make use of it.
When used in web form applications, it is necessary to insert a file called style.css into the Public project directory. In order for GUI elements of web form applications to use this style sheet, they must be told which CSS class within the style sheet to use. The 'Class' property of the GUI elements is intended for this purpose, in which only the name of the CSS class is entered.
For Gamba's web applications, you should also place CSS files in the Public project directory. Linking to them can be done in HTML pages using the following exemplary syntax:
<link rel="stylesheet" href="style.css">
To simplify linking, you can use the style.css file, for example, to import additional style sheets. This can be achieved, for example, like this:
/* ~~~~~~~~~~~~~~~~~~~~~~~~~~~~~~~~~~~~~~~~~~~~~~~~~~~~~~~~~~~~~~~
  CSS
  MASTER STYLESHEET
  --------------------
  File name: style.css

  The CSS file style.css is included in every HTML page:
  <link rel="stylesheet" href="style.css">
~~~~~~~~~~~~~~~~~~~~~~~~~~~~~~~~~~~~~~~~~~~~~~~~~~~~~~~~~~~~~~~ */

  @import url("basis.css");
  @import url("header.css");
  @import url("navigation.css");
  @import url("table.css");
  @import url("multimedia.css");
  @import url("formular.css");
  @import url("footer.css"
The style sheet style.css takes over the function of the master and is only linked to one style sheet. Attention: In contrast to web page applications, with web form applications you can only use one CSS file and it must have the name 'style.css'. Therefore, with this form of web programming with Gambas, it is advisable to use the method of importing other style sheets.
If you would like to get to know CSS in more detail, you can find out more on the website https://www.w3schools.com/css/.
24.6.10.8 Installation and setup of a Lighttpd web server
If you want to test websites, web applications or a CMS locally or use them on a separate platform in the local network, then the lightweight and fast web server Lighttpd is ideal. The following describes how to install, configure and extend it for this purpose.
24.6.10.8.1 Installation
The installation of Lighttpd is carried out here as an example on a Mint 20.3 distribution and should be carried out there as follows. Deviations are to be expected for other distributions:
$ sudo apt-get update
$ sudo apt-get upgrade
$ sudo apt-get install lighttpd
It is recommended to also install the web server documentation:
$ sudo apt-get install lighttpd-doc
This documentation is available after installation at /usr/share/doc/lighttpd. You can view the installed version of Lighttpd as follows:
$ lighttpd -v
lighttpd/1.4.55 (ssl) - a light and fast webserver
The installation starts the daemon automatically. This can be checked like this:
$ service lighttpd status oder $ /etc/init.d/lighttpd status
During the installation, a new user 'www-data' and a new group 'www-data' were created. This user must therefore always be granted read and execute rights as 'Other'. The web server can be tested with its basic configuration after installation. To do this, go to the web browser
http://localhost/index.lighttpd.html oder http://127.0.0.1/index.lighttpd.html oder http://localhost
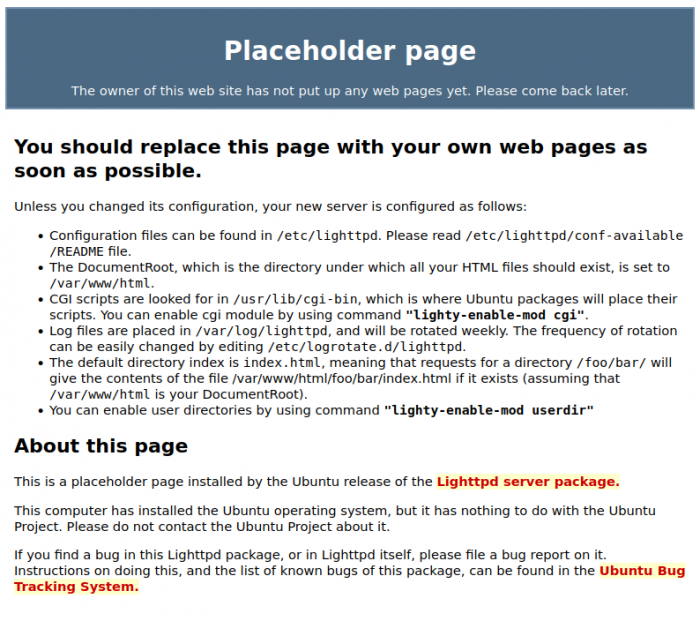
because the web server automatically looks for an 'index' page in the web folder when called. The web browser then displays a pre-installed web page that contains important information:
Figure 24.6.10.8.1: Information page
24.6.10.8.2 Troubleshooting the web server
You can view the server's error log in a console using the following command:
$ journalctl -u lighttpd
The status query with the following command has also proven to be very helpful because, in addition to the status, possible causes of errors are also pointed out:
$ service lighttpd status
24.6.10.8.3 Web server control
The following calls in a terminal control the web server Lighttpd with the parameters listed in the list:
$ sudo /etc/init.d/lighttpd {start|stop|restart|reload|force-reload|status}
Alternative:
$ sudo service lighttpd {start|stop|restart|reload|force-reload|status}
Examples:
$ /etc/init.d/lighttpd status
$ sudo service lighttpd reload
24.6.10.8.4 Configuration of the web server
Before making any changes to the configuration, the original server configuration file should be backed up:
$ sudo cp /etc/lighttpd/lighttpd.conf /etc/lighttpd/lighttpd.conf.old
In order for the server to be able to run Gambas web applications, only the area marked in red needs to be changed in the basic configuration. To do this, go to:
$ sudo nano /etc/lighttpd/lighttpd.conf
Contents of the file /etc/lighttpd/lighttpd.conf:
 server.modules = (
	"mod_indexfile",
	"mod_access",
	"mod_alias",
 	"mod_redirect",
)

server.document-root        = "/var/www/html"
server.upload-dirs          = ( "/var/cache/lighttpd/uploads" )
server.errorlog             = "/var/log/lighttpd/error.log"
server.pid-file             = "/run/lighttpd.pid"
server.username             = "www-data"
server.groupname            = "www-data"
server.port                 = 80

# strict parsing and normalization of URL for consistency and security
# https://redmine.lighttpd.net/projects/lighttpd/wiki/Server_http-parseoptsDetails
# (might need to explicitly set "url-path-2f-decode" = "disable"
#  if a specific application is encoding URLs inside url-path)

server.http-parseopts = (
  "header-strict"           => "enable",# default
  "host-strict"             => "enable",# default
  "host-normalize"          => "enable",# default
  "url-normalize-unreserved"=> "enable",# recommended highly
  "url-normalize-required"  => "enable",# recommended
  "url-ctrls-reject"        => "enable",# recommended
  "url-path-2f-decode"      => "enable",# recommended highly (unless breaks app)
 #"url-path-2f-reject"      => "enable",
  "url-path-dotseg-remove"  => "enable",# recommended highly (unless breaks app)
 #"url-path-dotseg-reject"  => "enable",
 #"url-query-20-plus"       => "enable",# consistency in query string
)

index-file.names            = ( "index.php", "index.html" )
url.access-deny             = ( "~", ".inc" )
static-file.exclude-extensions = ( ".php", ".pl", ".py", ".cgi", ".gbs", ".gbw", ".gambas")

compress.cache-dir          = "/var/cache/lighttpd/compress/"
compress.filetype           = ( "application/javascript", "text/css", "text/html", "text/plain" )

# default listening port for IPv6 falls back to the IPv4 port
## Use ipv6 if available
#include_shell "/usr/share/lighttpd/use-ipv6.pl " + server.port

include_shell "/usr/share/lighttpd/create-mime.conf.pl"
include "/etc/lighttpd/conf-enabled/*.conf"

#server.compat-module-load   = "disable"
server.modules += (
	"mod_compress",
	"mod_dirlisting",
	"mod_staticfile",
)
The configuration file can be checked for errors after changes with the following command:
$ lighttpd -t -f /etc/lighttpd/lighttpd.conf
Once changes have been made to the configuration file, the web server must be prompted to reread the configuration:
$ sudo service lighttpd force-reload
24.6.10.9 Extension of the web server
A number of modules are available to expand the server; including the following two:
- Module cgi: CGI scripts from the Gambas programming languages (scripts and web pages), Perl and Python are executed in the /usr/lib/cgi-bin folder
- Fastcgi module: PHP scripts are executed in /var/www/html
The setup and activation of which is described in the next paragraphs.
To deactivate modules you can use the command at any time
$ sudo lighttpd-disable-mod modulname
use. You then need to cause the server to load the changed configuration:
$ sudo service lighttpd force-reload
24.6.10.9.1 Module CGI
This module is required to run Gambas, Perl and Python CGI scripts in dynamic web pages. It ensures that the scripts in the /usr/lib/cgi-bin directory can be executed. The appropriate configuration file under /etc/lighttpd/conf-available/10-cgi.conf remains unchanged for the time being. If you still want to change it, first save the original configuration of the module:
$ sudo cp /etc/lighttpd/conf-available/10-cgi.conf /etc/lighttpd/conf-available/10-cgi.conf.old
You can then edit the file
$ sudo nano /etc/lighttpd/conf-available/10-cgi.conf
The module comes with
$ sudo lighttpd-enable-mod cgi
activated and in this case, too, the server must re-read the changed configuration with the following command:
$ sudo service lighttpd force-reload
Test with a web form application
You can test the new functionality by, for example, storing a dynamic web page with the owner root in the /usr/lib/cgi-bin directory. To do this, create a new “Web Form Application” project in the Gambas IDE and name it Web_Form_App.
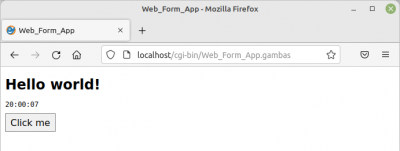
To get you started, the new project automatically creates a minimal hello world application, which, in addition to text and a button, displays the time as a dynamic element and is ready for immediate use.
In the main menu of the IDE under Debugging>Configuration… activate the embedded HTTP server via the 'Option' tab. Start the application. Now you should see the following in the web browser:
Figure 24.6.10.9.1: Web form application view (debug mode)
To run this minimal application on the Lighttpd server, create an executable file 'Web_Form_App.gambas'. Copy this to /usr/lib/cgi-bin with root privileges:
$ sudo cp ~/Gambas/Web_Form_App/Web_Form_App.gambas /usr/lib/cgi-bin
Now launch the web browser and enter this URL:
localhttp://localhost/cgi-bin/Web_Form_App.gambas
The result in the web browser should look like this:
Figure 24.6.10.9.2: Web form application view
It is particularly important to note that the Gambas IDE provides the generated Gambas file with access rights 755 (octal), which works unchanged in the target directory /usr/lib/cgi-bin of the web server. The access right as a rights string is rwx-rx-rx or in words:
- Owner: read, write, execute.
- Group: read, execute and
- Others: read, execute.
where 'execute' is essential for all CGI scripts.
Test with a Perl script
Include a file
$ sudo nano /usr/lib/cgi-bin/pl.pl
and insert the following Perl program code:
#!/usr/bin/perl

print "Content-type:text/html\n\n";
print "<!DOCTYPE html>";
print "<html lang=\"de\">";
print   "<head>";
print     "<title>Hello World ...</title>";
print     "<meta charset=\"utf-8\">";
print     "<style>";
print       "body {background-color:#C3DDFF;font-family:Arial,Verdana,Courier;}";
print       "h2 {color:blue;}";
print     "</style>";
print   "</head>";
print   "<body>";
print     "<h2>Hello World!<br />This is a very basic Perl CGI-Script.</h2>";
print   "</body>";
print "</html>"
Unlike a generated executable Gambas file, a script as a text file is not provided with the necessary octal access rights 755 when it is created. Therefore, these rights must be adjusted in the target directory, for example - which can be done quickly:
$ sudo chmod 755 /usr/lib/cgi-bin/pl.pl
The website is accessed in the web browser like this:
http://localhost/cgi-bin/pl.pl
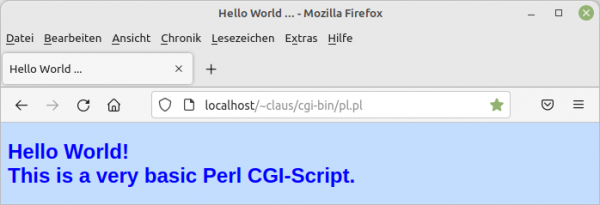
This is the view in the web browser:
Figure 24.6.10.9.3: Display in the web browser
Test with a Python script
To do this, create a file
$ sudo nano /usr/lib/cgi-bin/py.py
and paste the following Python program code:
#!/usr/bin/env python3
# -*- coding: utf-8 -*-
# Import modules for CGI handling
import cgi, cgitb
print ("Content-type:text/html\n\n")
print ("<!DOCTYPE html>")
print ("<html lang=\"de\">")
print   ("<head>")
print     ("<title>Hello World ...</title>")
print     ("<meta charset=\"utf-8\">")
print     ("<style>")
print       ("body {font-family:Arial,Verdana;background-color:#C3DDFF;}")
print       ("h2 {color:blue;}")
print     ("</style>")
print   ("</head>")
print   ("<body>")
print     ("<h2>Hello World!<br />This is a very basic Python CGI-Script.</h2>")
print   ("</body>")
print ("</html>")
As with the Perl script, the required access rights must be set here, which means
$ sudo chmod 755 /usr/lib/cgi-bin/py.py
is done quickly. The website is accessed in the web browser like this:
http://localhost/cgi-bin/py.py
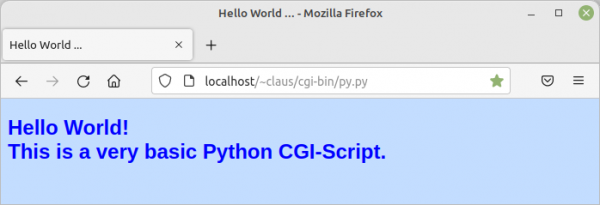
and you can see the result here:
Figure 24.6.10.9.4: Display in the web browser
Test for a Gambas script
This test requires the Gambas package gambas3-scripter to be installed, which can be done like this if necessary:
$ sudo apt-get install gambas3-scripter
Create the env.gbw3 file in /usr/lib/cgi-bin/:
$ sudo nano /usr/lib/cgi-bin/env.gbw3
Then paste the following Gambas source code:
#!/usr/bin/env gbw3
<% DIM sEnv AS String
'Further Gambas Code … %>
<!-- Variable declaration must come before any HTML -->
<html>
<h2>CGI Script Environmental Variables</h2>
<table border="1" cellspacing="0" cellpadding="2">
<tr>
<th align="left">Name</th>
<th align="left">Value</th>
</tr>
<% FOR EACH sEnv IN Application.Env %>
<tr valign="top">
<td><%= sEnv %></td>
<td><%= Application.Env[sEnv] %> </td>
</tr>
<% NEXT %>
</table>
</html>
As with the other scripts, the access rights must be set appropriately:
$ sudo chmod 755 /usr/lib/cgi-bin/env.gbw3
The website is accessed in the web browser
http://localhost/cgi-bin/env.gbw3
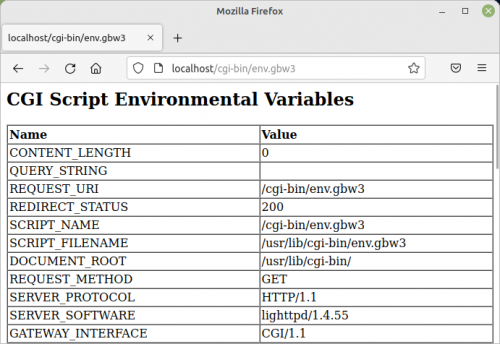
and the display looks like this:
Figure 24.6.10.9.5: Displaying the environment variables in the web browser
24.6.10.9.2 Module FastCGI (PHP)
To execute PHP scripts (in the /usr/lib/ path), the php7.4-cgi and php7.4-cli packages must be installed, which you can ensure as follows:
$ sudo apt install php7.4-common php7.4-cgi php7.4
The associated configuration file under /etc/lighttpd/conf-available/10-fastcgi.conf remains unchanged. If you still want to change this, save the original configuration of the module:
$ sudo cp /etc/lighttpd/conf-available/10-fastcgi.conf /etc/lighttpd/conf-available/10-fastcgi.conf.old
You can then edit the file with an editor of your choice
$ sudo nano /etc/lighttpd/conf-available/10-fastcgi.conf
After that you should have the file /etc/php/7.4/cli/php.ini
$ sudo xed /etc/php/7.4/cli/php.ini
open and set the value of cgi.fix_pathinfo to 1 or remove the leading semicolon in the applicable line.
The module is finally activated:
$ sudo lighttpd-enable-mod fastcgi-php
This activation includes the fastcgi module through a dependency! Here, too, the server must re-read the changed configuration:
$ sudo service lighttpd force-reload
To test the new server function, create a script file php.php and insert the following PHP source code:
<?php
echo "Content-type:text/html\n\n";
echo "<!DOCTYPE html>";
echo "<html lang=\"de\">";
echo   "<head>";
echo     "<title>Hello World ...</title>";
echo     "<meta charset=\"utf-8\">";
echo     "<style>";
echo       "body {background-color:#C3DDFF;font-family:Arial,Verdana,Courier;}";
echo       "h2 {color:blue;}";
echo     "</style>";
echo   "</head>";
echo   "<body>";
echo     "<h2>Hello World!<br />This is a very basic PHP-Script.</h2>";
echo   "</body>";
echo "</html>"
?>
In contrast to other types of scripts, the access rights of PHP scripts do not have to be set to 'executable'. This website is accessed in the web browser like this:
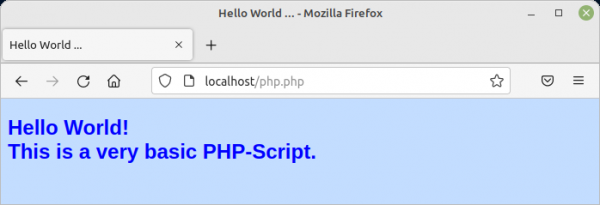
http://localhost/php.php
Figure 24.6.10.9.6: Display in the web browser
24.6.10.9.3 Module UserDir
Since you can only access the previously used server directories /var/www and /usr/lib/cgi-bin with root rights, it would be a significant simplification if you could store the websites in your own home directory. The Userdir module provides a suitable function for exactly this. It ensures that the user www-data can also access the websites in the home directory. To use this function, the standardized public_html directory must first be created in the home directory:
$ mkdir /home/$USER/public_html
You activate the userdir module with the following command:
$ sudo lighttpd-enable-mod userdir
The server must then reload the configuration with the following command:
$ sudo service lighttpd force-reload
Test with HTML pages
The easiest way to test whether this new function is now available is to create the test.html file in the ~/public_html directory. To do this, enter (now without elevated rights)
$ nano ~/public_html/test.html
into the console and then fill the file with the following content:
<!DOCTYPE html>
<html lang="de">
  <head>
    <title>TEST.HTML</title>
    <meta charset="utf-8">
    <style>
      body {background-color: #C3DDFF; font-family: Arial; font-size:10px; colo>
      h1 {text-align: left; font-family: Arial; font-size: 24px; color: blue;}
    </style>
  </head>
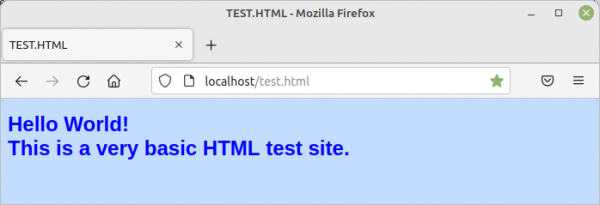
  <body><h1>Hello World!<br />This is a very basic HTML test site.</h1></body>
</html>
Open the website in the web browser in a slightly different way. Replace the username “claus” with your own:
http://localhost/~claus/test.html
Figure 24.6.10.9.7: Display in the web browser
Test with PHP scripts
PHP scripts can also be stored in the ~/public_html directory. Since the PHP script ph.php has already been created in the standard directory /var/www/html, this can be done for testing purposes
$ sudo cp /var/www/html/php.php ~/public_html
copied into the home directory and the (current) owner 'root' with it
$ sudo chown claus:claus ~/public_html/php.php
changed to the owner of the home directory. The script can then be called and displayed in the web browser:
http://localhost/~claus/php.php
Figure 24.6.10.9.8: Display in the web browser
Test with CGI scripts
You can now also store CGI web applications in the home directory. However, this happens in a subdirectory of ~/public_html. To do this, create the cgi-bin subdirectory and store CGI web applications that you have previously stored under /usr/lib/cgi-bin under ~/public_html/cgi-bin. Make sure that the owner of the files stored there is always the owner of the home directory (your standard user account) and that the files have access permission 775 (octal), which is the standard in the home directory.
In order for this to work, the following change (marked in red) must be made in the CGI configuration file. To do this, first save the original file
$ sudo cp /etc/lighttpd/conf-available/10-cgi.conf /etc/lighttpd/conf-available/10-cgi.conf.old
and then modify the 10-cgi.conf file with an editor of your choice:
$ sudo nano /etc/lighttpd/conf-available/10-cgi.conf
This is the content of the configuration file conf-available/10-cgi.conf:
# /usr/share/doc/lighttpd/cgi.txt

server.modules += ( "mod_cgi" )

$HTTP["url"] =~ "^/cgi-bin/" {
	cgi.assign = ( "" => "" )
	alias.url += ( "/cgi-bin/" => "/usr/lib/cgi-bin/" )
}

   cgi.execute-x-only = "enable"

   cgi.assign = ( ".pl"  => "/usr/bin/perl",
                  ".cgi" => "/usr/bin/perl",
                  ".py"  => "/usr/bin/python3",
                  ".gbw3" => "/usr/bin/gbw3",
                  ".gambas" => "/usr/bin/gbr3" )

## Warning this represents a security risk, as it allow to execute any file
## with a .pl/.py even outside of /usr/lib/cgi-bin.
#
#cgi.assign      = (
#	".pl"  => "/usr/bin/perl",
#	".py"  => "/usr/bin/python",
#)
Let Lighttpd reread the changed configuration:
$ sudo service lighttpd force-reload
and call the Perl script
http://localhost/~claus/cgi-bin/pl.pl
Figure 24.6.10.9.9: Display in the web browser
You can do the same thing with the Python, gbw3 and Gambas scripts. Please note that from now on you will see HTML pages and CGI scripts both in the directories
- /var/www/HTML and
- /usr/lib/cgi-bin (owner = root)
as well as in
- ~/public_html and
- ~/public_html/cgi-bin (owner = user)
can execute.
24.6.10.9.4 Module SSI
On the topic of 'Server Side Includes' (SSI) there was this summary in the documentation:
SSI is certainly not a replacement for CGI or other technologies used to create dynamic web pages. But it's a good way to add small amounts of dynamic content to pages without putting in a lot of extra work.
Anyone who uses server side includes in websites will be able to confirm: Yes, that's how it is…! SSI is browser-independent because SSI instructions from the SSI scripting language are processed in a web page by the web server and the results are immediately inserted into the HTML source text, which is then sent to the browser. The ssi module is of interest to you if you want to conveniently insert frequently changing text into an sHTML page.
(1) Configure the module by editing the appropriate configuration file
Read the documentation for the module:
$ sudo xed /usr/share/doc/lighttpd/ssi.txt
Back up the original configuration file:
$ sudo cp /etc/lighttpd/conf-available/10-ssi.conf /etc/lighttpd/conf-available/10-ssi.conf.old
To use 'Server Side Includes', you must configure the ssi module by editing the /etc/lighttpd/conf-available/10-ssi.conf file:
$ sudo nano /etc/lighttpd/conf-available/10-ssi.conf
Change the contents of the 10-ssi.conf configuration file to this content:
## --- MODUL: SSI ---
##
## Documentation: /usr/share/doc/lighttpd/ssi.txt
##
## Aktivierung des Moduls 'ssi'
## Activation of the module 'ssi'

server.modules += ( "mod_ssi" )
ssi.extension = ( ".html", ".shtml" )

## --- END OF MODULE: SSI ---
(2) Activate module
$ sudo lighttpd-enable-mod ssi
...
Run /etc/init.d/lighttpd force-reload to enable changes
(3) Reread configuration files
$ sudo service lighttpd force-reload
(4) Test the functionality of the activated module in the web browser
In the future, all files in the web folder with the .shtml extension will be parsed by the Lighttpd web server for SSI instructions and the SSI instructions contained in them will be executed. Please note that the web server option 'exec' - used, among other things, to execute system commands - was obviously not implemented on the Lighttpd web server due to security concerns!
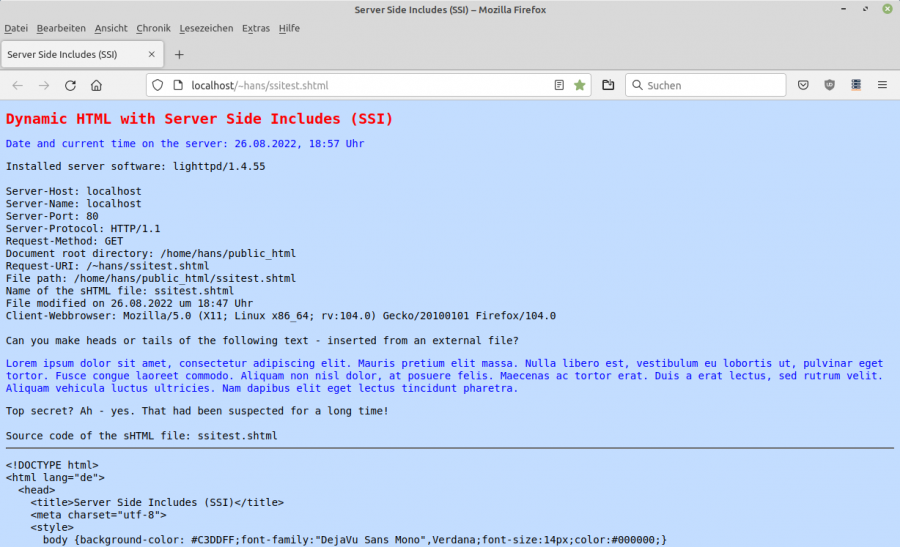
To test whether the web server reads the results of SSI instructions and texts from two external text files and integrates them into the HTML source code of the website, the SHTML file ssitest.shtml and the two text files are provided in the download area .
Figure 24.6.10.9.10: Detail of the display of the contents of ssitest.shtml
The SSI instructions are integrated into the HTML source text like HTML comments. Note that the <!–#SSI statement must be written without spaces, but the space before the closing –> is necessary:
<!--#SSI-Anweisung Attribut="Wert" -->
Don't forget to set the necessary rights for the SSI file:
$ sudo chmod 755 $HOME/public_html/ssitest.shtml
This is the contents of the ssitest.shtml file with inline CSS in the <style>…</style> section:
<!DOCTYPE html>
<html lang="de">
  <head>
    <title>Server Side Includes (SSI)</title>
    <meta charset="utf-8">
    <style>
      body {background-color: #C3DDFF;font-family:"DejaVu Sans Mono",Verdana;font-size:14px;color:#000000;}
      h1 {text-align: left; font-family:"DejaVu Sans Mono",Verdana;font-size:20px;color:#FF0000;}
      p {font-family:"DejaVu Sans Mono",Verdana;font-size:14px;color:#0000FF;}
      pre {font-family:"DejaVu Sans Mono",Verdana;font-size:14px;color:#000000;}
    </style>
  </head>
  <body>
    <h1>Dynamic HTML with Server Side Includes (SSI)</h1>
    <p>Date and current time on the server:
    <!--#config timefmt="%d.%m.%Y, %H:%M" --><!--#echo var="DATE_LOCAL" --> Uhr<br/></p>
    Installed server software: <!--#echo var="SERVER_SOFTWARE" --><br /><br />
    Server-Host: <!--#echo var="HTTP_HOST" --><br />
    Server-Name: <!--#echo var="SERVER_NAME" --><br />
    Server-Port: <!--#echo var="SERVER_PORT" --><br />
    Server-Protocol: <!--#echo var="SERVER_PROTOCOL" --><br />
    Request-Method: <!--#echo var="REQUEST_METHOD" --><br />
    Document root directory: <!--#echo var="DOCUMENT_ROOT" --><br />
    Request-URI: <!--#echo var="DOCUMENT_URI" --><br />
    File path: <!--#echo var="SCRIPT_FILENAME" --><br />
    Name of the sHTML file: <!--#echo var="DOCUMENT_NAME" --><br />
    File modified on <!--#config timefmt="%d.%m.%Y um %H:%M" --><!--#echo var="LAST_MODIFIED" --> Uhr<br />
    Client-Webbrowser: <!--#echo var="HTTP_USER_AGENT" --><br />
    <br />
    Can you make heads or tails of the following text - inserted from an external file?
    <p><!--#include file="texte/loremipsum.html" --></p>
    Top secret? Ah - yes. That had been suspected for a long time!<br /><br />
    Source code of the sHTML file: <!--#echo var="DOCUMENT_NAME" -->
    <hr />
    <p><!--#include file="texte/ssitest.txt" --></p>
  </body>
</html>
To access the sHTML file in the web browser (→ Figure 24.13.8.6.1):
http://localhost/~hans/ssitest.shtml
Not only are values from SSI environment variables read and displayed, but the text from the above two text files is also inserted into the generated website and displayed.
It is definitely worth looking at the HTML source code generated by the web server at http://localhost/~hans/ssitest.shtml, which you can display in the Firefox web browser using CTRL+U and compare with the original SSI script . Then – even if only at second glance – how SSI works becomes clear.
24.6.10.10 Remote access to the web server Lighttpd
If you have installed Lighttpd on a separate platform in your local network, then the SSH protocol is particularly suitable for transferring web pages/files to the server easily and securely. On small computers like the Raspberry Pi, an SSH server is usually already set up and just needs to be activated. An SSH client is usually preinstalled on every Linux platform, including your development system.
If there is no SSH server on the web server yet, you can use the OpenSSH server package, which can be installed quickly:
$ sudo apt-get update
$ sudo apt-get upgrade
$ sudo apt-get install openssh-server
The SSH server will start automatically immediately after installation and also during future restarts of the PC. You can check this with:
$ service ssh status
It is now possible to connect to the server:
claus@claus-HP:~$ ssh claus@192.168.1.100
The authenticity of host '192.168.123.100 (192.168.1.100)' can't be established.
ECDSA key fingerprint is SHA256:DIb+yYTRkuzurn7+qjJcNIOZOjI2tveaazDqrDA38YE.
Are you sure you want to continue connecting (yes/no/[fingerprint])? yes
Warning: Permanently added '192.168.1.100' (ECDSA) to the list of known hosts.
claus@192.168.1.100's password:
Note the last line of this dialog. You will see the SSH server prompt and can now work with it via the console as if you were logged in locally to the server. The connection can also be canceled again:
claus@claus-VirtualBox:~$ exit
Abgemeldet
Connection to 192.168.1.100 closed.
Since there is usually a DHCP server in a local network, you can avoid entering the IP address by specifying the (host) name of the platform
claus@claus-HP:~$ ssh claus@claus-VirtualBox
The authenticity of host 'claus-virtualbox (192.168.1.100)' can't be established.
ECDSA key fingerprint is SHA256:DIb+yYTRkuzurn7+qjJcNIOZOjI2tveaazDqrDA38YE.
Are you sure you want to continue connecting (yes/no/[fingerprint])? yes
Warning: Permanently added 'claus-virtualbox' (ECDSA) to the list of known hosts.
claus@claus-virtualbox's password:
Last login: Sun Jul 10 10:34:13 2022 from 192.168.1.144
As you can see, an initial recognition of the fingerprint is also required here. To terminate the SSH connection, type `exit`. Afterwards you are back in the console on the SSH client host. For all subsequent connection attempts from the same client, the SSH server will not issue warnings because the client registered the host as known in the ~/.ssh/known_hosts file during the first SSH connection.
24.6.10.10.1 Transfer of websites to the server
There are two options for transferring a website to a server via SSH:
- File manager
- SSH commands in a console
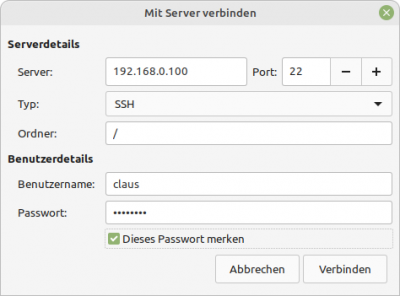
The modern file managers of Linux distributions support the SSH protocol and you can use it to log in to an SSH server in a very simple way. Here is an example dialog from the Nemo file manager (File>Connect to server):
Figure 24.6.10.10.1: Dialog display in the file manager
After logging in, you can manage content as usual and copy files to the server as if it were a local path. However, this form of file transfer is not suitable for target paths that require root rights. Of course, you can also transfer websites to the server using the command line. This happens (without an existing connection to the SSH server) with the following syntax:
$ scp <Pfad_quell-Datei> <SSH-user-Name>@<SSH-Server-IP>:<Pfad-SSH-Server>
Example:
claus@claus-VirtualBox:~$ scp /home/claus/Gambas/gb.Home_Assistant_gb.web.gui_0.0.18/gb.Home.gambas claus@192.168.1.100:/home/claus/public_html/cgi-bin
claus@192.168.1.100's password:
gb.Home.gambas                                100%  875KB  30.0MB/s   00:00
If you want to recursively transfer a directory and its contents to the server, use the following syntax:
$ scp -r <Quell-Verzeichnis> <SSH-Username>@<SSH-Server-IP>:<Ziel-Verzeichnis>
This is necessary, for example, if you want to transfer the entire hidden project directory .hidden, which contains all files that are not transferred to the executable Gambas file during compilation and should be updatable on the server if required (see “Directory structure for web applications” for details).
Example:
$ scp -r /home/claus/Gambas/gb.Home2/.hidden claus@192.168.1.100:/home/claus/public_html/cgi-bin/gb.Home2
The website is now ready for use on the server. If further data files are required on the server, proceed with their transfer in the same way.
If you want to avoid entering passwords during the transfer, you can set up public key authentication, which is described in detail in the Gambas book:
https://gambas-buch.de/doku.php?id=k24:k24.14:start&s[]=ssh
When using a server on a separate platform that third parties should also be able to access, it is of course not very useful if you have to access websites via the server's user account (e.g. http://192.168.1.100/~claus/cgi-bin/pl.pl). So that websites can be called up without specifying a user name (for example: http://192.168.1.100/cgi-bin/pl.pl), the websites must be stored in the directories
/usr/lib/cgi-bin oder /var/www/html
directories, which can be done for individual files with an existing SSH connection:
$ sudo mv ~/public_html/cgi-bin/pl.pl /usr/lib/cgi-bin
The owner is then set to “root”:
$ sudo chown root:root /usr/lib/cgi-bin/pl.pl
The same procedure can be used for directories:
$ sudo mv ~/public_html/cgi-bin/.hidden /usr/lib/cgi-bin
$ sudo chown -R root:root /usr/lib/cgi-bin/.hidden
24.6.10.11 Installation of database systems for web applications
If database systems are to be used for the web applications, the installations described below must be carried out.
<uuuu>SQLite<uuuu>
SQLite is a popular and lightweight SQL database system that does not require a client-server architecture. Unlike other database systems, you only need to install SQLite if you intend to use the client to edit the database. The installation can be carried out as follows
$ sudo apt-get update
$ sudo apt-get upgrade
$ sudo apt-get install sqlite3
<uuuu>Database systems with client-server architecture<uuuu>
To create a database system with a client-server environment, suitable configurations must be made in addition to the installation. This source provides extensive information on the setup and use of such database systems:
https://www.gambas-buch.de/doku.php?id=k22:start
24.6.10.12 Using 'Virtual Machines (VMs)' for HTTP servers
The use of virtual machines as local HTTP servers requires more space on the hard disk, but has proven to be particularly practical. In the event of failure, you can simply start again from the beginning. The user platform remains unaffected. In addition, a fully set up VM can be exported and, if required, put back into operation on any platform with any operating system within a few seconds.
When setting up an HTTP server, the procedure is exactly the same as on a normal platform. Only the IP address is different and independent of the host. It makes sense to also install the Gambas IDE, which minimises the effort required to transfer a website to the server. A web browser should also be available for this case.
For the installation of virtual machines, you can use the following:
- VirtualBox (commercial and free version for private use)
- QEMU + virt-manager (GPL2/GPL3))
- VMWare (commercial and free version for private use)

