Sidebar
Table of Contents
24.13 Excursus: Lighttpd web server - installation, configuration and testing
If you want to test websites, web applications or a CMS (content management system such as DokuWiki) locally, then you need a web server such as Lighttpd as a fast web server with low memory consumption.
Lighttpd - called Lighty - with a sufficiently simple and straightforward configuration is an alternative to the Apache web server.
Please note the following tips and suggestions:
- This description for Linux Mint 20.2 describes the installation, configuration and a basic test of the Lighttpd web server.
- Version 1.4.55 of the Lighttpd web server is used.
- You can use any text editor to create and change all configuration files under root rights.
- The documentation for the web server should also be installed so that you have access to the documentation for the individual modules, which is essential for configuring the modules.
- The paths to the documentation of the individual modules can be found in the configuration files of the individual modules.
- You can extend the (basic) functionality of the web server with individual modules.
- For some commands in the console or when specifying links for the web browser, the user name hans of the author's test environment must always be replaced by your user name!
24.13.2 Installing the Lighttpd web server
The Lighttpd web server can be installed via the application management or you can enter the following lines in a terminal:
$ sudo apt-get update && apt-get upgrade
$ sudo apt-get install lighttpd
You should then also install the web server documentation:
$ sudo apt-get install lighttpd-doc
You can display the installed version of Lighttpd like this:
$ lighttpd -v
lighttpd/1.4.55 (ssl) - a light and fast webserver
24.13.3 Web server status and web server start
The web server is started automatically after installation. This allows you to check its status at any time:
$ service lighttpd status
or
$ /etc/init.d/lighttpd status
Attention! The Lighttpd web server is started automatically every time the system is started (default). You can change this with these two commands:
$ sudo update-rc.d -f lighttpd remove 	' → Lighttpd aus der Autostart-Liste entfernen
  Removing any system startup links for /etc/init.d/lighttpd …
$ sudo update-rc.d lighttpd defaults 	' → Lighttpd der Autostart-Liste wieder hinzufügen
  Adding system startup for /etc/init.d/lighttpd ...
Option:If you do not start the web server automatically at system startup, you can start the HTTP server temporarily as a background process at any time:
Variant 1:
$ lighttpd -f /etc/lighttpd/lighttpd.conf
End background process:
$ pidof lighttpd
$ sudo kill PID
Variant 2:
$ lighttpd -D -f /etc/lighttpd/lighttpd.conf (→ ohne Ablösung von der Konsole)
End the background process started in this way with CTRL+X or close the terminal window.
If you are constantly working with the Lighttpd web server, it is worth creating starters on the desktop for selected actions such as starting or stopping.
24.13.4 Web server - test
After the installation, you are prompted with the following command
$ cat /etc/passwd | cut -d: -f1 | grep www-data
www-data
you will notice that a new user www-data has been created automatically, under which the web server Lighttpd runs. There is also a group with the same name.
You can test the automatically started web server with the existing (basic) configuration by opening the web page index.lighttpd.html - saved from version Mint 18 in the standard web folder /var/www/html - in a web browser.
The following calls of the (static) web page in the web browser of your choice are equivalent, as an index file is searched for in the standard web folder by default. :
http://127.0.0.1  oder  http://localhost  OR
http://127.0.0.1/index.lighttpd.html
OR
http://localhost/index.lighttpd.html OR
http://192.168.2.106 (IP des Server-Hosts → $ ifconfig.)
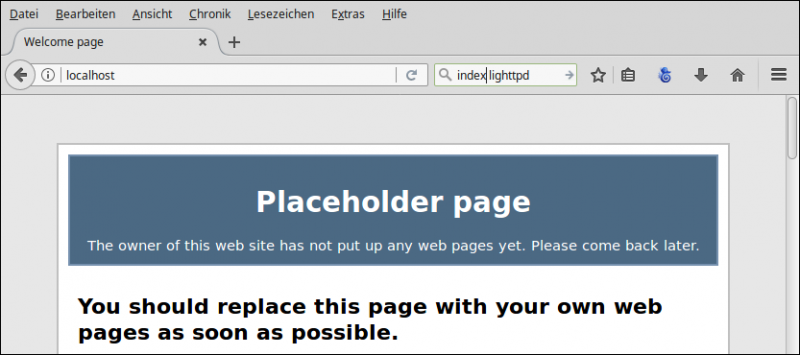
Attention: These addresses only work if you have not yet activated the userdir module! The content of the index file should be displayed like this in the web browser:
Figure 24.13.4.1: Excerpt from the content of the standard index file
Read the text in the 'Placeholder web page' carefully, as it contains important information about the web server.
24.13.5 Documentation
Comprehensive documentation (as of 14 June 2022) for the Lighttpd web server can be found at
LINK1:	https://www.lighttpd.net/
LINK2:	https://wiki.ubuntuusers.de/lighttpd/
Help on the Lighttpd web server can also be found here:
LINK3:	https://redmine.lighttpd.net/projects/lighttpd/wiki
LINK4:	https://www.elektronik-kompendium.de/sites/raspberry-pi/1905271.htm
CONSOLE:	$ lighttpd -h
CONSOLE:	$ ls -l /usr/share/doc/lighttpd
24.13.6 Log files
You can view the last entries of the current (error) log file of the web server in a console with the following command
$ sudo tail -f /var/log/lighttpd/error.log
Older log files can also be found in the /var/log/lighttpd/ directory.
24.13.7 Web server control
The following calls in a terminal control the Lighttpd web server with the parameters shown in the list:
$ sudo /etc/init.d/lighttpd {start|stop|restart|reload|force-reload|status}
Alternative:
$ sudo service lighttpd {start|stop|restart|reload|force-reload|status}
Examples:
$ /etc/init.d/lighttpd status
$ sudo service lighttpd reload
24.13.8 Configuration of the Lighttpd web server
The (basic) configuration file for the Lighttpd web server is /etc/lighttpd/lighttpd.conf. Without changing the basic configuration, the web server only delivers static HTML pages from the /var/www/html directory to the web browser!
- Changes are made to the (basic) configuration file /etc/lighttpd/lighttpd.conf!
- The configuration files of the intended modules are changed and activated in the specified manner.
- Re-importing the (basic) configuration file ensures that the server configuration is expanded to include the module functionality.
In the (base) configuration file (Mint ≥ 20.1), the following include statement causes activated module configurations from the /etc/lighttpd/conf-enabled folder to be inserted into the (base) configuration file:
include "/etc/lighttpd/conf-enabled/*.conf"
As a general rule: To check a (changed) configuration file for (syntax) errors, you can use the following command in a console, which quickly recognises a misconfiguration or confirms the correctness of the syntax, as the following two examples show:
$ lighttpd -t -f /etc/lighttpd/lighttpd.conf
2017-05-11 18:34:40: (configfile.c.957) source: /etc/lighttpd/lighttpd.conf line: 83 pos: 1 parser failed somehow near here: (EOL)
$ lighttpd -t -f /etc/lighttpd/lighttpd.conf
Syntax OK
24.13.8.1 Changing the basic configuration of the Lighttpd web server
First save the original Lighttpd base configuration file:
$ sudo cp /etc/lighttpd/lighttpd.conf /etc/lighttpd/lighttpd.conf.old
Then change the content of the basic configuration file lighttpd.conf to the content below with comments. Then save the changed file:
$ sudo geany /etc/lighttpd/lighttpd.conf ' Editoren: nano, gedit, bluefish, bracket ...
# Determination of the modules that are to be activated immediately

server.modules = (
	"mod_indexfile",
	"mod_access",
	"mod_alias",
 	"mod_redirect",
)

# Server-Configuration:

server.document-root        = "/var/www/html"
server.upload-dirs          = ( "/var/cache/lighttpd/uploads" )
server.errorlog             = "/var/log/lighttpd/error.log"
server.pid-file             = "/run/lighttpd.pid"
server.username             = "www-data"
server.groupname            = "www-data"
server.port                 = 80

# strict parsing and normalization of URL for consistency and security
# https://redmine.lighttpd.net/projects/lighttpd/wiki/Server_http-parseoptsDetails
# (might need to explicitly set "url-path-2f-decode" = "disable"
#  if a specific application is encoding URLs inside url-path)

server.http-parseopts = (
  "header-strict"           => "enable",  # default
  "host-strict"             => "enable",  # default
  "host-normalize"          => "enable",  # default
  "url-normalize-unreserved"=> "enable",  # recommended highly
  "url-normalize-required"  => "enable",  # recommended
  "url-ctrls-reject"        => "enable",  # recommended
  "url-path-2f-decode"      => "enable",  # recommended highly (unless breaks app)
 #"url-path-2f-reject"      => "enable",
  "url-path-dotseg-remove"  => "enable",  # recommended highly (unless breaks app)
 #"url-path-dotseg-reject"  => "enable",
 #"url-query-20-plus"       => "enable",  # consistency in query string
)

# Default extensions for index files

index-file.names            = ( "index.php", "index.html", "index.gambas" )

# Default forbidden file extensions

url.access-deny             = ( "~", ".inc" )

# Do *not* consider files with the following extensions as static content

static-file.exclude-extensions = ( ".php", ".pl", ".py", ".cgi", ".gbs", ".gbw", ".gambas")
compress.cache-dir          = "/var/cache/lighttpd/compress/"
compress.filetype           = ( "application/javascript", "text/css", "text/html", "text/plain" )

# Default listening port for IPv6 falls back to the IPv4 port
# Use ipv6 if available
# include_shell "/usr/share/lighttpd/use-ipv6.pl " + server.port
# Set allowed MIME types

include_shell "/usr/share/lighttpd/create-mime.conf.pl"

# Enabled module configurations from the /etc/lighttpd/conf-enabled folder will be
# inserted into the (main) configuration file.

include "/etc/lighttpd/conf-enabled/*.conf"

#server.compat-module-load   = "disable"

server.modules += (
	"mod_compress",
	"mod_dirlisting",
	"mod_staticfile",
)
After each change to a configuration file, you must always reload the configuration file for the changes to take effect. The force-reload parameter is used to reload the current configuration and restart the web server.
$ sudo service lighttpd force-reload 		# Without receipt if the reload was successful
$ sudo /etc/init.d/lighttpd force-reload 	# Good alternative, as with output of a commentary
Reloading lighttpd configuration (via systemctl): lighttpd.service.
24.13.8.2 Extending the functionality of the web server
You can extend the functionality of the web server with modules so that certain services are reliably available. The configuration of the Lighttpd web server is carried out in the chapter in such a way that the following server functionalities are achieved:
Module userdir: A system user manages all their own websites and scripts in their home directory in a special (standard) web folder /$HOME/public_html. Module cgi: CGI scripts of the programming languages Gambas (scripts and web pages), Perl and Python are executed in a special (sub)folder ~/public_html/cgi-binModule fastcgi: PHP scripts are executed in ~/public_htmlModule ssi: SSI scripts are executed in ~/public_html
On the website https://redmine.lighttpd.net/projects/1/wiki/Docs you will find an overview of the modules as a link list, so that you can quickly find out about the module description and the configuration options for the selected module!
The following sections describe in detail how you can expand the basic configuration step by step by activating individual modules in order to achieve a specific web server functionality. Many sufficiently pre-configured configuration files can be found in the red coloured folder /etc/lighttpd/conf-available:
Figure 24.13.8.2.1: Lighttpd - location of the configuration files
Note: You should only activate the modules that you actually need! In order to extend the functional scope of the web server by using a specific module, it has proven useful to work through the following sequence of steps for activating a module:
- Configure the module by editing the module configuration file with root rights in the etc/lighttpd/conf-available folder.
- Activate the module.
- Re-import the basic configuration file.
- Test the functionality of the module in the web browser of your choice.
The configuration of selected Lighttpd web server modules is described in detail in the following sections.
24.13.8.3 Configuration module userdir
You can only access the /var/www/html directory - in which the Lighttpd web server expects static or dynamic websites - with root rights in order to create, change or delete files there!
The userdir module offers a simple way to integrate a special directory in your home directory with the standardised name public_html into the global namespace of the web server (→ symbolic link).
As the system user, first create the web folder in your home directory:
$ mkdir /home/$USER/public_html
The permission for the public_html web folder was automatically set to 755 or drwxr-xr-x as the permission string. In future, you can copy your own web pages (HTML) and web scripts (Gambas, Perl, Python, PHP, SSI) into this web folder (often referred to as DOCUMENT_ROOT) or write them there as scripts.
In the following section, the above sequence of steps for using a module is implemented using the userdir module as an example:
(1) Configure the module by editing the appropriate configuration file
Always read the module documentation first:
$ xed /usr/share/doc/lighttpd/userdir.txt
Then save the original module configuration file:
$ sudo cp /etc/lighttpd/conf-available/10-userdir.conf /etc/lighttpd/conf-available/10-userdir.conf.old
The userdir module is configured by editing the file /etc/lighttpd/conf-available/10-userdir.conf with the editor of your choice.
$ sudo xed /etc/lighttpd/conf-available/10-userdir.conf
Change the content of the configuration file 10-userdir.conf to the content below.
## The userdir module provides a simple way to link user-based directories into the global namespace of the webserver.
##
## --- MODULE: USERDIR ---
##
## Documentation: /usr/share/doc/lighttpd/userdir.txt
##
## Aktivierung des Moduls 'userdir'
## Activation of the module 'userdir'

server.modules += ( "mod_userdir" )

## Pfadangabe zum Webordner im Home-Verzeichnis
## Path to the web folder in the home directory

userdir.path = "public_html"

## Bestimmten Benutzern den Zugriff auf den Webordner public_html verbieten
## Certain users prohibit access to the public_html web folder

userdir.exclude-user = ( "root", "postmaster" )

##
## --- END OF MODULE: USERDIR ---
Then save the changed module configuration file.
(2) Activate module
The module is activated using the command
$ sudo lighttpd-enable-mod userdir
...
Run /etc/init.d/lighttpd force-reload to enable changes
If you activate a module configuration file, a link to the module configuration file is saved as a symbolic link in the /etc/lighttpd/conf-enabled folder.
Note: You can use the following command to deactivate a specific module if required:
$ sudo lighttpd-disable-mod modulname
(3) Read in configuration files again
As already mentioned, you must reload the changed (base) configuration file after each change to the configuration, as requested with 'Run /etc/init.d/lighttpd force-reload to enable changes' after activation:
$ sudo /etc/init.d/lighttpd force-reload
(4) Test the functionality of the activated userdir module in the web browser of your choice
Exercise: Create the (text) file test.html in your web folder ~/public_html:
$ geany /home/$USER/public_html/test.html '-- Create empty HTML file
Enter the following content:
<!DOCTYPE html>
<html lang="de">
  <head>
    <title>TEST.HTML</title>
    <meta charset="utf-8">
    <style>
      body {background-color: #E2E2E2; font-family: Arial; font-size:10px; color:#000000;}
      h1 {text-align: center; font-family: Arial; font-size: 32px; color: blue;}
    </style>
  </head>
  <body>
    <h1>Test-HTML5-File <br />in the web folder ~/public_html</h1>
  </body>
</html>
Hints
The user www-data, under whose rights the web server lighttpd runs, requires at least read rights to your web folder ~/public_html and the files it contains. check whether the required file rights are set for all directories and files.
The new file test.html has the file rights 644, which corresponds to the standard for (static) HTML files in the web folder. You can always check this quickly:
$ cd $HOME/public_html && ls -l | grep test.html && stat -c "%a %n" $HOME/public_html/test.html
The output not only shows you the owner, but also the rights as a rights string and in octal notation:
-rw-rw-r--  1 hans     hans        431 Aug 12 11:03 test.html
664 /home/hans/public_html/test.html
Finally, you can call up the (static) HTML file in the web browser of your choice with the following URL in a special syntax, whereby USERNAME must be replaced by your own user name:
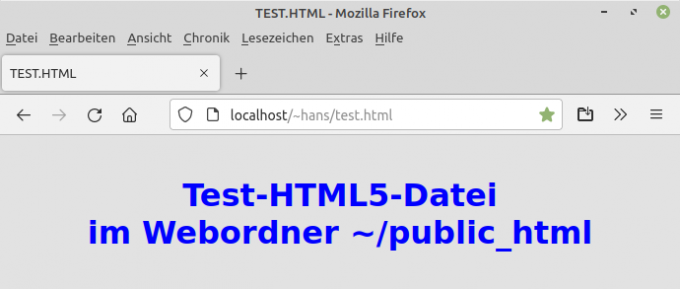
http://localhost/~USERNAME/test.html
http://127.0.0.1/~USERNAME/test.html
Figure 24.13.8.3.1: Display of the test file in the web browser for the user 'hans'
Note: All generated web pages should fulfil the HTML5 standard, for which the basic structure is always the same:
<!DOCTYPE html>
<html lang="de">
  <head>
    <title>Webserver Lighttpd</title>
    <meta charset="utf-8">
    <!-- Use of inline CSS - as opposed to a separate CSS file -->
    <style>
      body {background-color: #C3DDFF; font-family: Arial; font-size:14px; color:#000000;}
      h1 {text-align: center; font-family: Verdana; font-size: 32px; color: #FF0000;}
    </style>
  </head>
  <body>
    <br />
    <h1>HTML5-File (HTML5-Standard)</h1>
  </body>
</html>
The HTML validator on → https://www.freeformatter.com/html-validator.html shows for the above HTML file:
The document is valid and conforms to best practices and standards!
Alternatively, you can also use this validator → https://validator.w3.org/#validate_by_input.
24.13.8.4 Configuration module cgi
If you also want to use dynamic and interactive websites as CGI scripts - which also include Gambas web pages *.gambas or Perl scripts or Python scripts - you must configure and activate the cgi module.
(1) Configure the module by editing the appropriate configuration fileRead the documentation for the module:
$ sudo xed /usr/share/doc/lighttpd/cgi.txt
Save the original configuration file:
$ sudo cp /etc/lighttpd/conf-available/10-cgi.conf /etc/lighttpd/conf-available/10-cgi.conf.old
The cgi module is configured by editing the file /etc/lighttpd/conf-available/10-cgi.conf:
$ sudo xed /etc/lighttpd/conf-available/10-cgi.conf
Change the content of the configuration file 10-cgi.conf to this content:
## --- MODULE: CGI ---
##
## Documentation: /usr/share/doc/lighttpd/cgi.txt
##
## Aktivierung des Moduls 'cgi'
## Activation of the module 'cgi'

server.modules += ( "mod_cgi" )

## Alle ausführbaren Dateien (+x) sind CGI-Skripte ...
## All executable files (+x) are CGI scripts ...

cgi.execute-x-only = "enable"
cgi.assign = ( "" => "" )

## CGI-Skripte nur im benutzer-definierten Ordner ~/public_html/cgi-bin ausführen
## CGI scripts only run in the user-defined folder ~/public_html/cgi-bin

$HTTP["url"] =~ "^/cgi-bin/" { cgi.assign = ( "" => "" ) alias.url += ( "/cgi-bin/" => "/usr/lib/cgi-bin/" ) }

## --- END OF MODULE: CGI ---
(2) Activate module
$ sudo lighttpd-enable-mod cgi
[sudo] password for hans:
Enabling cgi: ok
Run /etc/init.d/lighttpd force-reload to enable changes
(3) Read in the configuration files again
$ sudo service lighttpd force-reload
(4) Test the functionality of the activated module in the web browser
Test 1: CGI script in the Perl programming language - saved directly in the web folder ~/public_html/cgi-bin. This folder ../cgi-bin must also be created. This is the source code for the Perl script ~/public_html/cgi-bin/pl.pl:
#!/usr/bin/perl
print "Content-type:text/html\n\n";
print "<!DOCTYPE html>";
print "<html lang=\"de\">";
print   "<head>";
print     "<title>Hallo World ...</title>";
print     "<meta charset=\"utf-8\">";
print     "<style>";
print       "body {background-color:#C3DDFF;font-family:Arial,Verdana,Courier;}";
print       "h2 {color:blue;}";
print     "</style>";
print   "</head>";
print   "<body>";
print     "<h2>Hallo Welt!<br />Isn't that a nice Perl CGI program</h2>";
print   "</body>";
print "</html>";
Don't forget to set the specified permissions for the Perl script:
$ sudo chmod 645 $HOME/public_html/cgi-bin/pl.pl
Call the Perl script in the web browser of your choice:
http://localhost/~USERNAME/cgi-bin/pl.pl
Figure 24.13.8.4.1: Perl script
Test 2: CGI script in the Python programming language – saved directly in the web folder ~/public_html/cgi-bin. This is the source code for the Perl script ~/public_html/cgi-bin/py.py:
#!/usr/bin/env python3
# -*- coding: utf-8 -*-
# Import modules for CGI handling
import cgi, cgitb

print ("Content-type:text/html\n\n")
print ("<!DOCTYPE html>")
print ("<html lang=\"de\">")
print   ("<head>")
print     ("<title>Hallo World ...</title>")
print     ("<meta charset=\"utf-8\">")
print     ("<style>")
print       ("body {font-family:Arial,Verdana;background-color:#C3DDFF;}")
print       ("h2 {color:blue;}")
print     ("</style>")
print   ("</head>")
print   ("<body>")
print     ("<h2>Hallo Welt!<br />Isn't that a nice Python CGI program</h2>")
print   ("</body>")
print ("</html>")
Set the specified rights:
$ sudo chmod 645 $HOME/public_html/cgi-bin/py.py
Then call the Python script in the web browser of your choice:
http://localhost/~USERNAME/cgi-bin/py.py
Figure 24.13.8.4.2: Python script
Test 3: Note: If you also want to use web scripts *.gbw3, then you have to install an additional package for Mint 20.1, for example:
$ sudo apt-get install gambas3-scripter
The test is carried out using a web script in the Gambas programming language – saved in the web folder ~/public_html/cgi-bin. This is the source code for the CGI script ~/public_html/cgi-bin/env.gbw3:
#!/usr/bin/env gbw3
<% DIM sElement AS String %>
<html>
  <h2>Umgebungsvariablen</h2>
  <table border="1" cellspacing="0" cellpadding="2">
    <tr>
      <th align="left">Name</th>
      <th align="left">Value</th>
    </tr>
    <% FOR EACH sElement IN Application.Env %>
    <tr valign="top">
      <td><%= sElement %></td><td><%= Application.Env[sElement] %></td>
    </tr>
    <% NEXT %>
  </table>
</html>
Don't forget: Set the following rights:
$ sudo chmod 665 $HOME/public_html/cgi-bin/env.gbw3
Call the Gambas web script in the web browser of your choice:
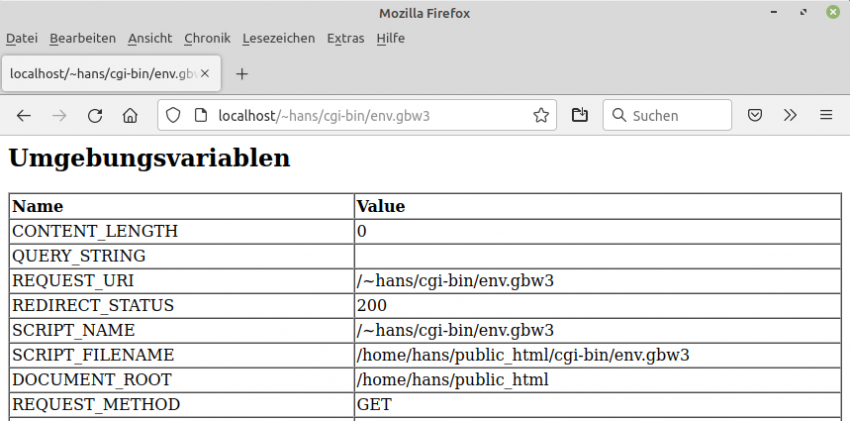
http://localhost/~USERNAME/cgi-bin/env.gbw3
Figure 24.13.8.4.3: Output of the values of the web server environment variables
Test 4: For the fourth test, a web page based on the Webpage (gb.web) class is loaded in the IDE. You can find the project archive in the download area. The webpage shows static text and the output of a JavaScript function for a timer.
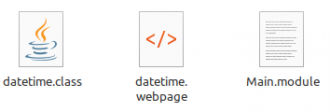
In the source code, the design of the website is specified in the head area with inline CSS (<style>…</style>) and the JavaScript source text (<script>…</script>) is also noted inline. In addition, it is shown how you can insert the value of a function in the Gambas programming language - outsourced to a class belonging to the web page - into HTML in a special syntax for web pages. The output of (pure) HTML is handled by the datetime function. Render() in the Main.module module. This is the contents of the (hidden) .scr folder in the project folder:
Figure 24.13.8.4.4: Source code files
Webpage – (HTML) file: datetime.webpage
<!DOCTYPE html> <html lang="de"> <head> <title>DATE.TIME</title> <meta charset="utf-8"> <style> body {background-color:#C3DDFF;font-family:Verdana,Helvetica,font-size:32px;color:#0000FF;} .time-current {display: flex;margin-top: auto;} .time-current p {padding: 0px;font-size: 32px;text-align: left;} </style> <script> function startTime() { var today = new Date(); var h = today.getHours(); var m = today.getMinutes(); var s = today.getSeconds(); m = checkTime(m); s = checkTime(s); document.getElementById('display_current_time').innerHTML = h + ":" + m + ":" + s; var t = setTimeout(startTime, 1000); } function checkTime(i) { if (i < 10) {i = "0" + i}; return i; } </script> </head> <body onload="startTime()"> <br /> Date: <%=SetDateToGerman(Now)%><br> The website was accessed at <%=Format$(Now, "hh:nn:ss")%> o'clock! <br> <time class="time-current"> <p style="display:inline; ">Current time: </p> <p id="display_current_time"></p><p> Uhr</p> </time> </body> </html>
Source code in the class file of the webpage datetime.webpage – Gambas file: datetime.class
' Gambas class file

Private Function SetDateToGerman(dDatum As Date) As String

  Dim aMonatMatrix, aWochenTagMatrix As New String[]
  Dim sWochenTag, sTag, sMonat, sJahr As String

  aMonatMatrix.Clear()
  aMonatMatrix = ["Januar", "Februar", "März", "April", "Mai", "Juni", "Juli", "August", "September",
                  "Oktober", "November", "Dezember"]
  aWochenTagMatrix.Clear()
  aWochenTagMatrix = Split("Sonntag Montag Dienstag Mittwoch Donnerstag Freitag Samstag", " ")

  sWochenTag = aWochenTagMatrix[WeekDay(dDatum)]
  sTag = Str(Day(dDatum))
  sMonat = aMonatMatrix[Month(dDatum) - 1]
  sJahr = Str(Year(dDatum))

  Return sWochenTag & " - " & sTag & ". " & sMonat & " " & sJahr

End
Starting class – module file: Main.module
' Gambas module file

Public Sub Main()
  datetime.Render()
End
Since inline CSS is used and no additional files such as image files or similar are required, it is advisable for an initial test to use the embedded HTTP server in the IDE to display the website. To do this, you need to enable this HTTP server in the 'Debug' menu in the 'Use embedded HTTP server' debugger configuration.
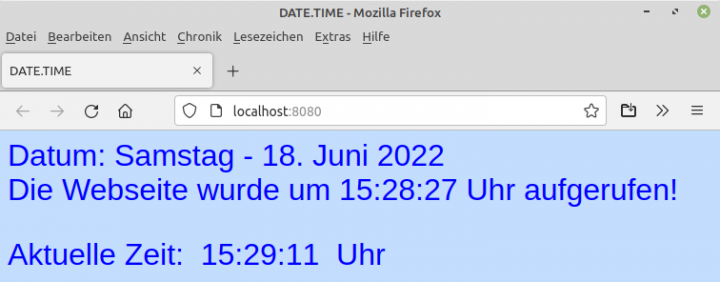
Figure 24.13.8.4.5: Output in the embedded web server on port 8080
If you see this output with the current time displayed continuously, then you can create the executable file datetime.gambas and save it to ~/public_html/cgi-bin/datetime.gambas.
Set the specified rights for the Gambas executable file datetime.gambas:
$ sudo chmod 665 $HOME/public_html/cgi-bin/datetime.gambas
Access the website in the web browser of your choice:
http://localhost/~USERNAME/cgi-bin/datetime.gambas
You should see the same display as in Figure 24.13.8.4.5.
24.13.8.5 Configuration module fastcgi
In order to use PHP support for the web server, which is interesting for testing purposes in connection with the component gb.xml.rpc and XML, PHP must also be installed if this has not already been done. First, you need to explore which PHP version can be installed on your system. The output of the php -v command in a console gives an indication of the PHP version that can currently be installed:
$ php -v
Der Befehl 'php' wurde nicht gefunden, kann aber installiert werden mit:
sudo apt install php7.4-cli
Attention: You should stick to the order of the packages! Otherwise the web server `Apache2` will also be installed (automatically), which is guaranteed to lead to problems!
You can now install PHP using this command chain:
sudo apt-get install php7.4-common php7.4-cgi php7.4 php7.4-mbstring php7.4-xml php7.4-xmlrpc
How to determine the (current) PHP version on your system after successful installation:
$ php -v
PHP 7.4.3 (cli) (built: Oct  6 2020 15:47:56) ( NTS )
...
This is the overview of the installed PHP environment:
hans@mint20:~$ dpkg --list | grep php7
ii  php7.4           7.4.3-4ubuntu2.4    all    server-side, HTML-embedded scripting language (metapackage)
ii  php7.4-cgi       7.4.3-4ubuntu2.4    amd64  server-side, HTML-embedded scripting language (CGI binary)
ii  php7.4-cli       7.4.3-4ubuntu2.4    amd64  command-line interpreter for the PHP scripting language
ii  php7.4-common    7.4.3-4ubuntu2.4    amd64  documentation, examples and common module for PHP
ii  php7.4-json      7.4.3-4ubuntu2.4    amd64  JSON module for PHP
ii  php7.4-opcache   7.4.3-4ubuntu2.4    amd64  Zend OpCache module for PHP
ii  php7.4-readline  7.4.3-4ubuntu2.4    amd64  readline module for PHP
ii  php7.4-xml       7.4.3-4ubuntu2.4    amd64  DOM, SimpleXML, XML, and XSL module for PHP
ii  php7.4-xmlrpc    7.4.3-4ubuntu2.4    amd64  XMLRPC-EPI module for PHP
If you want to use scripts in the PHP language, you must also configure and activate the fastcgi module.
(1) Configure the module by editing the appropriate configuration file
Read the documentation for the module:
$ sudo gzip -d /usr/share/doc/lighttpd/fastcgi.txt.gz
$ sudo xed /usr/share/doc/lighttpd/fastcgi.txt
Back up the original configuration file:
$ sudo cp /etc/lighttpd/conf-available/10-fastcgi.conf /etc/lighttpd/conf-available/10-fastcgi.conf.old
The module is configured by editing the /etc/lighttpd/conf-available/10-fastcgi.conf file:
$ sudo xed /etc/lighttpd/conf-available/10-fastcgi.conf
Change the contents of the 10-fastcgi.conf configuration file to this content:
## --- MODULE: FASTCGI ---
##
## Documentation: /usr/share/doc/lighttpd/fastcgi.txt
##
## Für PHP von "lighttpd" ((Fast-)CGI) muss php7-cgi oder php-cgi installiert sein!
## In /etc/php/7.4/cli/php.ini ist der Wert von 'cgi.fix_pathinfo' auf 1 zu setzen.
## For PHP of "lighttpd" ((fast)CGI, the package php7-cgi or php-cgi must be installed!
## Do not forget to set the value of cgi.fix_pathinfo to 1 in /etc/php/7.4/cli/php.ini.
##
## Aktivierung des Moduls 'fastcgi'
## Activation of the module 'fastcgi'

server.modules += ( "mod_fastcgi" )

## Fast-CGI-Server

fastcgi.server = ( ".php" => (("bin-path" => "/usr/bin/php-cgi", "socket" => "/tmp/php.sock")) )

##
## --- END OF MODULE: FASTCGI ---
(2) Activate module
$ sudo lighttpd-enable-mod fastcgi
...
Run /etc/init.d/lighttpd force-reload to enable changes
(3) Reread configuration files
$ sudo service lighttpd force-reload
(4) Test the functionality of the activated module in the web browser
You can test the basic PHP functionality with the PHP script ~/public_html/phpinfo.php with the following source code:
<?php phpinfo(); ?>
Don't forget to set the specified rights for the PHP script:
$ sudo chmod 644 $HOME/public_html/phpinfo.php
Call the PHP script in the web browser of your choice:
http://localhost/~USERNAME/phpinfo.php
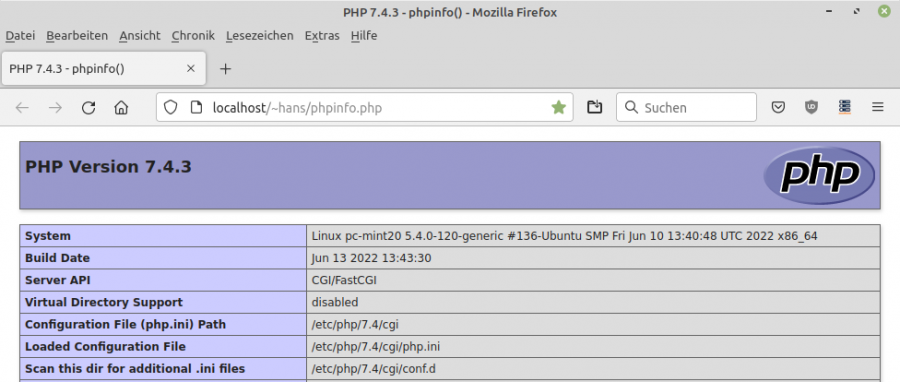
Figure 24.13.8.5.1: Output of the PHP script phpinfo.php in the web browser
24.13.8.6 Configuration module ssi
On the topic of 'Server Side Includes' (SSI) there was this summary in the documentation:
SSI is certainly not a replacement for CGI or other technologies used to create dynamic web pages. But it's a good way to add small amounts of dynamic content to pages without putting in a lot of extra work.
Anyone who uses server side includes in websites will be able to confirm: Yes, that's how it is…! SSI is browser-independent because SSI instructions from the SSI scripting language are processed in a web page by the web server and the results are immediately inserted into the HTML source text, which is then sent to the browser. The ssi module is of interest to you if you want to conveniently insert frequently changing text into an sHTML page.
(1) Configure the module by editing the appropriate configuration file
Read the documentation for the module:
$ sudo xed /usr/share/doc/lighttpd/ssi.txt
Back up the original configuration file:
$ sudo cp /etc/lighttpd/conf-available/10-ssi.conf /etc/lighttpd/conf-available/10-ssi.conf.old
To use 'Server Side Includes', you must configure the ssi module by editing the /etc/lighttpd/conf-available/10-ssi.conf file:
$ sudo xed /etc/lighttpd/conf-available/10-ssi.conf
Change the contents of the 10-ssi.conf configuration file to this content:
## --- MODUL: SSI ---
##
## Documentation: /usr/share/doc/lighttpd/ssi.txt
##
## Aktivierung des Moduls 'ssi'
## Activation of the module 'ssi'

server.modules += ( "mod_ssi" )
ssi.extension = ( ".html", ".shtml" )

## --- END OF MODULE: SSI ---
(2) Activate module
$ sudo lighttpd-enable-mod ssi
...
Run /etc/init.d/lighttpd force-reload to enable changes
(3) Reread configuration files
$ sudo service lighttpd force-reload
(4) Test the functionality of the activated module in the web browser
In the future, all files in the web folder with the .shtml extension will be parsed by the Lighttpd web server for SSI instructions and the SSI instructions contained in them will be executed. Please note that the web server option 'exec' - used, among other things, to execute system commands - was not implemented on the Lighttpd web server - apparently due to security concerns!
To test whether the web server integrates the results of SSI instructions into the HTML source code of a website, the SHTML file ssitest.shtml is provided in the download area.
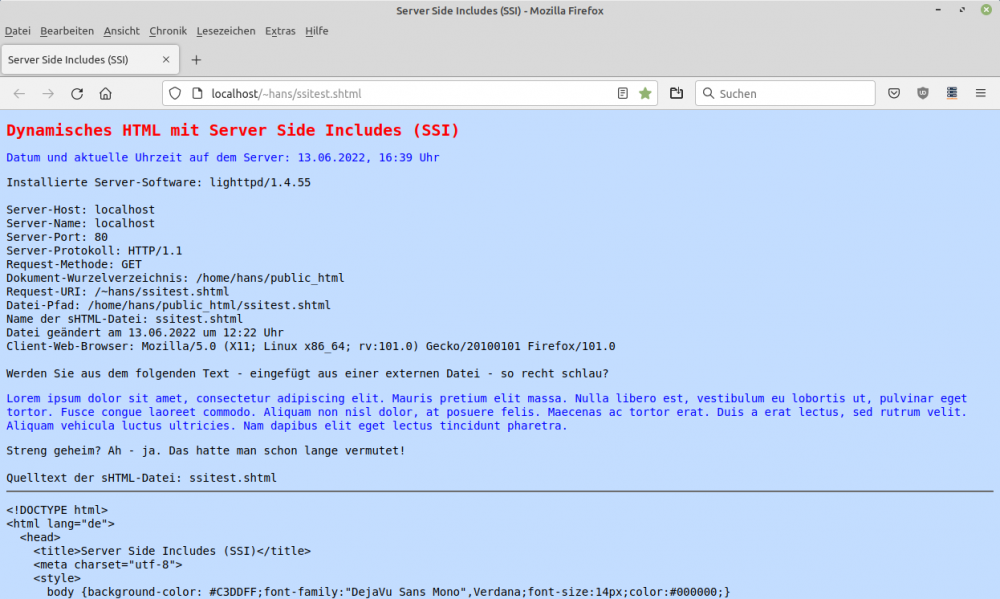
Figure 24.13.8.6.1: Detail of the display of the contents of ssitest.shtml
The SSI instructions are integrated into the HTML source text like HTML comments. Note that the <!–#SSI statement must be written without spaces, but the space before the closing –> is necessary:
<!--#SSI-Anweisung Attribut="Wert" -->

Vergessen Sie nicht, für die SSI-Datei die angegebenen Rechte zu setzen:

<code>
$ sudo chmod 644 $HOME/public_html/ssitest.shtml
This is the contents of the ssitest.shtml file with inline CSS in the <style>…</style> section:
<!DOCTYPE html>
<html lang="de">
  <head>
    <title>Server Side Includes (SSI)</title>
    <meta charset="utf-8">
    <style>
      body {background-color: #C3DDFF;font-family:"DejaVu Sans Mono",Verdana;font-size:14px;color:#000000;}
      h1 {text-align: left; font-family:"DejaVu Sans Mono",Verdana;font-size:20px;color:#FF0000;}
      p {font-family:"DejaVu Sans Mono",Verdana;font-size:14px;color:#0000FF;}
      pre {font-family:"DejaVu Sans Mono",Verdana;font-size:14px;color:#000000;}
    </style>
  </head>
  <body>
    <h1>Dynamic HTML with Server Side Includes (SSI)</h1>
    <p>Date and current time on the server:
    <!--#config timefmt="%d.%m.%Y, %H:%M" --><!--#echo var="DATE_LOCAL" --> Uhr<br/></p>
    Installierte Server-Software: <!--#echo var="SERVER_SOFTWARE" --><br /><br />
    Server-Host: <!--#echo var="HTTP_HOST" --><br />
    Server-Name: <!--#echo var="SERVER_NAME" --><br />
    Server-Port: <!--#echo var="SERVER_PORT" --><br />
    Server-Protokoll: <!--#echo var="SERVER_PROTOCOL" --><br />
    Request-Methode: <!--#echo var="REQUEST_METHOD" --><br />
    Dokument-Wurzelverzeichnis: <!--#echo var="DOCUMENT_ROOT" --><br />
    Request-URI: <!--#echo var="DOCUMENT_URI" --><br />
    Datei-Pfad: <!--#echo var="SCRIPT_FILENAME" --><br />
    Name der sHTML-Datei: <!--#echo var="DOCUMENT_NAME" --><br />
 Datei geändert am <!--#config timefmt="%d.%m.%Y um %H:%M" --><!--#echo var="LAST_MODIFIED" -->Uhr<br />
    Client-Webbrowser: <!--#echo var="HTTP_USER_AGENT" --><br />
    <br />
    Can you make sense of the following text - inserted from an external file?
    <p><!--#include file="texte/loremipsum.html" --></p>
    Top secret? Ah - yes. We had suspected that for a long time!<br /><br />
    Quelltext der sHTML-Datei: <!--#echo var="DOCUMENT_NAME" -->
    <hr />
    <p><!--#include file="texte/ssitest.txt" --></p>
  </body>
</html>
The SSI instructions are marked red in the source code in the ssitest.shtml file. The two text files to be integrated, loremipsum.html and ssitest.txt, in the folder './public_html/texte' are also made available to you in the download area of the chapter. How to open an sHTML file in the web browser (→ Figure 24.13.8.6.1):
http://localhost/~hans/ssitest.shtml
Not only are values from SSI environment variables read and displayed, but the text from the above two text files is also inserted into the generated website and displayed.
It is definitely worth looking at the HTML source code generated by the web server at http://localhost/~hans/ssitest.shtml, which you can display in the Firefox web browser using CTRL+U and compare with the original SSI script . Then – even if only at second glance – how SSI works becomes very clear.
24.13.9 Conclusion
The web server - configured in the (basic) configuration file /etc/lighttpd/lighttpd.conf and the modules described above - delivers HTML code from static websites and from CGI scripts as well as from SSI scripts:
- Static HTML web pages *.html
- Perl CGI scripts → *.pl
- Python CGI scripts → *.py
- Gambas CGI scripts→ *.gbw
- Gambas CGI programs → Webpages → *.gambas
- PHP scripts → *.php
- SSI scripts → *.shtml
Option: Retrieve data from an XML-RPC server through an XML-RPC client. Information on RPC can be found in chapter 27.5.0 XML-RPC.
All HTML files and PHP files such as phpinfo.php as well as SSI scripts such as ssitest.shtml are saved in the ~/public_html folder. CGI scripts (*.pl, *.py, *.gbw) and CGI programs such as web pages (*.gambas), on the other hand, belong in the ~/public_html/cgi-bin folder.
In the download area you will find all the files described in the chapter in an archive:
- test.html
- pl.pl
- py.py
- env.gbw3
- project wp_datetime
- info.php
- ssitest.shtml
- folder 'texte' with the files loremipsum.html and ssitest.txt

