Sidebar
Table of Contents
12.3.2 ToolBar
The ToolBar class (gb.form.mdi) implements a toolbar to hold ToolButton and MenuButton. It has some special properties, but only one method and exactly one event as well as 2 constants for specifying the alignment of a ToolBar.
12.3.2.1 Properties, method and event
The two properties ToolBar.Key and ToolBar.Text only need to be set if you want to use the ToolBar.Configure method. The method allows you to change the design of a ToolBar within narrow limits during the runtime of a programme. The changes concern the height of the icons on the ToolButton or MenuButton (small, medium or large), the addition or removal of ToolButtons or MenuButtons, the addition or removal of separators and spaces as well as the regrouping of elements in the ToolBar. You can only add tool or menu buttons that have previously been removed and 'parked' in a configuration dialogue. It is up to you to decide whether this feature is a successful gimmick or a useful addition.
12.3.2.2 Properties
| ToolBar | DataType | Default | Description |
|---|---|---|---|
| AutoResize | Boolean | False | Specifies whether the size of the ToolBar automatically adjusts to the content |
| Orientation | Integer | 0 | Sets the orientation of the ToolBar or returns this integer value. Either use the number 0 for horizontal orientation or 1 for vertical orientation or use the constants ToolBar.Horizontal or ToolBar.Vertical. |
| Separator | Boolean | False | If the value is set to True, a thin line the length of the ToolBar appears below the ToolBar. The property value can also be read out. |
| ToolTip | String | Zero | Sets the ToolTip text of the ToolBar to be displayed or returns it |
| Text | String | Zero | Sets or returns the name of the ToolBar. The name is used internally in the ToolBar configuration. |
| Key | String | Zero | Sets or returns a string to uniquely identify the ToolBar. This key is used when automatically saving or restoring the toolbar configuration. Only if the property is set, then the ToolBar will be configurable! |
Table 12.3.2.2.1: Selected ToolBar Properties
12.3.2.3 Method
The ToolBar.Configure method only takes effect if.
- a key string has been set and
- the .Action property has been set for the ToolButton or MenuButton in the ToolBar container. You should not change these settings later.
Hints:
- You can only set the key string for a ToolBar in the development environment (IDE).
- The same applies to the .Action property of ToolButton or MenuButton in the ToolBar container.
You call the ToolBar.Configure method in an event handler routine or you conveniently use the context menu of the ToolBar component.
12.3.2.4 Event
The ToolBar_Configure() event is raised when the ToolBar has been configured.
12.3.2.5 Example
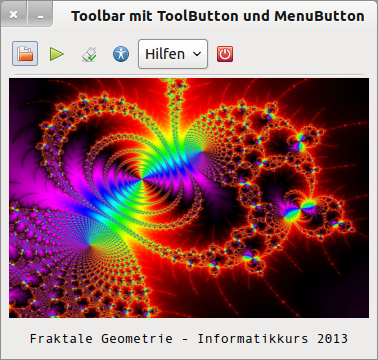
This example demonstrates the use of a ToolBar that can be configured at programme runtime. The ToolBar contains several ToolButtons and a MenuButton, but the MenuButton is not configurable because its .Action property has not been set.
- The menu with its 2 entries for the MenuButton was created and configured with the menu editor. The internal programme help is called up via F1 and the online help via F12. Both function keys were defined in the menu editor.
- The functionality of the two ToolButtons Play and FTP is only hinted at.

Figure 12.3.2.5.1: ToolBar with ToolButton and MenuButton
After you have placed all the components on the form in the development environment (IDE), you must set the ToolButton.Key property and the .Action property for the ToolButton and MenuButton there in the Properties tab, which should be configurable because the following source code will not produce an error but will have no effect:
ToolBar1.Key = "Emma"
toolbtnOpen.Action = "A1"
toolbtnPlay.Action = "A2"
toolbtnFTP.Action = "A3"
toolbtnConfiguration.Action = "A4"
toolbtnClose.Action = "A5"
12.3.2.6 Project source code
The source code is given in full and then commented:
[1] ' Gambas class file
[2]
[3] Public Sub Form_Open()
[4]   FMain.Center
[5]   FMain.Resizable = False
[6]   PictureBox1.Picture = Picture["fractal.jpg"]
[7]
[8]   ToolBar1.Height = 32
[9]   ToolBar1.Orientation = ToolBar1.Horizontal ' Alternative: ToolBar1.Orientation = 0
[10]   ToolBar1.Separator = False
[11]   toolbtnFTP.Toggle = True
[12]   toolbtnFTP.Value = False
[13]
[14]   mnubtnHelp.Width = 72
[15]   mnubtnHelp.Text = "Aids"
[16]   mnubtnHelp.Menu = "mnuHelp"
[17]   mnubtnHelp.MenuOnly = True
[18]
[19] End ' Form_Open()
[20]
[21] Public Sub mnu21Help_Click()
[22]   FHelp.Show ' → F1
[23] End ' mnuHelp_Click()
[24]
[25] Public Sub mnu22Information_Click()
[26]   Desktop.Open("http://www.gambas-buch.de/dw/doku.php?id=k18:k18.6:start") ' → F12
[27] End ' mnu22Information_Click()
[28]
[29] Public Sub toolbtnOpen_Click()
[30]   OpenImage()
[31] End ' toolbtnOpen_Click()
[32]
[33] Public Sub toolbtnFTP_Click()
[34]   FTPStartStop()
[35] End ' toolbtnFTP_Click()
[36]
[37] Public Sub toolbtnConfiguration_Click()
[38]   ToolBar1.Configure()
[39] End ' toolbtnConfiguration_Click()
[40]
[41] Public Sub toolbtnClose_Click()
[42]   FMain.Close
[43] End ' toolbtnClose_Click()
[44]
[45] Public Sub Form_Close()
[46]   FHelp.Close
[47]   FMain.Close
[48] End ' Form_Close()
[49]
[50] '**************************************************************************
[51]
[52] Private Sub OpenImage()
[53]   Dialog.Title = "Import a picture file!"
[54] Dialog.Filter = ["*.png", "Picture Files"]
[55]
[56]   If Dialog.OpenFile(False) = True Then ' Multiselect=False (Standard)
[57]      Message.Info("The opening of the image file was cancelled!")
[58] Return ' Cancel button pressed
[59]   Else
[60]      Try PictureBox1.Picture = Picture.Load(Dialog.Path)
[61]      If Error Then
[62]         Message.Error("Error when opening the image file")
[63]      Else
[64]         Label1.Alignment = Align.Left
[65]         Label1.Text = " File: " & File.Name(Dialog.Path)
[66]      Endif ' ERROR ?
[67]   Endif ' Dialog.OpenFile(...) = TRUE ?
[68] End ' OpenImage()
[69]
[70] Private Sub FTPStartStop()
[71]   If toolbtnFTP.Value = True Then
[72]      toolbtnFTP.Picture = Picture["icon:/16/disconnect"]
[73]      toolbtnFTP.Tooltip = "Launch FTP-Server"
[74]    ' FTP-Server ---> Execute start command
[75]   Else
[76]      toolbtnFTP.Picture = Picture["icon:/16/connect"]
[77]      toolbtnFTP.Tooltip = "Stop FTP-Server"
[78]    ' FTP-Server ---> Execute stop command
[79]   Endif ' toolbtnFTP.Value = True ?
[80] End ' FTPStartStop()
[81]
[82] Public Sub ToolBar1_Configure()
[83]   FMain.Background = Color.Red
[84]   Wait 0.05
[85]   FMain.Background = Color.ButtonBackground
[86] End ' ToolBar1_Configure()
Comments:
- In line 10, the alignment of the ToolBar is set to 'horizontal' and the contour ToolBar.Horizontal is used for this.
- The statement in line 11 specifies that no thin line is displayed below the ToolBar. Instead, a horizontal separator is used because it is displayed across the full width of the ToolBar.
- The ToolButton toolbtnFTP is defined as a switch in line 12 and the switch state is set to 'not snapped' in line 13 . Lines 71 to 81 demonstrate the switch.
- Lines 38 to 40 declare a procedure that starts the configuration dialogue for the ToolBar.
- The change of the configuration of the ToolBar is signalled in lines 83 to 87 by a short colour change of the programme window.
12.3.2.7 Configuration of the ToolBar
You start the configuration dialogue for configuring the ToolBar either via the 4th ToolButton (call the procedure ToolButton.Configure() ) or via the context menu of the ToolBar:
Public Sub toolbtnConfiguration_Click()
  ToolBar1.Configure()
End ' toolbtnConfiguration_Click()
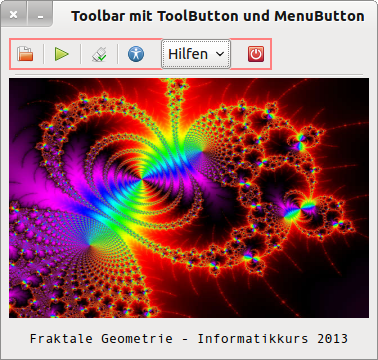
In the context menu there are 3 entries - Set up, Icon size (3 possibilities: small, medium, large) and Cancel. The ToolBar1_Configure() event is triggered via the context menu!

Figure 12.3.2.7.1: Context menu of the ToolBar
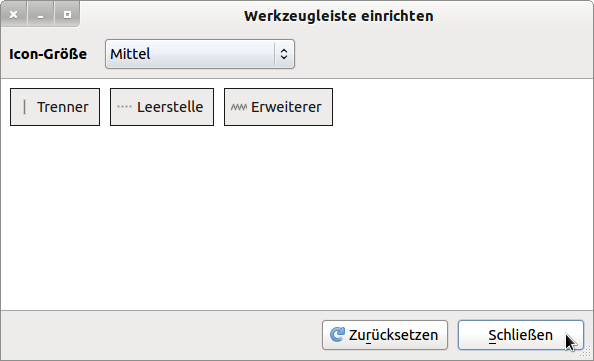
Both variants open a dialogue for the configuration of a ToolBar. When the configuration dialogue has been opened, the ToolBar is in configuration mode. In this mode the ToolBar is deactivated. You can
- arrange the current contents of the ToolBar freely in the ToolBar by dragging and dropping,
- remove a ToolButton or MenuButton from the ToolBar and place it on the configuration dialogue area (park it),
- insert an element from the configuration dialogue area (separator, space or extended space; optionally, for example, a 'parked' ToolButton) into the ToolBar or move it from there to the configuration dialogue area and place it there, as well as
- change the icon size to the button in the ToolBar (ComboBox).


Figure 12.3.2.7.2: Deactivated ToolBar and Configuration Dialogue
After the changes, exit the configuration dialogue via the 'Close' button. The toolbar changes configuration mode and is usable again.After changing the geometry of the ToolBar configuration dialogue window, you will find the following entry in the configuration file ~/.config/gambas3/ToolBar.conf:
[gb.form.mdi/FToolbarConfig]
Geometry=[1042,337,592,329,0]
or after configuring the ToolBar with these settings, an extended entry:
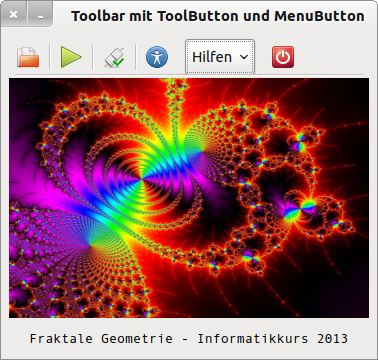
- Icon size remains at 'Small' (The default value 'Small' is not entered).
- Insert separators between individual ToolButtons.
- Inserting spaces before and after the MenuButton
[gb.form.mdi/FToolbarConfig]
Geometry=[1042,337,592,329,0]

[gb.form.mdi/Toolbars/Emma]
Layout=["A1","|","A2","|","A3","|","A4","-","$mnubtnHelp","-","A5"]

Figure 12.3.2.7.3: Configured ToolBar
A “Reset” in the dialogue means that the ToolBar properties, except for the icon size, are reset to the start settings after a confirmation prompt → Figure 12.3.2.5.1.


