Sidebar
k12:k12.2:k12.2.7:start
Table of Contents
12.2.7 Form - Form in Form
The question “Is it possible to embed a form in another form (FormInForm), the selection of which can be changed at will?” can generally be answered YES, although the detailed answers vary:
- Practically easy-to-use approaches of 'forms in another form' (FormInForm) work via so-called 'multidocument interfaces' such as the control elements TabStrip (gb.qt4) → chapter 12.6 and TabPanel (gb.form) → chapter 12.7 as well as Workspace (gb.form.mdi) → chapter 12.3.1 and are described in detail in the given chapters.
- In 'Tip of the day number 14' in the Gambas IDE you will find this answer: You can embed any form into other forms with Gambas! To do something this powerful, simply create an instance of the form, specifying the container for the form as the last argument to the constructor. … Attention: An embedded form is still its own event observer and thus receives its events itself! This tip is supplemented by an example with suitably chosen source code:

- Yes - you can create a form and insert it into any container in another form (and possibly remove it again) - this is the most flexible solution.
- Yes - You can realise your own control elements by inserting forms into forms. A control can be understood as a class that can be integrated into a GUI.
In this chapter, you will be presented with projects in which answers 2 and 3 are implemented in practice. The development of your own control elements is described in → Chapter 12.2.8. The corresponding projects are also presented.
12.2.7.1 Project 1
In all projects presented, including those in chapter 12.2.8, the following procedure is implemented:
- First, create at least one additional form - for example FEmbed - next to the (main) form of the project that you want to insert into the main form.
- Then design the FEmbed form with Gambas controls with the intended functionality described in the FEmbed.class. If necessary, you can also add a regular menu or a context menu to the FEmbed form.
- Finally, insert the FEmbed form into a suitable container in the (main) form.
In order to focus attention on inserting a form into a (main) form, the functionality of the (main) form is spartan. It is limited to making the background colour of the inserted form visible via a SwitchButton and a button with which the (main) form can be closed. The inserted form displays either a text in a TextArea or a picture in a PictureBox. Switching is done with the 'Switch View' button on the inserted form. An inserted form has no title bar with the window title and the usual buttons because it is not a top-level window. Therefore, the inserted form has a menu to show here that the inserted form is its own event observer and therefore you can manage its events - such as _Close() - in the source code of the class itself.
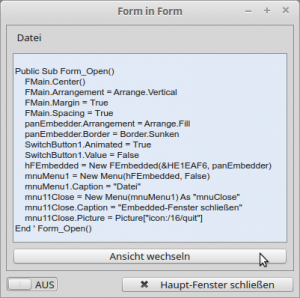

Figure 12.2.7.1.1: Main window with inserted window in action.
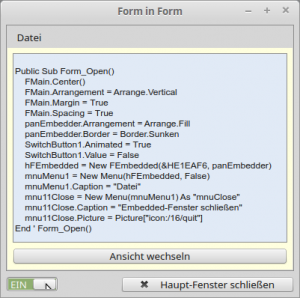
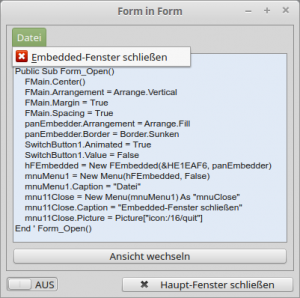
Figure 12.2.7.1.2: Main window with selected window (left)

Figure 12.2.7.1.3: Main window with outlined but empty container (panel).
In connection with the development of projects where forms are inserted into a (main) form, this experience could be gained:
- Plan these kinds of projects primarily from the point of view of what the form to be inserted should do in the project.
- Develop and test the form to be inserted in an independent project beforehand.
- Make sure that you replace the identifier for the form with 'Me' later in the class of the form to be inserted!
- If you use the _new method (constructor) in these test projects, you should first comment it out. This prevention is advantageous, however, if you want to give the window to be inserted necessary start values. For this purpose, you can simply overwrite the original constructor in the class and declare further parameters there.
- Note exactly which controls of the forms are to be accessed reciprocally. For these selected controls, you must set the public property permanently or temporarily to the value 'True'.
- Include a concept for data exchange between the form to be inserted and the (main) form in your considerations, if this becomes necessary.
From the source code of the class for the inserted form FEmbedded, only this excerpt is interesting for the constructor:
Public Sub _new(iColor As Integer)
  TextArea1.Background = iColor
End ' _new(...)
This is how the form FEmbedded is inserted into the form FMain:
Private hFEmbedded As FEmbedded

Public Sub Form_Open()
  FMain.Center()
' Weitere Initialisierungen ...
  SwitchButton1.Value = False
  hFEmbedded = New FEmbedded(&HE1EAF6, panEmbedder)
End ' Form_Open()
Comment:
- You can write a constructor to a form class - as to any other class - in the _new(..) method that defines additional form parameters (mandatory or optional). In the case of a form for changing the password of a user account, for example, it could be the name of the current user, which was already known to the main programme beforehand.
- The example shows that constructor parameters are inherited. The class FEmbedded inherits from Form and Form in turn inherits from Window. Window has the parent container as an optional constructor parameter, Form has no further constructor parameters.
- If a new parameter is added to the FEmbedded class in the constructor, the new constructor parameter is added to the end of the argument list since Gambas 3.
- Attention:Optional parameters are always written at the end of the argument list. Since the parameter iColor in the signature of the constructor is a mandatory parameter and the parameter Parent-Container is an optional parameter, this optional parameter is now pushed to the end of the argument list. This can also be seen in the following line in the source code excerpt above:
hFEmbedded = New FEmbedded(&HE1EAF6, panEmbedder)
First the argument for the colour is noted (obligatory parameter) and only then the argument for the parent container (optional parameter).Note that you do not have to open the FEmbedded window! It will open automatically when it is inserted into the container (panel) on the (main) form FMain.
12.2.7.2 Project 2
In the second project you will learn how to insert two different forms into a (main) form and also how to remove them from their container on the (main) form.
- First, three top-level windows are created and displayed grouped one after the other. Then you can insert the two windows Form1 and Form2 into a (here common) container. You can place the two inserted windows - independently of each other - back on the desktop as top-level windows. The order of insertion or removal is freely selectable. As a special feature: When the main window is closed, the two windows Form1 and Form2 are closed automatically. You set this behaviour via the property Application.MainWindow = FMain.
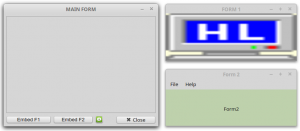
Figure 12.2.7.2.1: Three top-level windows
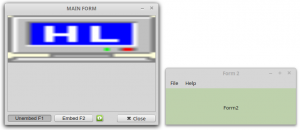
Figure 12.2.7.2.2: (Main) window with window 1 inserted.
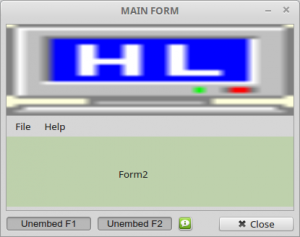
Figure 12.2.7.2.3: (Main) window with window 1 and 2 inserted.

Figure 12.2.7.2.4: (Main) window with the two windows 1 and 2 removed.
For a test in the project trial, you can display the number of top-level windows, their titles and window heights, and the names of the control elements on the (main) form:
FMain
Number of open windows = 3

1. Window: Caption      = MAIN FORM
1. Window: Window height = 301
------------------------------------------
2. Window: Caption      = FORM 1
2. Window: Window height = 126
------------------------------------------
3. Window: Caption      = Form 2
3. Window: Window height = 126
------------------------------------------
panContainer
HBox1
The insertion of the two windows in project 2 is done by one of the two procedures in the event handler Form_Open() of FMain, respectively:
Public Sub Form_Open()
' When this window is closed, all project windows are closed automatically
  Application.MainWindow = FMain
  ...
' Insert Form1 and Form2 in FMain - Set Button Texts
  btnEMUNForm1_Click()
  btnEMUNForm2_Click()
End

Public Sub btnEMUNForm1_Click()
  If btnEMUNForm1.Value Then
     Form1.Reparent(panContainer, 0, 0) ' Insert
     btnEMUNForm1.Text = ("Unembed F1")
  Else
     Form1.Reparent(Null) ' Remove
     btnEMUNForm1.Text = ("Embed F1")
  Endif
End

Public Sub btnEMUNForm2_Click()
  If btnEMUNForm2.Value Then
     Form2.Reparent(panContainer, 0, 0) ' Insert
     btnEMUNForm2.Text = ("Unembed F2")
  Else
     Form2.Reparent(Null) ' Remove
     btnEMUNForm2.Text = ("Embed F2")
  Endif
End
Download
k12/k12.2/k12.2.7/start.txt · Last modified: 01.02.2022 (external edit)
Page Tools
Except where otherwise noted, content on this wiki is licensed under the following license: CC Attribution-Noncommercial 3.0 Unported
