Sidebar
k12:k12.2:start
Table of Contents
12.2.0 Form - Class Window and Class Form
This chapter is about descriptions of the Window and Form classes and the special features of forms.
12.2.0.1 Class Window and Class Form
The class Form inherits from the class Window. The wiki http://gambaswiki.org/wiki/comp/gb.qt4/form lists a few more special properties of Form over Window. One is worth noting: the class Form is aligned with the Gambas IDE and a form in the Gambas IDE always describes a class that inherits from the class Form. Therefore, even in a .class file for a form, you must not use the Inherits keyword. A form implicitly already inherits from the Form class and Gambas does not support the simultaneous inheritance of multiple classes. So each form becomes a special form class. From this class you get a so-called automatic instance - Classes[Form].Instance - free of charge, which is an object of this class that you address via the class name. You will certainly have noticed this more or less consciously: You have a form 'FMain' and a real application window as an instance of your form class, which appears automatically and which you can address via the name 'FMain'.
You largely write the source code of a form class yourself and it is in the .class file belonging to the form after saving. However, the Gambas compiler generates a hidden, special routine called '$load'. This is called internally when a form object is instantiated and ensures that all the controls you place in the IDE form editor are created. You can convince yourself of this by opening a project folder in which a (simple) graphic project with at least one form exists. Then execute the following command in the system console:
~/PROJEKT-ORDNER/ $ gbc3 -av
The switch 'v' causes the compiler to output the byte code of the compilation in a human-readable way. Scroll through this output and you will find, among other things, the $load function. You can see that the function creates all the controls on the form and provides each with the specified properties:
Private Sub {$load}()
  With Me
    .MoveScaled(0,0,48,19)

  {SpinBox1} = New SpinBox(Me) As "SpinBox1"
  With {SpinBox1}
    .MoveScaled(2,2,32,4)
    .Value = 50
  End With

  {SpinBar1} = New SpinBar(Me) As "SpinBar1"
  With {SpinBar1}
    .MoveScaled(2,7,32,4)
    .Value = 0.7
    .Step = 0.2
  End With

  {btnChange} = New Button(Me) As "btnChange"
  With {btnChange}
    .MoveScaled(2,13,32,4)
    .Text = ("Change Enable Property ') & '...'
  End With

  {Label1} = New Label(Me) As "Label1"
  With {Label1}
    .MoveScaled(36,2,10,4)
    .Text = ("SpinBox")
  End With

  {Label2} = New Label(Me) As "Label2"
  With {Label2}
    .MoveScaled(36,7,10,4)
    .Text = ("SpinBar")
  End With
  End With
End

Figure 12.2.0.1.1: Application window
The Form class is specifically intended to work in the Gambas IDE and its purpose is, among other things, to be able to easily write graphical applications (GUI) in the IDE.
12.2.0.2 Form and Window
As already formulated in the first part, there is a Form class and a Window class, where Form is derived from Window and thus Form is a special Window. In a narrower sense, one speaks of a form if it was created with the form editor in the IDE. The Form class is therefore a Window class designed to work with the Gambas IDE. Technically, the only difference between Window and Form is that a Form object is its own event server as soon as it is created. So you are used to opening the source code to a form in the IDE and for example:
Public Sub Form_Open()
' ...
End
to implement. But this is not a matter of course. This is only possible because form objects automatically execute the following code when they are created:
Object.Attach(Me, Me, "Form")
In addition, the Form object ensures - if it is the start class of a project - that the application window is displayed. The source code of the Form class is written in C++, but formally translated into Gambas it would be something like:
' Main is automatically executed by the interpreter in the start class when the project is started.
Public Sub Main()
  Me.Show()
End
Forms are interesting in another respect, however, namely with regard to the form editor in the IDE and the Gambas compiler. The form editor stores .form files in the project folder. When the compiler compiles a form, it reads these .form files and automatically creates Gambas code from them, which is entered into a hidden method called '$load'. This code creates and positions all the controls as you had specified in the form editor. Form is thus a Gambas-tailored class, designed only to create convenience in the IDE. You can also think of a form at development time in the IDE as a Form class that has become an image, which you see at runtime as an application window on the desktop. You can also think of an application window belonging to a project as a frontend for managing the contents of the graphical user interface (GUI).
At http://gambaswiki.org/wiki/doc/window you will find some remarks on the CV of an application window in Gambas.
12.2.0.3 Create instances of a Form class
This two-liner creates a new Form object, works as with any other class, and displays it as an application window or as an embedded window in a container control if the optional parameter is set:
Dim hForm As Form
hForm = New Form ( [ Parent As Control ] ) As "EventName"
However, events are only triggered if an event name has also been assigned.
Example:
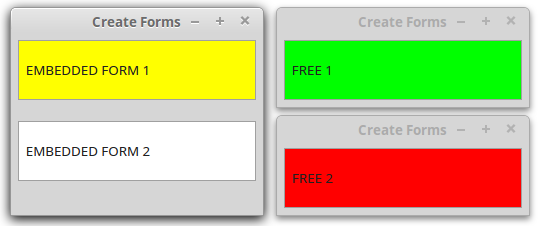
Figure 12.2.0.3.1: Two embedded and 3 desktop windows
Quell-Text FMain.class:

' Gambas class file

Public Sub Form_Open()

  Dim hColorLabel As FColorLabel

  Application.MainWindow = FMain

  FMain.Arrangement = Arrange.Vertical
  FMain.Margin = True
  FMain.Spacing = True
  FMain.Show()

  hColorLabel = New FColorLabel('  EMBEDDED FORM 1", FMain, Color.Yellow)
  hColorLabel = New FColorLabel('  EMBEDDED FORM 2", FMain, Color.White)
' ----------------------------------------------------------------------------
  hColorLabel = New FColorLabel('  FREE 1", Zero, Color.Green)
  hColorLabel.Show()
  hColorLabel.Move(FMain.X + FMain.W + 14, FMain.Y)
' ----------------------------------------------------------------------------
  hColorLabel = New FColorLabel('  FREE 2", Zero, Color.Red)
  hColorLabel.Raise()
  hColorLabel.Move(FMain.X + FMain.W + 14, FMain.Y + FMain.H - hColorLabel.H)

End
Source text FColorLabel:
Public Sub _new(Text As String, Optional iColor As Integer)
  If Text Then
     lblMe.Text = Text
  Else
     Error.Raise("Text is missing!")
  Endif

  lblMe.Border = Border.Solid
  Me.Margin = True

  If Not IsMissing(iColor) Then lblMe.Background = iColor
End
12.2.0.4 Accessing instances of the same form class - FMAIN and ME
The use of ME as a reference to the current shape object is necessary whenever at least two instances of the same shape class exist. If you want to call a method or access a property or variable of a Form instance, as shown in the following example:
Public Sub _new()
  FSpecial.Center()
End
Public Sub _new()
  ME.Center()
End
then you must note the following: The centre() method centres the application window on the desktop in both cases. However, there is a subtle difference between FSpecial and ME. The source code above uses FSpecial, which is the so-called “automatic instance” of the form. ME in the source text below always refers to the current form object! You can create several instances of FSpecial as objects from the class FSpecial. In the upper source text, only the first window is centred when an instance of FSpecial is created. In the lower source text, on the other hand, each new instance of FSpecial is centred. ME returns a reference to the current shape object, which always represents the object whose code is currently being executed by the interpreter. ME is special in that the Gambas interpreter is constantly changing the value in the background because the value may represent something different in a different execution context.
12.2.0.5 Window Activation & Deactivation
To become the active window, that is the window returned by the 'Application.ActiveWindow' property, it must either be a TopLevel window or you must implement the Form_Activate() event handler if it is an embedded window. The following applies: If a control receives the focus, then its window becomes the active window, provided that this window can become the current active window, as explained above. If the window cannot become the current active window, then an attempt is made to see if it can be the parent window of that window and so on until a top level window is reached. Activating a window sends a Deactivate event to the old active window and an Activate event to the new one. If the application window is displayed as an icon, the current active window is deactivated.
12.2.0.6 Data Exchange
Forms are 'create static' classes. If you use the class name like an object, an object of the class is created in the background and made publicly available under the class name. This object is called the 'automatic instance' of the class. Therefore, from a Form2 window, you can change properties of this automatic instance if Form2 has a reference to Form1 and Form2.class contains, for example, the following source text:
Public Sub Form2Button1_Click()
  Form1.Background = Color.Black
End
You cannot access control elements of FMain from Form2 (or vice versa), as the access right 'private' applies to these control elements by default.
Example:
If bChanged Then
   FMain.lblTemperaturAnzeige.Text = Format(Form2.fCurTemperature, '##.0 °C")
Endif
triggers an error for this reason - even if the control element lblTemperaturAnzeige exists on the form 'FMain':

Figure 12.2.0.6.1: Error message
Access rights for control elements are also pointed out in the Gambas documentation: “Form controls in Gambas programs are private by default. You can change this by going into the Project Properties dialog and checking the Make form controls public checkbox.' and at the same time mentions the possibility to get a general change of behaviour in the project properties.
Also in the form editor of the IDE you can set the public property to True for used controls. As long as there is no compelling reason to change the public property from False to True, you should give preference to the complete encapsulation of the state and behaviour of objects.
Chapter 12.2.9 describes concepts for data transfer between application windows and presents suitable projects that implement the concepts.
12.2.0.7 Start class
Every Gambas project needs a start class. This must define a common (static) method 'Main()' with no arguments that acts as the starting point for the application.
Case 1 - GUI:
You can define the start class by right-clicking on the form name in the project window in the IDE and then selecting 'Start Class' from the pop-up menu. You can recognise the start form in the project overview in the IDE because it has moved out to the right and a small grey triangle has been inserted in front of the form symbol. Since the start class is a form, it does not need to have a Main method, as a form already has a ready-made Main method: the form is instantiated and displayed. In Gambas, a form is its own event observer, so you can manage its events - such as Resize or Activate - in the source text of the class itself.
Case 2 - Gambas script:
For a Gambas script that does not require an application window, you must mandatorily implement the Main() method in the source text:
#!/usr/bin/gbs3

Use "gb.gsl"

Public Sub Main()
 Dim Matrix1, Matrix2 As Matrix
  Matrix1 = [[2, 0], [0, 2]]
  Matrix2 = [[0, 1], [2, 0]]
  Print Matrix1 * Matrix2
End
Calling mmult.gbs - under this name the source text was saved - with the above content returns the product of the two matrices in the system console:
hans@linux ~/Test $ gbs3 ./mmult.gbs3
[[0 2][4 0]]
12.2.0.8 Method Form.Load()
The method Form.Load() ensures that the automatic instance of the respective form class exists - otherwise 'FMain.Load()' would create the main window. In 99% of cases, however, this automatic instance already exists (in the IDE). It is created as soon as FMain is used like an object. In particular, this happens exactly when FMain is the start class of a project. As soon as the main window is created, the automatic instance exists and FMain.Load() would have no effect.
12.2.0.9 Form.TopLevel
A TopLevel window is a window on the desktop. When you create a form, after all, it's just a class. You can create a desktop window from it - as you normally do. In contrast, you create an embedded window as a “fake” window as an object of a form class in an existing container. You then get a control element like any other - the window is then no longer top-level.
Source code:
  Dim hTopLevelWindow, hEmbeddedWindow As Window

' Creates a top-level window from the FMain class
  hTopLevelWindow = New FMain

' Creates a non-top-level window in a container (here -> hTopLevelWindow)
  hEmbeddedWindow = New FMain(hTopLevelWindow)
12.2.0.10 Form.TopOnly
The following source code will alternatively set the property 'TopOnly' for the existing window 'FMain'. In the example, a menu entry is used to set the 'TopOnly' property in two variants. However, you could also use a toggle button in the GUI.
PUBLIC SUB mnuOnTop_Click()
  IF mnuOnTop.Value THEN
     FMain.TopOnly = TRUE
  ELSE
     FMain.TopOnly = FALSE
  ENDIF
END

PUBLIC SUB mnuOnTop_Click()
  FMain.TopOnly = NOT FMain.TopOnly ' Variant 2
END
12.2.0.11 Form.Stacking
Imagine the screen with three layers of windows on top of each other. Windows in the top layer always cover those in the bottom two layers. In between are the normal windows. The Stacking property determines to which of the three layers the window should belong. The default layer is Form.Normal. Note that the Form class is a special Window class and therefore inherits the Window.Stacking property. In the documentation for Form you will therefore also find:
Window.Stacking (gb.qt4)
Property Stacking As Integer
With this property you determine the layer or set the (desktop) layer of the window. Windows on the desktop can belong to one of three layers. The Form.Stacking property can have one of the following values or be set to this value:
- Window.Above: The window remains above all other windows. This group is used by desktop applets that should remain permanently visible on the desktop.
- Window.Below: The window remains below all other windows.
- Window.Normal: The window remains on the desktop with all other windows. This is the default layer.
12.2.0.12 Form.Scaled
The authors of the Gambas book used the same Gambas version for a while, but under different Linux systems (Ubuntu 12.04 LTS and Mint 17). Since the developed projects are always carefully tested, there were always hints about the faulty geometry of the programme windows. It was noticeable that the programme windows and the size of all control elements under Mint 17 were always smaller than the window images in the project description under Ubuntu 12.04 LTS. The reduction factor was sufficiently constant. The solution is to set the property Form.Scaled to False to prevent the size of the form and the control elements from depending on the size of the default font. Attention: This boolean property is virtual! It therefore only exists and can be changed in the IDE and no longer exists at runtime. Another possibility is to adjust the size of the form and the control elements in the IDE manually or at runtime to the intended values.
12.2.0.13 Gambas and the bindings to QT4/QT5 and GTK+2/3 as a GUI toolkit
You need to know that Gambas supports both GTK+2/3 and QT4/QT5 with the gb.gtk, gb.gtk3 and gb.qt4/5 components. There is another component, gb.gui, which loads one of the first three components depending on the existing desktop. This occasionally causes problems because although the interfaces of the components are compatible, the behaviour of GTK+ and QT4 differs internally in some parts. You should therefore refrain from using gb.gui and decide for one of the two options when creating a new project (GUI): “QT graphical application” or “GTK+ graphical application”.
Download
k12/k12.2/start.txt · Last modified: 01.02.2022 (external edit)
Page Tools
Except where otherwise noted, content on this wiki is licensed under the following license: CC Attribution-Noncommercial 3.0 Unported
