Sidebar
k12:k12.2:k12.2.9:start
Table of Contents
12.2.9 Data exchange between application windows
At the latest when you start another window F1 from a (main) window FMain, the question might have to be answered according to which concept the data transfer between the two application windows should take place. The following considerations will certainly enter into the concept:
- Are start values to be given to window F1 via the constructor?
- Is the data exchange between FMain and F1 bidirectional or unidirectional?
- Does the data exchange between FMain and F1 take place once or several times, clocked or by evaluating events?
In the following sections, you will find chapters in which the data transfer for the above considerations has already been described.
12.2.9.1 Start values F1
You can give start values to the window F1 with an appropriately designed constructor via mandatory and optional parameters in the _new method → Chapter 12.2.7.1 Project 1. Another possibility is offered by self-developed dialogues → Chapter 24.3.4 Account.Manager.
12.2.9.2 Unidirectional or bidirectional data exchange
- Self-developed dialogue windows → Chapter 12.2.4 Dialogue windows
- Persistent windows → Chapter 12.2.6 Form - Persistence (project).
You can also consider moving data from control elements to FMain and F1 via the Drag&Drop methods as a data transfer.
12.2.9.3 Data Exchange - Project 1
In a real, tested project, the temperature is recorded via a temperature sensor on a circuit board via an RS232 interface in an application window FSensor. From a main window FMain, the temperature reading is accessed on FSensor and the temperature is displayed in FMain:
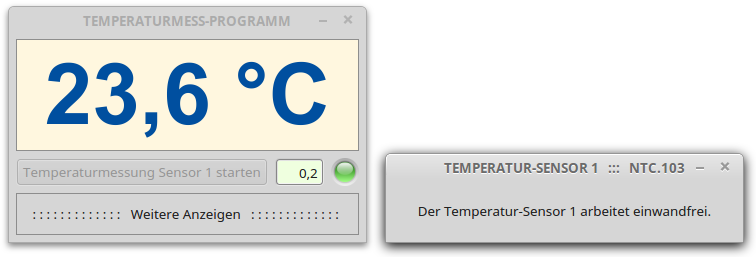
Figure 12.2.9.3.1: Temperature display on FMain - next to it FSensor
So that you can follow the project, the temperature values are generated by a random generator in a certain temperature range. This eliminates the need for a real board and the class SerialPort (gb.net).
If you want to access properties and methods of control elements on FMain and FSensor alternately, you must set the property Public of the respective control elements to True at development time, in addition to the declaration of project-wide variables. This is not possible at runtime because the Public property is virtual. As already noted in → Chapter 12.2.0 'Form - Window class and Form class', the following applies: As long as there is no compelling reason to change the Public property from False to True, you should give preference to the complete encapsulation of the state and behaviour of objects.
On the other hand, the bidirectional data exchange between FMain and FSensor via the public control elements and variables is very simple. The source code for the classes FMain and FSensor in projects 1 and 2 is sufficiently short and is therefore given in full.FMain.class
' Gambas class file

Public Sub Form_Open()
  Application.MainWindow = FMain
  FMain.Center()
  FMain.Resizable = False
  piboxOn.Picture = Picture["LED/led_yellow.svg"]
  ValueBox1.Value = 0.2
  btnStartSensor1.Text = "Start temperature measurement sensor 1".
 End

Public Sub btnStartSensor1_Click()
  piboxOn.Picture = Picture["LED/led_green.svg"]
  FSensor.fTIBegin = 22.9
  FSensor.fTIEnd = 24
  FSensor.fTITrigger = ValueBox1.Value
  FSensor.Show()
  FSensor.X = FMain.X + FMain.W + 20
  FSensor.Y = FMain.Y + FMain.H - FSensor.H
  btnStartSensor1.Enabled = False
End

Public Sub ValueBox1_Change()
  If ValueBox1.Value >= 0 And If ValueBox1.Value <= 0.9 Then FSensor.fTITrigger = ValueBox1.Value
End

Public Sub Form_Close()
  FMain.Close()
End
</close>

FSensor.class

<code gambas>
' Gambas class file

Public fCurTemperature As Float
Public fTIBegin As Float
Public fTIEnd As Float
Public fTITrigger As Float

Private fSavedTemperature As Float

Public Sub Form_Open()
  FSensor.Center()
  FSensor.Resizable = False
  TimerSimulation.Trigger()
End

Public Sub TimerSimulation_Timer()

  Dim bChanged As Boolean

  Randomize
  fCurTemperature = Rnd(fTIBegin, fTIEnd)
  bChanged = Abs(fCurTemperature - fSavedTemperature) > fTITrigger
  fSavedTemperature = fCurTemperature
  If bChanged Then
     FMain.lblTemperaturAnzeige.Text = Format(FSensor.fCurTemperature, "##.0 °C")
  Endif
End

Public Sub Form_Close()
  FMain.piboxOn.Picture = Picture["LED/led_yellow.svg"] ' piboxOn.Public = True
  FMain.btnStartSensor1.Enabled = True                  ' btnStartSensor1.Public = True
  FMain.lblTemperaturAnzeige.Text = "--- °C"            ' lblTemperaturAnzeige.Public = True
  FMain.ValueBox1.Value = 0.2                           ' ValueBox1.Public = True
End
Comment:
- The display of the temperature changes only if the temperature difference is greater than the value of the variable fTITrigger.
- The class FSensor does not contain any reusable source code because of the tight binding to the class FMain, as it is clearly shown especially by the last lines in FSensor.class; the source code becomes difficult to read.
- For example, if the name of the class FMain changes, then various changes are necessary in both classes.
12.2.9.4 Data exchange - project 2
In the second project, data exchange between the application windows FMain and FSensor takes place only via public interfaces whose signatures are known. Each class thus completely encapsulates its data vis-à-vis the other class. This is also clear in the source code for the two classes FMain and FSensor: there are no public control elements and also no public variables!
FMain.class

' Gambas class file

Private fTITrigger As Float = 0.2
Public hSensor As FSensor

Public Sub Form_Open()
  Application.MainWindow = FMain
  FMain.Center()
  FMain.Resizable = False
  piboxOn.Picture = Picture["LED/led_yellow.svg"]
  ValueBox1.Value = fTITrigger
 End

 Public Sub btnStartSensor1_Click()
  CreateSensor1()
  piboxOn.Picture = Picture["LED/led_green.svg"]
  btnStartSensor1.Enabled = False
End

Public Sub Sensor1_Close()
  piboxOn.Picture = Picture["LED/led_yellow.svg"]
  btnStartSensor1.Enabled = True
  lblTemperature1.Text = "--- °C"
  ValueBox1.Value = fTITrigger
End

Public Sub Sensor1_Change()
  lblTemperature1.Text = Format(hSensor.Temperature, "##.0 °C")
End

Public Sub ValueBox1_Change()
  If hSensor Then
     If ValueBox1.Value >= 0 And If ValueBox1.Value <= 0.9 Then
        hSensor.TriggerValue = ValueBox1.Value
     Endif
  Endif
End

Public Sub CreateSensor1()

  Dim hObserver As Observer
  Dim aRanges As Float[] = [19.9, 21]

  hSensor = New FSensor(aRanges[0], aRanges[1])
  hSensor.Caption = "TEMPERATUR-SENSOR 1"
  hSensor.TriggerValue = fTITrigger
  hSensor.Show()
  hSensor.X = FMain.X + FMain.W + 20
  hSensor.Y = FMain.Y + FMain.H - hSensor.H
  hObserver = New Observer(hSensor) As "Sensor1"
End

Public Sub Form_Close()
  FMain.Close()
End
FSensor.class
' Gambas class file

Private fSavedTemperature As Float = 0.0
Private $fIBegin As Float
Private $fIEnd As Float
'--------------------------------------------------------------------
'' Property: Temperature, Access right: public, Modus: read-only
Property Read Temperature As Float
'' Property: TriggerValue, access right: public
Property TriggerValue As Float
'---------------------------------------------------------------------
Private $fTemperature As Float     ' Local variable ➘ Cut point
Private $fTriggerValue As Float    ' Local variable ➘ Cut point
'---------------------------------------------------------------------
'' Event: Change
Event Change
'---------------------------------------------------------------------

Public Sub _new(IBegin As Float, IEnd As Float)
  If Not TypeOf(IBegin) = gb.Float Then Error.Raise("Type error: Start value of temperature interval.")
  If Not TypeOf(IEnd) = gb.Float Then Error.Raise("Type error: end value of temperature interval.")
  If IBegin >= IEnd Then Error.Raise("The start value is greater than or equal to the end value of the interval..")
  $fIBegin = IBegin
  $fIEnd = IEnd
End

Public Sub Form_Open()
  Me.Center()
  Me.Resizable = False
  TimerSimulation.Delay = 1000
  TimerSimulation.Start()
  TimerSimulation.Trigger()
End ' Form_Open()

Public Sub TimerSimulation_Timer()

  Dim bChanged As Boolean

  Randomize
  $fTemperature = Rnd($fIBegin, $fIEnd)
  bChanged = Abs($fTemperature - fSavedTemperature) > $fTriggerValue
  fSavedTemperature = $fTemperature

  If bChanged Then Raise Change

End

' Additional service or interface (public method): Temperature_read
Private Function Temperature_Read() As Float
  Return $fTemperature
End

' Additional service or interface (public method): Trigger_read
Private Function TriggerValue_Read() As Float
  Return $fTriggerValue
End

' Additional service or interface (public method): Trigger_Write
Private Sub TriggerValue_Write(Value As Float)
  If Value < 0 Or Value > 1 Then
     Error.Raise("The trigger value is not in the interval. [0|1]")
  Endif

  $fTriggerValue = Value

End
Comment:
- If you look at the interaction of FMain and FSensor you can see that FSensor produces data and through the 'Change' event only notifies FMain when new data is available. FMain reads the temperature value as a ReadOnly property of FSensor via a public interface with a known signature and prepares it to display it in the control element lblTemperature1. This is exemplary data encapsulation: no object knows more about the other than it absolutely has to and each takes care of its own tasks!
Public Sub TimerSimulation_Timer()
  Dim bChanged As Boolean

  Randomize
  $fTemperature = Rnd($fIBegin, $fIEnd)
  bChanged = Abs($fTemperature - fSavedTemperature) > $fTriggerValue
  fSavedTemperature = $fTemperature
  If bChanged Then Raise Change

End

Public Sub Sensor1_Change()
  lblTemperature1.Text = Format(hSensor.Temperature, "##.0 °C")
End
- Similarly, the 'Sensor1_Close()' event informs FMain that the FSensor application window has been closed. How the class FMain reacts to this event is specified in the source text of the class FMain alone!
Public Sub Sensor1_Close()
  piboxOn.Picture = Picture["LED/led_yellow.svg"]
  btnStartSensor1.Enabled = True
  lblTemperature1.Text = "--- °C"
  ValueBox1.Value = fTITrigger
End
- The property FSensor.TriggerValue can only be read and written via a public interface.
- The FSensor class has a constructor with two parameters, which in this project only define the temperature range in which the temperature values are randomly generated:
FSensor.class:
Public Sub _new(IBegin As Float, IEnd As Float)
  If Not TypeOf(IBegin) = gb.Float Then Error.Raise("Type error: Start value.")
  If Not TypeOf(IEnd) = gb.Float Then Error.Raise("Type error: End value of temperature interval.")
  If IBegin >= IEnd Then Error.Raise("The start value is greater than or equal to the end value.).")
  $fIBegin = IBegin
  $fIEnd = IEnd
End
FMain.class:
Public Sub CreateSensor1()
  Dim hObserver As Observer
  Dim aRanges As Float[] = [19.9, 21]

  hSensor = New FSensor(aRanges[0], aRanges[1])
  hSensor.Caption = "TEMPERATURE-SENSOR 1"
  hSensor.TriggerValue = fTITrigger
  hSensor.Show()
  hSensor.X = FMain.X + FMain.W + 20
  hSensor.Y = FMain.Y + FMain.H - hSensor.H
  hObserver = New Observer(hSensor) As "Sensor1"
End
The observer must be created because the FSensor class inherits from the Form class but does not have the extensions (2 properties and an event) of the class 'in view'.
In my opinion, the project offers several advantages over project 1:
- You can easily rename the controls on FMain or, more generally, completely change the implementation of the temperature representation without having to have in mind which classes rely on the current implementation details and then change them accordingly.
- The internal code of the FSensor class is easier to understand because it is self-contained.
- The state of an object of the class is more consistent if access from the outside is only regulated by the public interfaces. In other words, if less is visible to the outside, the interfaces are less likely to be misused.
The advantages sound convincing. The only thing is that you will soon realise that these advantages quickly melt away in larger projects, because encapsulating a class consistently and neatly can be very difficult and tedious in design. Occasionally the code even becomes too cumbersome. These are the only cases for the carefully considered use of public controls! Such a case does not exist for project 1, so preference should be given to project 2.
12.2.9.5 Data Exchange - Project 3
The 3rd project works with 3 sensor application windows. All three application windows are instances of the class FSensor, which is taken over from project 2. Therefore, only the source code of the class FMain is presented and commented:
[1] ' Gambas class file
[2]
[3] Private $iSensors As Integer = 1
[4] Private aSensors As New FSensor[]
[5] Private aTrigger As Float[] = [0.1, 0.3, 0.5]
[6]
[7] Public Sub Form_Open()
[8]   Application.MainWindow = FMain
[9]   FMain.Center
[10]   FMain.Resizable = False
[11]   piboxOn.Picture = Picture["LED/led_green.svg"]
[12]   CreateSensors()
[13]   ValueBox1.Value = aTrigger[0]
[14]   ValueBox2.Value = aTrigger[1]
[15]   ValueBox3.Value = aTrigger[2]
[16] End
[17]
[18] Private Sub CreateSensors()
[19]   Dim hSensor As FSensor, hObserver As Observer
[20]   Dim i As Integer
[21]   Dim aRanges As Float[][] = [[20, 21], [40.0, 42], [33, 35.8]]
[22]
[23]   For i = 1 To aRanges.Count
[24]     hSensor = New FSensor(aRanges[i - 1][0], aRanges[i - 1][1])
[25]     hSensor.Caption = "TEMPERATURE-SENSOR " & Str($iSensors)
[26]     hSensor.Tag = $iSensors ' The tag property stores the number of the sensor
[27]     hSensor.TriggerValue = aTrigger[i - 1]
[28]     hSensor.Show()
[29]     aSensors.Add(hSensor)
[30]     hObserver = New Observer(aSensors[i - 1]) As "Sensor"
[31]     hObserver.Tag = $iSensors ' The tag property stores the number of the observer
[32]     Inc $iSensors
[33]   Next
[34] End
[35]
[36] Public Sub Sensor_Change()
[37]   Select Case Last.Tag
[38]     Case 1
[39]       lblTemperature1.Text = Format(Last.Temperature, "##.0 °C")
[40]     Case 2
[41]       lblTemperature2.Text = Format(Last.Temperature, "##.0 °C")
[42]     Case 3
[43]       lblTemperature3.Text = Format(Last.Temperature, "##.0 °C")
[44]   End Select
[45] End
[46]
[47] Public Sub Sensor_Close()
[48]   Select Case Last.Tag
[49]     Case 1
[50]       lblTemperature1.Text = "--- °C"
[51]     Case 2
[52]       lblTemperature2.Text = "--- °C"
[53]     Case 3
[54]       lblTemperature3.Text = "--- °C"
[55]   End Select
[56] End
[57]
[58] Public Sub ValueBox1_Change()
[59]   aSensors[0].TriggerValue = ValueBox1.Value
[60] End
[61]
[62] Public Sub ValueBox2_Change()
[63]   aSensors[1].TriggerValue = ValueBox2.Value
[64] End
[65]
[66] Public Sub ValueBox3_Change()
[67]   aSensors[2].TriggerValue = ValueBox3.Value
[68] End
Comment:
- Line 8 has the advantage that when FMain is closed, all windows opened by FMain are also closed.
- The number of temperature ranges in line 21 determines the number of instances of the class FSensor.
- In line 24, a new instance of the class FSensor is created, which is passed 2 parameters.
- Note that all observers have the same event name 'Sensor“ under which events are triggered!
- Storing the number of the sensor and the observer in the tag property (line 26 and line 31) has the advantage of reacting compactly to the two events Sensor.Change() and Sensor.Close() in lines 36 to 45 and in lines 47 to 56. To do this, you only need to determine the reference to the object that triggered the last event. This can be done with the combination of Last.Tag and Last.Temperature, because Last returns a reference to the object that triggered the last event.
Note: An alternative is to replace line 30 with this source code:
hObserver = New Observer(aSensors[i - 1]) As "Sensor" & Str($iSensors)
Now you get three observers, each with its own event name, and for this reason you can evaluate the Change() event and the Close() event separately if you replace lines 36 to 56 with the following two source code sections:
Public Sub Sensor1_Change()
  lblTemperature1.Text = Format(aSensors[0].Temperature, "##.0 °C")
End

Public Sub Sensor2_Change()
  lblTemperature2.Text = Format(aSensors[1].Temperature, "##.0 °C")
End

Public Sub Sensor3_Change()
  lblTemperature3.Text = Format(aSensors[2].Temperature, "##.0 °C")
End
Public Sub Sensor1_Close()
  lblTemperature1.Text = "--- °C"
  ValueBox1.Enabled = False
End

Public Sub Sensor2_Close()
  lblTemperature2.Text = "--- °C"
  ValueBox2.Enabled = False
End

Public Sub Sensor3_Close()
  lblTemperature3.Text = "--- °C"
  ValueBox3.Enabled = False
End
Download
k12/k12.2/k12.2.9/start.txt · Last modified: 01.02.2022 (external edit)
Page Tools
Except where otherwise noted, content on this wiki is licensed under the following license: CC Attribution-Noncommercial 3.0 Unported
