Sidebar
Table of Contents
12.2.3 Shape - Transparent Windows
In the context of 'Transparent windows' and 'Windows with transparent background', this note from Minisini provides valuable information:
… OK, it was a bit difficult, but I succeeded: in revision #6308, you get a new Window.Transparent property. By setting it, you make your window (or form) transparent, and then you can use a RGBA background colour and/or a background picture with an alpha channel. Of course, that works only if you have a compositing window manager. Regards, Benoît Minisini
Compositing window managers are window managers that support special effects such as window transparency. The answer to the question of whether a compositing window manager is active is provided by this line in a console:
xprop -id $(xprop -root -notype | awk '$1=="_NET_SUPPORTING_WM_CHECK:"{print $5}') -notype \
-f _NET_WM_NAME 8t | grep _NET_WM_NAME | sed 's/.*"\(.*\)"/\1/'
and displays the window manager under Mint 17.3 LTS Chinnamon:
Mother (Muffin)
On Ubuntu 12.04, the following command (→ http://askubuntu.com/questions/72549/how-to-determine-which-window-manager-is-running) yielded:
hans@linux:~$ wmctrl -m
Name: Metacity  Class: N/A  PID: N/A
Window manager's "showing the desktop" mode: OFF
also gave a clear answer. The window manager is Metacity, but it was not activated. The remedy was to activate it with the help of the configuration editor 'gconf-editor' in the settings 'metacity' > general> compositing-manager = on → https://wiki.ubuntuusers.de/metacity#Effekte. For Mint 17.3, the programme 'wmctrl' (WindowsManagerControl) must be installed.
The following projects each create a fully transparent window or a window with a transparent background. A fully transparent window is a window with the properties Form.Transparent = True and Form.Border = False. This causes only the frameless transparent background to represent the active window. An alternative concept is needed to be able to move and close fully transparent windows. A window with a transparent background and visible title bar (title and buttons) is created when the properties Form.Transparent = True and Form.Border = True are set.
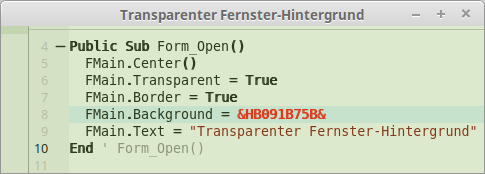
This source code should create a window with a transparent window background in the (background) colour light green:
Public Sub Form_Open()
  FMain.Center()
  FMain.Transparent = True
  FMain.Border = True
  FMain.Background = &H0091B75B&
End
Here is the result:
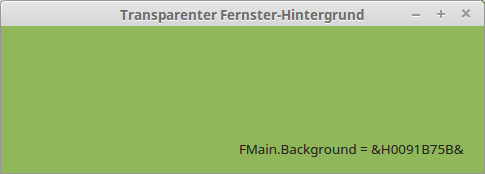
Figure 12.2.3.1: Alpha channel 00 (0dez)
Transparency looks different! As you can see, the RGBA colour value &H0091B75B& in the source code excerpt above has an alpha channel of 0, which in Gambas is to be interpreted as 'zero transparency' or 'completely opaque'.
Changes to the value for the alpha channel gave these results:
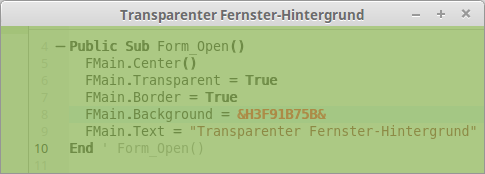
Figure 12.2.3.2: Alpha channel 3F (63dec).
12.2.3.0.1 Project 1
In the SimpleClock project, the current time text is displayed in a simple label on a fully transparent window background. The decision to show the window frame has only practical reasons, because this way the window can be moved and closed without any effort:

Figure 12.2.3.5: Window with fully transparent background
Then this source code is enough to display the current time on transparent window background:
' Gambas class file

Public Sub Form_Open()

  FMain.Transparent = True
  FMain.Border = True
  FMain.Resizable = False
  FMain.Margin = True
  FMain.Arrangement = Arrange.Fill
  FMain.Center()

  lblShowTime.Alignment = Align.Center
  lblShowTime.Font = Font["FreeMono, Bold, +16"]

  Timer1.Enabled = True
  Timer1.Delay = 1000
  Timer1.Trigger()

End ' Form_Open()

Public Sub Timer1_Timer()
  lblShowTime.Text = Format(Now, "hh:nn:ss")
End ' Timer1_Timer()
You can find the SimpleClock project together with the other projects in the download area.
12.2.3.0.2 Project 2
For the project 'TransparentClock_Digital' as a mini program for the desktop (widget, desklet or GadGets) this note is necessary: The effort to draw the time text with Paint methods is not necessary. Originally, the layout for this digital clock was to have a frame with rounded corners. Therefore, the decision was made for the drawn version with Paint methods.

Figure 12.2.3.6: Transparent window
More interesting than the questions:
- How do you move a fully transparent window on the desktop?
- How do you close a transparent window?
- How do you inform the user about these possibilities of interaction?
are the answers. The source code is given in full and then commented on:
[1] ' Gambas class file
[2]
[3] Private $fFontSize As Float
[4] Private $MX As Integer
[5] Private $MY As Integer
[6]
[7] Public Sub Form_Open()
[8]
[9]   $fFontSize = 64
[10]
[11]   FMain.Font = Font[$fFontSize]
[12]   FMain.Arrangement = Arrange.Fill
[13]   FMain.Margin = True
[14]   FMain.Padding = 21
[15]   FMain.Resize(FMain.Font.TextWidth("00:00:00") + 64, FMain.Font.Height + 16)
[16]   FMain.Resizable = False
[17]   FMain.Text = "Was - schon so spät ?"
[18]   FMain.Background = &HFFFFFFFF
[19]   FMain.Opacity = 100
[20]   FMain.Border = False
[21]   FMain.Transparent = True
[22]   FMain.Tooltip = "Move with pressed LMT\nClose via context menu (RMT)"
[23]   FMain.Center()
[24]
[25]   PictureBox1.Expand = True
[26]   PictureBox1.Alignment = Align.Center
[27]
[28]   Timer1.Trigger()
[29]
[30] End ' Form_Open()
[31]
[32] Public Sub Timer1_Timer()
[33]   PaintDigitalClock($fFontSize)
[34] End ' Timer1_Timer()
[35]
[36] Private Sub PaintDigitalClock(FontSize As Float)
[37]
[38]   Dim hPicture As Picture
[39]   Dim sText As String
[40]
[41]   sText = Str(Time)
[42]
[43] ' The picture has the transparent mask if the optional parameter 'Transparent' has the value True.
[44] ' LINK: https://sourceforge.net/p/gambas/mailman/message/32766778/
[45]   hPicture = New Picture(FMain.Width, FMain.Height, True)
[46]
[47]   Paint.Begin(hPicture)
[48]     Paint.Font.Size = FontSize
[49]     Paint.Font.Bold = True
[50]     Paint.Brush = Paint.Color(&H7F9FFF)
[51]     Paint.DrawText(sText, 0, 0, hPicture.W, hPicture.H, Align.Center)
[52]   Paint.End()
[53]
[54]   FMain.PictureBox1.Picture = hPicture
[55]
[56] End ' PaintDigitalClock()
[57]
[58] Public Sub PictureBox1_DblClick()
[59]   FMain.Close()
[60] End ' PictureBox1_DblClick()
[61]
[62] Public Sub PictureBox1_MouseDown()
[63]
[64]   Dim hPopUpMenu, hMenuItem As Menu
[65]
[66]   $MX = Mouse.ScreenX - Me.X
[67]   $MY = Mouse.ScreenY - Me.Y
[68]   FMain.Background = &H00E2E2E2
[69]
[70]   If Mouse.Right = True Then
[71]    ' Create a PictureBox context menu
[72]      hPopUpMenu = New Menu(Me) As "mnuPopUpMenu"
[73]      hMenuItem = New Menu(hPopUpMenu) As "mnuExit"
[74]      hMenuItem.Text = "Exit"
[75]      hMenuItem.Picture = Picture["icon:/16/quit"]
[76]      hPopUpMenu.Popup()
[77]   Endif
[78]
[79] End ' PictureBox1_MouseDown()
[80]
[81] Public Sub PictureBox1_Mouseup()
[82]   FMain.Background = &HEEFFFFFF
[83] End ' PictureBox1_Mouseup()
[84]
[85] Public Sub PictureBox1_MouseMove()
[86]   If Mouse.Left Then Me.Move(Mouse.ScreenX - $MX, Mouse.ScreenY - $MY)
[87] End ' PictureBox1_MouseMove()
[88]
[89] Public Sub mnuExit_Click()
[90]   Me.Close()
[91] End ' mnuExit_Click()
[92]
[93] ' Public Sub Form_MouseDown()
[94] '   $MX = Mouse.ScreenX - Me.X
[95] '   $MY = Mouse.ScreenY - Me.Y
[96] '   FMain.Background = &H00C3DDFF
[97] ' End
[98]
[99] ' Public Sub Form_MouseUp()
[100] '   FMain.Background = &HEEFFFFFF
[101] ' End
[102]
[103] ' Public Sub Form_MouseMove()
[104] '   If Mouse.Left Then Me.Move(Mouse.ScreenX - $MX, Mouse.ScreenY - $MY)
[105] ' End
Comment:
- In lines 20 and 21, a fully transparent programme window is declared.
- The tooltip in the following line informs the user how to move the window and how to exit it.
- In lines 81 to 87, the shifting of the fully transparent programme window is realised.
- During the shift, the window background is coloured light grey to temporarily indicate the window position.
- An alternative to the realised shift can be found from line 93.
- Closing the window is realised via a double click (lines 58 to 60) or via the context menu of the window-filling PictureBox in lines 62 to 77 and 89 to 91.

Figure 12.2.3.7: Marked transparent window with context menu
12.2.3.0.3 Project 3
The project TransparentClock_Analog by Claus Dietrich shows an analogue clock whose design you can change via a context menu. The menu also contains the menu item 'Close'.
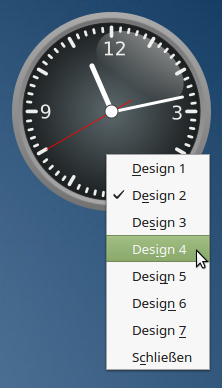
Figure 12.2.3.8: Analogue clock with context menu
You can move the fully transparent programme window freely on the desktop with the mouse:
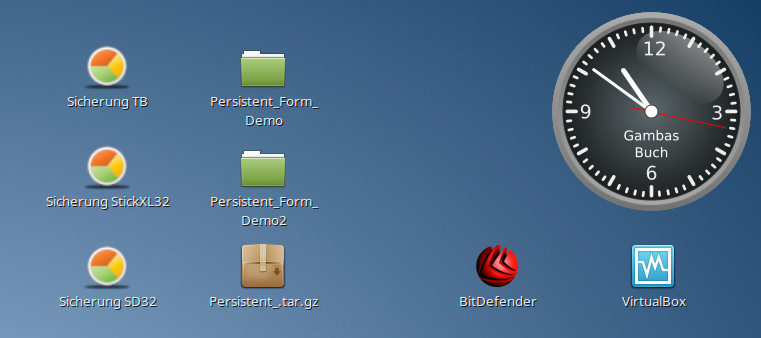
Figure 12.2.3.9: Analogue clock as desklet
The setting for the design used is saved in a settings file when the transparent programme window is closed and is available as a default value for the design when the programme is started again.
In the readme file for this desklet, you will find information on how to create a starter on the desktop for this programme as well as the information that the clock faces are modifications of free graphics whose sources are given.

