Sidebar
Table of Contents
20.3.2 Timer projects 2
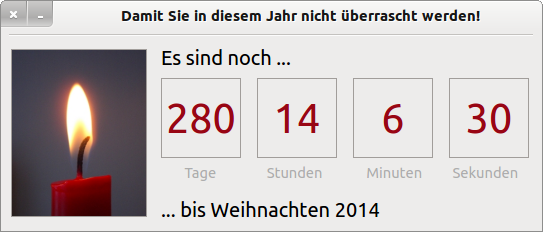
20.3.2.1 Example 5 - CountDown 1
Figure 20.3.2.1.1: Gifts together yet?
Source code:
Public Sub Form_Open()
  FMain.Center
  FMain.Resizable = False
  CountDown.Delay = 1000 '-- Auslese-Takt für die aktuelle Zeit (kleiner oder gleich 1000ms)!
  CountDown.Start
  CountDown.Trigger
  MovieBox1.Playing = True
  lblText2.Text &= " " & Format$(Now(), "yyyy")
End

Public Sub CountDown_Timer()
  Dim dCountDown As Date
  Dim dMonth, dWeek, dDay, dHour, dMinute, dSecond As Integer
  Dim iRestZeitInSekunden, iZeitInSekunden, iTage, iStunden, iMinuten, iSekunden As Integer

  dCountDown = Date(Year(Now()), 12, 24, 0, 0, 0, 0) ' Weihnachten; 24.12.

  If DateDiff(Now, dCountDown, gb.Second) > 0 Then
     iZeitInSekunden = DateDiff(Now, dCountDown, gb.Second)
     iTage = Int(iZeitInSekunden / (24 * 60 * 60))
     lblTage.Text = Str(iTage)
     iRestZeitInSekunden = iZeitInSekunden - iTage * 24 * 60 * 60
     iStunden = Int(iRestZeitInSekunden / (60 * 60))
     lblStunden.Text = Str(iStunden)
     iRestZeitInSekunden = iRestZeitInSekunden - (iStunden * 60 * 60)
     iMinuten = Int(iRestZeitInSekunden / 60)
     lblMinuten.Text = Str(iMinuten)
     iRestZeitInSekunden = iRestZeitInSekunden - (iMinuten * 60)
     iSekunden = iRestZeitInSekunden
     lblSekunden.Text = Str(iSekunden)
  Endif

End
20.3.2.2 Example 6 - CountDown 2
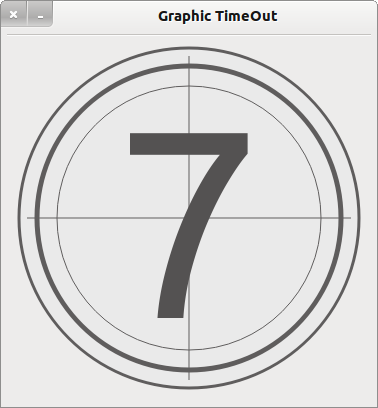
Figure 20.3.2.2.1: CountDown in the range from 1 to 99
The special feature of this project is that a self-developed TimeOut component with integrated timer is used. You can preset the CountDown counter in the interval from 1 to 99. In the range 1-9, the digits are displayed in an automatically adjusted size. You can set the clock frequency as well as various colour settings for areas, circles, lines or the text (digits), for example, in the properties window of the TimeOut component.
Source code:
  Public iCount As Integer

  Public Sub Form_Open()
    FCountDown.Center
    FCountDown.Resizable = False
    Timer1.Delay = 100
    Timer1.Start
    Timer1.Trigger
'-- Eigenschaften der Komponente TimeOut festlegen:
'-- Entweder über das Eigenschaften-Fenster oder im Quelltext
'-- Ein TimeOut-Steuerelement ist bereits auf das Formular gezogen worden
    TimeOut1.Delay = 1000
    TimeOut1.Count = 9

  End

  Public Sub Timer1_Timer()

    If TimeOut1.Finished Then
       Timer1.Stop
         Wait 1
       TimeOut1.Delete
         Wait 1
       FCountDown.Close
   '-- Hauptprogramm starten ...
    Endif

  End
The timer Timer1 is only needed in the test programme to check in a 100ms interval whether the countdown counter is at zero.
20.3.2.3 Example 7 - CountDown 3
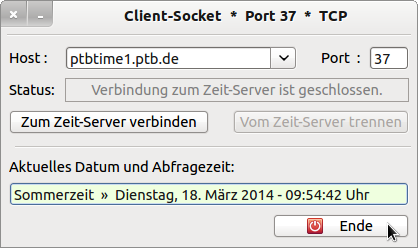
Figure 20.3.2.3.1: Time server
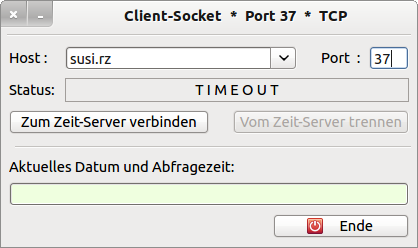
If a time server is not reachable within a given time and returns a timestamp, then the connection is aborted and the state is documented with TIMEOUT.
Source text:
Within the procedure 'Connect to time server' the TimeOut time is set and the TimeOut timer is started, which is stopped here after 5 seconds:
...
 If TCPIP_Socket.Status > Net.Inactive Then
     btnDisconnect.Enabled = True
     lblStatus.Text = "Verbindung zum Zeit-Server wird aufgebaut ..."
     TimeOut.Delay = 5000 '-- TimeOut = 5 Sekunden
     TimeOut.Start
 Endif

Public Sub TimeOut_Timer()
  TimeOut.Stop
  If TCPIP_Socket.Status <> Net.Connected Or lTimeResult = 0 Then
     If TCPIP_Socket.Status > 0 Then Close #TCPIP_Socket
     Set_Interface(False)
     lblStatus.Text = "T I M E O U T"
  Endif
End
20.3.2.4 Example 8 - Alarm simulation
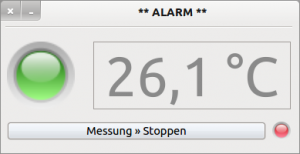
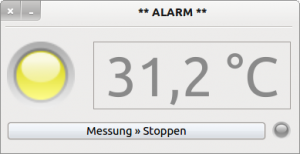
Figure 20.3.2.4.1: Simulation.
In this project, five timers and the Timer() function are used to simulate an experiment. The large LED shows the temperature state qualitatively (green, yellow, orange and red). The exact temperature is read out and displayed time-controlled.
If the temperature exceeds a certain value, the heating is switched off and the small LED flashes red to document the alarm status - even if the temperature has returned to the normal value and the heating is operating in interval mode (heating in oscillating mode). In this mode, the temperature changes only slightly with (25 ± 0.2)°C. This behaviour is also simulated with a timer and a random generator.
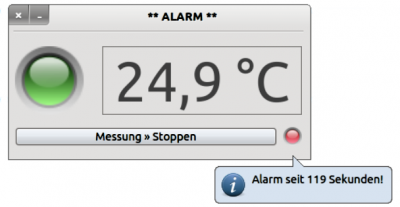
In the procedure pibAlarmFlash_Enter(), the timer function Timer() is used to calculate the time difference from the start time of the measurement - determined with fStartTime = Timer() - how long the alarm has already existed. The time is displayed in a balloon when standing with the mouse over the blinking alarm LED:
Figure 20.3.2.4.2: Alarm time display
Source code extract with selected procedures:
  Public fTemperatur As Float = 20.0
  Public fStartZeit As Float

  Public Sub Form_Open()
    FMain.Center
    FMain.Resizable = False
    TimerAlarm.Delay = 100
    TimerUp.Delay = 100
    TimerDown.Delay = 100
    TimerFlash.Delay = 500
    TimerZufall.Delay = 1000
    SetLEDColor("green")
    lblTemperatur.Text = Format(fTemperatur, "##.0 °C")
    btnStart.Text = "Messung " & String.Chr(187) & " Starten"
    Randomize
  End

  Public Sub TimerZufall_Timer()
    Dim fZufallsTemperatur As Float

    fZufallsTemperatur = Rnd(24.8, 25.2)
    lblTemperatur.Text = Format(fZufallsTemperatur, "##.0 °C")
  End

  Public Sub TimerAlarm_Timer()
    If fTemperatur < 30 Then
       SetLEDColor("green")
    Else If (fTemperatur >= 30 And fTemperatur < 32) Then
         SetLEDColor("yellow")
    Else If (fTemperatur >= 33 And fTemperatur < 34) Then
         SetLEDColor("orange")
    Else If fTemperatur >= 34 Then
         SetLEDColor("red")
     '-- Die Heizung wird ausgeschaltet ...
         TimerUp.Stop
         TimerDown.Start
         TimerFlash.Start
         TimerFlash.Trigger
         fStartZeit = Timer()
    Endif
  End

  Public Sub pibAlarmFlash_Enter()
    Dim fAlarmZeit As Float
    Dim sMessage As String

    If TimerFlash.Enabled = True Then
       fAlarmZeit = Round(Timer() - fStartZeit, 0)
       sMessage = "Alarm seit " & Str(fAlarmZeit) & " Sekunden! "
       Balloon.Info(sMessage, Last)
    Endif

  End
20.3.2.5 Example 9 - Timed measurement acquisition
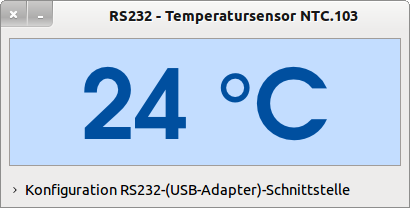
Figure 20.3.2.5.1: Temperature display
After an analogue-to-digital converter, the digital temperature value is read in and displayed time-controlled via a serial USB-RS232 interface.
Relevant source code sections to demonstrate the concept for using the Timer class:
PUBLIC SUB Start()
'...
  GetValueTimer.Delay = 100 '-- Alle 100·ms wird die Temperatur ausgelesen
  GetValueTimer.Start()     '-- Synonym für GetValueTimer.Enabled = TRUE
  GetValueTimer.Trigger()   '-- Löst das Timer-Event() sofort aus
'...
END

PUBLIC SUB GetValueTimer_Timer()
  IF RS232.Status <> Net.Active THEN
     lblTemperaturAnzeige.Text = "--- °C"
     rbLED.ForeColor = Color.Red
  ELSE
     lblTemperaturAnzeige.Text = iTemperaturByte & " °C"
     rbLED.ForeColor = Color.Green
  ENDIF
END

