Sidebar
Table of Contents
25.1.10 Drawing with Cairo
25.1.10.1 Drawing areas
You can draw on these four drawing areas with Cairo:
- Image,
- CairoPdfSurface,
- CairoPsSurface,
- CairoSvgSurface.
25.1.10.2 Geometric shapes
You can draw the following geometric shapes (lines or surfaces or text) on the drawing area:
- Point
- Line - distance as the shortest connection between two points
- Rectangle (special case square),
- Circle - circle-arc - circle-sector / ellipse - ellipse-arc - ellipse-sector
- 3rd degree Bézier curves as curvilinear connection of two points in the drawing plane
- Text
To draw text, you must specify the text, the font information, the font colour and the (start) point at which the font is inserted into the drawing area after calling special methods.
25.1.10.3 Cairo coordinate system
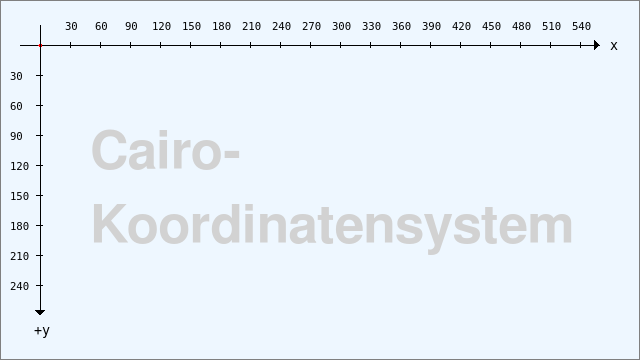
All drawing areas have a (virtual) coordinate system to which all coordinate specifications in the properties or in the arguments of the methods of the Cairo class refer. Please observe these notes:
- The coordinate origin O(0|0) of the Cairo coordinate system is located in the top left-hand corner of the Cairo drawing area.
- The positive x-axis points to the right. The positive y-axis points downwards - in contrast to the usual Cartesian coordinate system!
- Coordinates in Cairo are always of the float data type.
- Each point on the drawing area is defined by a coordinate pair P(x|y).
Figure 25.1.10.3.1: Cairo coordinate system with shifted coordinate origin
In order to draw the designations of the two axes and the values in a way that is easy to read if required, you can (permanently) move the coordinate origin of the coordinate system using the Translate method of the Cairo class. However, this shift does not change the direction of the two coordinate axes!
Cairo.Begin(hImage)
  Cairo.Translate(40, 45) '-- Shift by +40.0 in the x-direction and by +45.0 in the y-direction
  ...
Cairo.End()
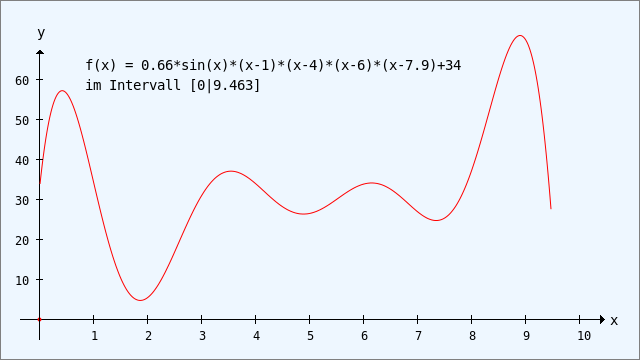
Figure 25.1.10.3.2: Image of a function y = f(x)
To realise the usual view in contrast to → Figure 25.1.10.3.1, you can scale the coordinate system so that the positive y-axis points upwards. A parallel shift of the coordinate origin O(0|0), combined with a mirroring of the y-axis at the abscissa, realised by using the scale method, is implemented in this way:
Cairo.Begin(hImage)
  Cairo.Translate(40, 45) '-- Shift by +40.0 in the x-direction and by +45.0 in the y-direction
  Cairo.Scale(1, -1)      '-- The -1 causes the direction of the y-axis to be inverted → +y ▲
  ...
Cairo.End()
25.1.10.4 Drawing with methods of the Cairo class
The concept for drawing geometric shapes with Cairo is similar to drawing with Paint. Differences are described in section → 25.1.10.7. A geometric shape is always drawn in three steps on the drawing area used:
- First assign suitable properties to the brush via Cairo.Source, such as fill colour or line colour. Set the line width separately if required.
- Then define the so-called drawing path, which is described by a start point and the specification of a geometric shape. You can define a start point using the Cairo.MoveTo(..) method or use the end point of a completed drawing action. You define the shape using selected drawing methods such as Cairo.LineTo(..), Cairo.Rectangle(..) or Cairo.Arc(..) with defined arguments. For areas, always differentiate between the border (line shape) and the area within the border.
- Finally, trace the drawing path with the defined brush on the drawing area, using the Cairo.Stroke(A) method for a defined line and the Cairo.Fill(A) method for an area. Normally, the last drawing path used is deleted after tracing (once). If you set the optional argument A to the value True, the drawing path is retained and can continue to be used.
25.1.10.5 Draw, display and save image
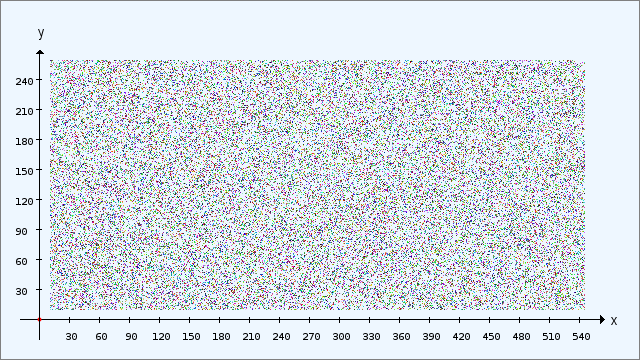
Example: A point cloud is drawn on an image (object) as a drawing area:
Public Sub CairoScriptPointCloud()

  Dim i As Integer

  GenerateNewImage()
  SetImageBorder()

  Cairo.Begin(hImage)
    Cairo.Translate(xTranslate, yTranslate)
    Cairo.Scale(xScale, yScale) ' +y ▲
    Cairo.AntiAlias = False
    DrawCoordinateSystem()
    For i = 1 To 50000
'-- Set points with random coordinates and a random colour
        SetPoint(Rnd(10, 550 - 5), Rnd(10, 260), Color.RGB(Rnd(0, 255), Rnd(0, 255), Rnd(0, 255)))
    Next
    Cairo.AntiAlias = True
  Cairo.End()

End
To see the result of the drawing, the image - which is currently only in memory - is drawn in a DrawingArea (daCanvas) and thus becomes visible:
Public Sub daCanvas_Draw()
  If hImage Then Paint.DrawImage(hImage, 0, 0, hImage.W, hImage.H)
End
This flexible way of drawing has proven its worth. If you want to save the drawn image and process it further, for example to present it in a text, save the image in an image file:
Public Sub btnSaveCurImage_Click()
  hImage.Save(sImagePath &/ Lower(cmbImages.Text & ".png"))
End
Figure 25.1.10.5.1: Point cloud
In chapter → 25.1.11 Cairo projects, further image examples are presented and commented on in detail.
25.1.10.6 Default values
There are (default) start values for drawing with Cairo:
- The line or fill colour or the font colour is fully opaque black - without an alpha channel in the colour.
- The line width is 2.
- Edge smoothing (AntiAlias) is switched on.
- The Cairo documentation → http://cairographics.org/manual/cairo-text.html states that the default font is platform-specific and the quasi-standard is
sans-serif. - You cannot read out the font name of the standard font used in Gambas. This is only possible if you have assigned your own font as the current font using the Cairo.Font.Name property.
A test results in these values:
Print Cairo.LineWidth		'-- 2
Print Cairo.AntiAlias		'-- 0
Print Cairo.Font.Size          	'-- 10
25.1.10.7 Differences when drawing with Paint and Cairo
You should take a very close look at the documentation for the properties and methods of the Cairo class of the Cairo component and the Paint class (gb.qt4), as some methods have the same names but different syntax or, for example, the same properties have different value ranges. Particular attention should be paid to the following topics
- Character areas
- Font assignments
- Colour distributions in a pattern with LinearGradient and RadialGradient
- Circle - circle-arc - circle-sector / ellipse - ellipse-arc - ellipse-sector
- Anti-aliasing


