Sidebar
Table of Contents
22.11.1 Report - Selected classes
In this chapter, selected properties and methods of fundamental classes of the report component are presented and described. The selection was made primarily from the point of view of use when creating a report without the Report Designer.
22.11.1.1 Class ReportBorder
The class implements an object that represents the border of a report control. You can create the class. The class behaves like a read-only static array.
22.11.1.1.1 Properties of the ReportBorder class
The ReportBorder class has the following properties:
| Property | Data type | Description |
|---|---|---|
| Brush | ReportBrush | Brush represents the brush tool that can be used to draw borders or different content. |
| Left | _ReportBorderSide | This property returns the left page border. Units are: mm, cm, in, ft, px and pt. |
| Top | _ReportBorderSide | This property returns the top page margin. |
| Right | _ReportBorderSide | This property returns the right margin. |
| Bottom | _ReportBorderSide | This property returns the bottom of the page. |
| RoundCorner | _ReportRoundCorner | This property sets the layout for rounded corners (BottomLeftCorner, BottomRightCorner, TopLeftCorner and TopRightCorner. |
| Width | String | Supplies or sets the width of the frame. |
Table 22.11.1.1.1 : Properties of the ReportBorder class
The class has only one method: ToString() of data type String. It returns a formatted string containing the complete border description of the report control.
To create a new border object:
Dim hReportBorder As ReportBorder
hReportBorder = ReportBorder[sValue As String]
The value of hReportBorder is a string array. Its content is a semicolon-separated list of the properties of the border or part of the border. You can define each border property globally or for its parts (Top, Right, Left, Bottom and optionally for the (rounded) corners TopLeftCorner, TopRightCorner, BottomLeftCorner and BottomRightCorner).
The border or a part of it is separated from its individual property values by a colon.
- Specify the size in the permitted unit (mm, cm, in, ft, px, pt). For the frame, the property values are separated by spaces.
- For corners, the values can be specified by one value or by 2 values separated by spaces.
- The brush is defined by a ReportBrush string (optional).
Examples:
' The ReportLabel1 frame (left, top, right and bottom) is set to a width of 1 pixel

  ReportLabel1.Border = ReportBorder["border:1px"]

' The border of HBox1 is set to a width of 2 pixels and the color black.
' The top left and top right corners are rounded.

  Report.HBox1.Border = Top:2px #000000;Bottom:2px #000000;Left:2px #000000;Right:2px #000000; TopLeftCorner:2mm;TopRightCorner:2mm
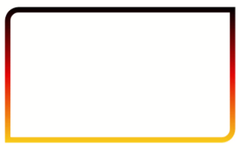
To define a border around a ReportPanel1 (left, right, top and bottom 5 mm, top left and bottom right corner additionally rounded with a radius of 5 mm) with a linear colour gradient black-red-yellow (linear gradient), you need this value assignment of the ReportPanel1.Border property:
ReportPanel.Border = ReportBorder["Top:5mm LinearGradient(0,0.04,0,1,[#000000,#FFFF00,#FF0000],[0,1,0.5]);
Bottom:5mm LinearGradient(0,0.04,0,1,[#000000,#FFFF00,#FF0000],[0,1,0.5]);
Left:5mm LinearGradient(0,0.04,0,1,[#000000,#FFFF00,#FF0000],[0,1,0.5]);
Right:5mm LinearGradient(0,0.04,0,1,[#000000,#FFFF00,#FF0000],[0,1,0.5]);
TopLeftCorner:5mm;TopRightCorner:0mm;BottomRightCorner:5mm;BottomLeftCorner:0mm"]
For a simple black border with a thickness of 1 pixel, the source text is much shorter:
ReportPanel.Border = ReportBorder["Top:1px #000000;Bottom:1px #000000;Left:1px #000000;Right:1px #000000"]
22.11.1.2 Class ReportBoxShadow
The class represents a shadow of a report control of type ReportFrame (→ http://www.gambaswiki.org/wiki/comp/gb.report2/reportframe).
You can create the class:
Dim hReportBoxShadow As ReportBoxShadow
hReportBoxShadow = New ReportBoxShadow ( )
The class behaves like a read-only static array:
Dim hReportBoxShadow As ReportBoxShadow
hReportBoxShadow = ReportBoxShadow [ sValue As String ]
22.11.1.2.1 Properties of the ReportBoxShadow class
The ReportBoxShadow class has the following properties:
| Property | Data type | Description |
|---|---|---|
| XOffset | String | Sets or reads the offset in the x direction. The offset refers to the bottom right corner of the report control. Units: mm, cm, in, ft, px and pt. |
| YOffset | String | Sets or reads the offset in the y-direction. The offset refers to the bottom right-hand corner of the report control. |
| Blur | String | Sets or reads the dimension for the blur. Units: mm, cm, in, ft, px and pt. |
| Spread | String | Sets or reads the measure for the spread. Units: mm, cm, in, ft, px and pt. |
| Color | Integer | Sets or reads the colour. |
Table 22.11.1.2.1 : Properties of the ReportBoxShadow class
Example
The values for the shadow around a ReportHBox1 are first assigned individually:
ReportHBox1.BoxShadow.XOffset = "1mm"
ReportHBox1.BoxShadow.YOffset = "1mm"
ReportHBox1.BoxShadow.Blur = "8px"
ReportHBox1.BoxShadow.Spread = "3px"
ReportHBox1.BoxShadow.Color = "#A5A5A5"
The values can also be assigned compactly:
ReportHBox1.BoxShadow = ReportBoxShadow["1mm 1mm 10px 3px #A5A5A5"]'[XOffset, Yoffset, Blur, Spread, Color]
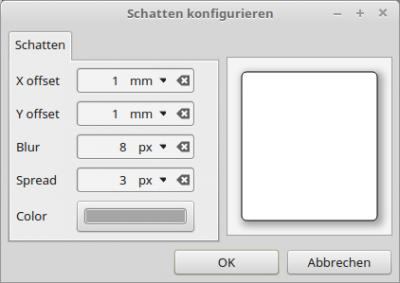
You can also define the shadow for ReportHBox1 in the dialogue in the Report Designer. This is quick and easy. First you must select the BoxShadow property for a report control in the properties window and call up the BoxShadow configuration dialogue via the […] button box:
Figure 22.11.1.2.1: Dialogue for defining shadow properties
The result is the same in three cases.
22.11.1.3 Class ReportPadding
The class represents the inner border of some report controls. The Padding property returns an instance to a ReportPadding object. This object has 4 properties: Left, Right, Top and Bottom. It defines the distance between the content of the report control and its (outer) edge. Each side can be set independently. The values can be defined via the corresponding dialogue in the IDE or via source code. The class can be created and behaves like a static array:
Dim hReportPadding As ReportPadding
hReportPadding = ReportPadding [ Value As String ]
22.11.1.3.1 Properties of the ReportPadding class
The ReportPadding class has the following properties:
| Property | Data type | Description |
|---|---|---|
| Bottom | String | Sets or reads the value for the bottom, inner margin. Units: mm, cm, in, ft, px and pt. |
| Left | String | Sets the value for the left, inner margin or reads it out. |
| Right | String | Sets or reads the value for the right, inner margin. |
| Top | String | Sets the value for the top, inner margin or reads it out. |
Table 22.11.1.3.1 : Properties of the ReportPadding class
The class only has the ReportPadding.IsActive() method. The function returns True if the set padding properties are active.
Example 1
All values are set to the same padding value of 2mm:
ReportLabel1.Padding.Top = "2mm"
ReportLabel1.Padding.Bottom = "2mm"
ReportLabel1.Padding.Left = "2mm"
ReportLabel1.Padding.Right = "2mm"

ReportLabel1.Padding = ReportPadding["2mm"] ' Alternative 1
ReportLabel.Padding = ReportPadding["Top:2mm;Bottom:2mm;Left:2mm;Right:2mm"] ' Alternative 2
Example 2
Only an upper, inner margin is set around the ReportLabel1 text:
ReportLabel1.Padding.Top = "3mm"
ReportLabel1.Padding = ReportPadding["Top:3mm"] ' Alternative
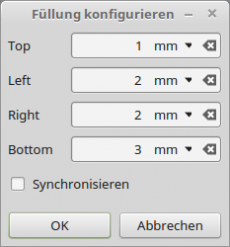
The padding properties can be conveniently defined in the dialogue:
Figure 22.11.1.3.1: Dialogue for defining padding properties
22.11.1.4 Class ReportMargin
The padding property (!) returns an instance of a ReportMargin object. This object has 4 properties: Left, Right, Top and Bottom. It defines the space between the border of a report control and its report container and other report controls that are in the same report container. This is a minimum space requirement. This means that two consecutive elements in a container are separated by the largest distance defined by the report controls or by the distance value of the container if this is higher. Each property can be set independently of each other. The values can be defined via the corresponding dialogue in the IDE or via source code. The class can be created and behaves like a static array:
Dim hReportPadding As ReportPadding
hReportPadding = ReportPadding [ Value As String ]
22.11.1.4.1 Properties of the ReportMargin class
The ReportMargin class has the following properties:
| Property | Data type | Description |
|---|---|---|
| Bottom | String | Sets or reads the value for the bottom, inner distance. Units: mm, cm, in, ft, px and pt. |
| Left | String | Sets or reads the value for the left, inner spacing. |
| Right | String | Sets or reads the value for the right, inner spacing. |
| Top | String | Sets the value for the top, inner spacing or reads it out. |
Table 22.11.1.4.1 : Properties of the ReportPadding class
The class only has the ReportMargin.IsActive() method. The function returns True if the set padding properties are active.
Example 1
All values are set to the same margin value of 2mm:
ReportHBox1.Margin.Top = "2mm"
ReportHBox1.Margin.Bottom = "2mm"
ReportHBox1.Margin.Left = "2mm"
ReportHBox1.Margin.Right = "2mm"

ReportHBox1.Margin = ReportPadding["2mm"] ' Alternative 1
ReportHBoxl.Margin = ReportPadding["Top:2mm;Bottom:2mm;Left:2mm;Right:2mm"] ' Alternative 2
Example 2
Only an upper inner margin is set around the report controls in the report container ReportHBox1:
ReportHBox1.Margin.Top = "3mm"
ReportHBox1.Margin = ReportPadding["Top:3mm"] ' Alternative
It is easy to define the properties for a margin object in the dialogue for other values:
Figure 22.11.1.4.1: Dialogue for defining padding properties for a margin object
22.11.1.5 Class ReportBrush
The class represents the brush tool with which you can draw margins or various contents. This can be a single colour, but also a colour gradient or an image. You can create the class and it behaves like a read-only static array. The following source code creates a new ReportBrush object from a brush description in sValue and returns it:
Dim hReportBrush As ReportBrush
hReportBrush = ReportBrush [ sValue As String ]
22.11.1.5.1 Properties of the ReportBrush class
The ReportBrush class has the following static properties:
| Property | Data type | Description |
|---|---|---|
| Function Color ( iColor As Integer ) | ReportBrush | Sets the brush colour. |
| Function Image ( hImage As Image ) | ReportBrush | Sets an image as a brush tool. |
| LinearGradient ( X As Float, Y As Float, X2 As Float, Y2 As Float, aColor As Integer[], aPos As Float[] ) | ReportBrush | Sets a linear colour gradient as a brush tool. |
| RadialGradient ( X As Float, Y As Float, Radius As Float, X2 As Float, Y2 As Float, aColor As Integer[], aPos As Float[] ) | ReportBrush | Sets a radial colour gradient as a brush tool. |
Table 22.11.1.5.1 : Properties of the ReportBrush class
Example 1
' Setzt eine Zeichenfarbe
  MyBrush = ReportBrush["#00FF00"]

' Setzt ein Bild als Zeichenwerkzeug
  MyBrush = ReportBrush["image(\"icon.png\")"] oder MyBrush = ReportBrush["image(icon.png)"]

' Setzt einen linearen Farbverlauf
' Alle Werte liegen zwischen 0 und 1 - auch für die Größe und den Gradientenstop.
' Syntax:
' relleft,reltop,relwidth,relheight,[colorstop1,colorstop2,...],[colorstopRelPos1,colorstopRelPos2,...])
  MyBrush = ReportBrush["LinearGradient(0,0,1,1,[#000000,#FFFFFF,#0000FF],[0,1,0.5])"]

' Setzt einen radialen Farbverlauf
' Alle Werte liegen zwischen 0 und 1 - auch für die Größe und den Gradientenstop.
' Syntax:
' relCenterX,relCenterY,relRadius,relFX,RelFY,[colorstop1,colorstop2,...],[colorstopRelPos1,colorstopRelPos2,...])
  MyBrush = ReportBrush["RadialGradient(0.53,0.53,0.5,0.88,0.18,[#000000,#FFFFFF,#0000FF],[0,1,0.5])"
An example of the use of a brush with a linear colour gradient can be seen in Figure 22.11.1.5.2.
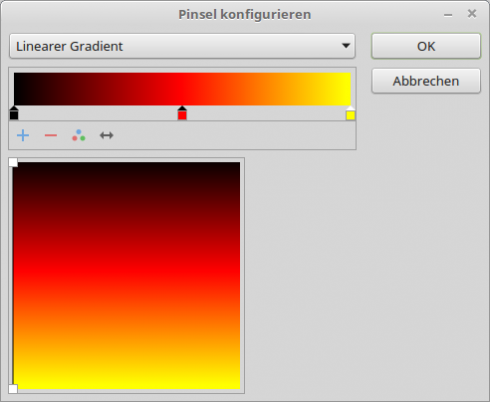
It is much easier to create a colour gradient in the corresponding dialogue. First you must select the Brush property for a report control in the properties window and call up the dialogue for brush configuration via the […] button box:
- Select 'Linear gradient' in the combo box
- Add gradient breakpoint (click on the +)
- Double-click on the first gradient breakpoint → Select colour black with OK
- Double-click on the second gradient breakpoint → select colour red with OK
- Double-click on the third gradient breakpoint → Select colour yellow with OK
- Click on the handle * in the colour field (top left) and drag to the bottom right corner
- Drag the now visible second handle to the bottom left-hand corner
- Drag the handle * from the bottom right-hand corner to the top left-hand corner
Figure 22.11.1.5.1: ReportPanel1 border
Click OK to accept the configured brush with the vertical black-red-yellow colour gradient:
Figure 22.11.1.5.2: ReportPanel1 border 2


