Sidebar
Table of Contents
4.2 IDE - Structure
This chapter introduces you to the structure of the Gambas IDE and describes how you can change this structure. You can change it by adding or deleting individual windows to the workspaces or by hiding them and by changing the arrangement of the individual windows in the workspace. When you create a new project in the IDE or open an existing project, the IDE starts with a preset structure.
4.2.1 IDE
It is assumed that you open an existing Gambas project. You will then see the IDE with the following structure:

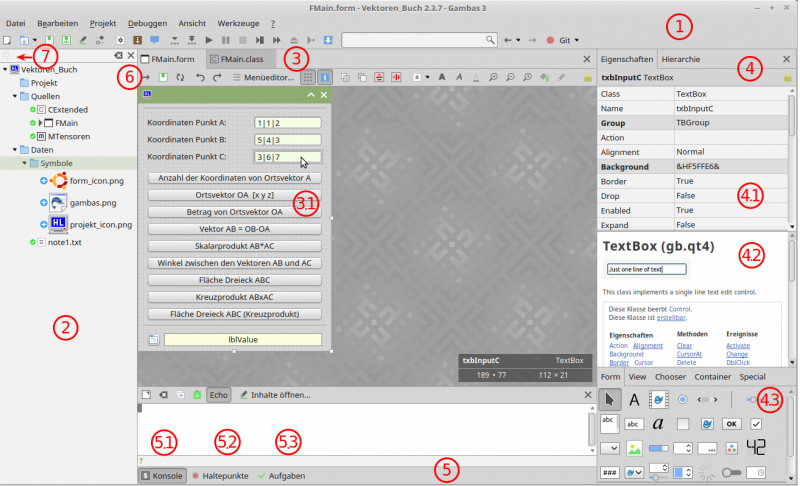
Figure 4.2.1.1: IDE - Form Editor
Comment
- (1 ) Gambas IDE ① with the main menu and the configurable tool bar for quick access to the most important functions.
- (2 ) Project window ② - In this window you see the project files in a tree structure in a special display, as for example the two folders Sources and Data are only `logical` folders. For information on the folders, see Chapters 5.1 and 11.10.0.
- (3 ) Workspace ③ with several windows. If you click on the icon labelled FMain in the project window ② - behind it is the file FMain.form in the physical, hidden folder .src - then the form editor with the form (3.1) opens in the workspace.
- (4 ) Under ④ you see the properties window, which is divided into three parts.
- 4.1 In the upper section you can see the properties of the control selected on the shape or the hierarchy of all controls that you can set yourself. Changed properties are highlighted in bold font like the background colour of the selected text box named txbInputC.
- 4.2 The middle section displays the documentation for the text box - provided you have activated the online help in the global configuration of the IDE. If you click on a specific property, only its documentation is displayed. You can reach the complete Gambas documentation by pressing F1 when you are online.
- 4.3 A display of the usable controls that you can drag and drop onto the shape is shown in the bottom section in five categories. Note: If you do not find a particular control, then look in the project properties under Project> Properties> Components to see if you have selected the corresponding component that contains the control. There are controls such as Timer or Socket or Printer that are not visible at runtime.
- (5 ) In the ⑤ area (debugging panel) you see a tool bar that you cannot hide.
- 5.1 In the console (5.1), the output of the Print, Debug and Error statements is displayed at runtime, as well as error messages.
- 5.2 In the Breakpoints window (5.2) you can see all the breakpoints you have defined with class, line and function. You can edit the breakpoints (activate, deactivate, remove and remove all) - but you cannot insert new breakpoints there.
- 5.3 If you have noted down so-called `tasks` in the source text, they will all be displayed in the Tasks window (5.3). The `tasks` are special comments in the source code → Chapter 4.5 IDE source code editor.
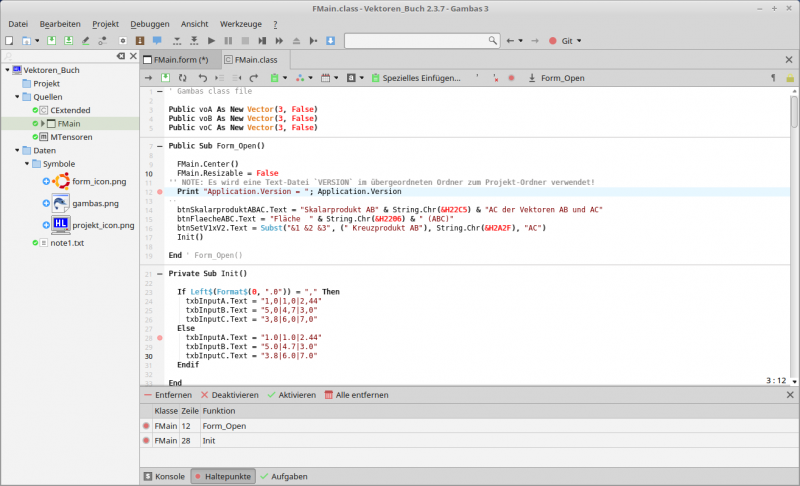
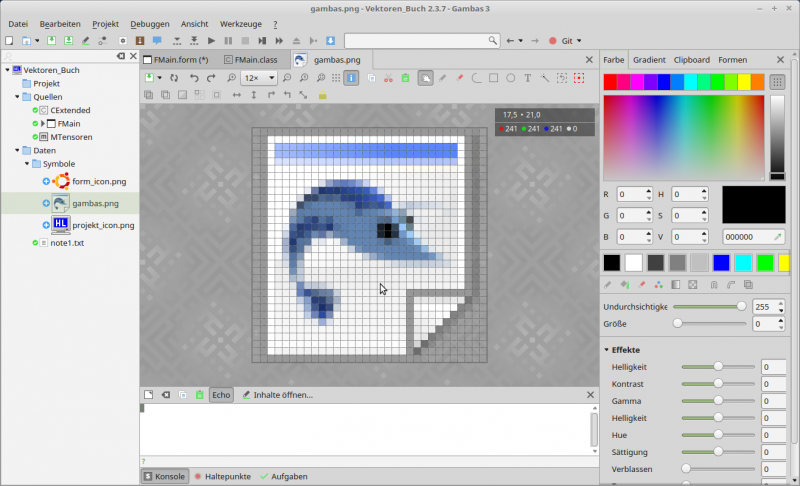
- (6 ) If you click on the arrow button ⑥, then a window with the source code editor opens in the workspace → Figure IDE - Source code editor. Later, you quickly switch the display of the windows via the corresponding tab. For example, if you open the image project_icon.png, you can comfortably edit the image in its own image editor - without leaving the IDE → Illustration IDE - Image Editor. If you want to view the contents of the file note1.txt, then a (plain) text editor opens after double-clicking on the file icon.
- (7 ) Click on the magnifying glass ⑦ to display special files.

Figure 4.2.1.2: IDE - source code editor

Figure 4.2.1.3: IDE - Image Editor
If you have started a Gambas programme or want to create an executable file, then output will be seen in the console and possibly other windows will be displayed, in which, for example, a warning will be issued:

Figure 4.2.1.4: Console - Output of `PRINT Application.Version`

Figure 4.2.1.5: Fixed breakpoints

Figure 4.2.1.6: Troubleshooting
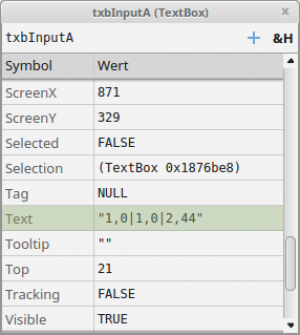
If you have set breakpoints, then execution stops at the first breakpoint. This gives you the possibility to display the current value of a property or properties and their values of a control. This way you can track down a possible error. You only have to double-click on the property or control of interest to read its properties:

Figure 4.2.1.7: Tasks - Value of the property `.Text` of the textbox txbInputA
Continuing in the programme flow, for example, use the function key F5.
Comment
- There are three types of tasks declared with 'TODO: task text or 'NOTE: task text or 'FIXME: task text in the source text → Figure 4.2.1.8 Tasks.
- If you select Project> Create> Executable File… from the menu. or with CTRL+ALT+X create an executable file, then there is, for example, a new tab `Warnings` if a warning is to be issued → Figure 4.2.1.9 Warnings.
4.2.2 IDE - Changes
Changes to the structure of the IDE relate to showing or hiding certain windows. This is done automatically when switching between editors such as the shape editor and source editor → Figure 4.2.1.1: IDE - Shape editor marker (arrow button ⑥ ). You can use the function key F12 to switch between the shape editor and the source text editor at lightning speed. You can use selected F keys to change the structure. Note that these changes depend on the current editor type. For example:
- Shape Editor - F4: Show or hide the properties window.
- Shape Editor - F10: Shape Editor Show or hide the project window.
- Shape editor - F11: Show or hide the debugging panel.
- Source editor - F4: Without effect
- Source editor - F10: Show or hide the project window
- Source editor - F11: Show or hide debugging panel
- Image editor - F4: Show or hide the tools panel.
- Image Editor - F10: Show or hide the project window.
- Image editor - F11: Show or hide the debugging panel.


