Sidebar
Table of Contents
4.5 IDE - Source code editor
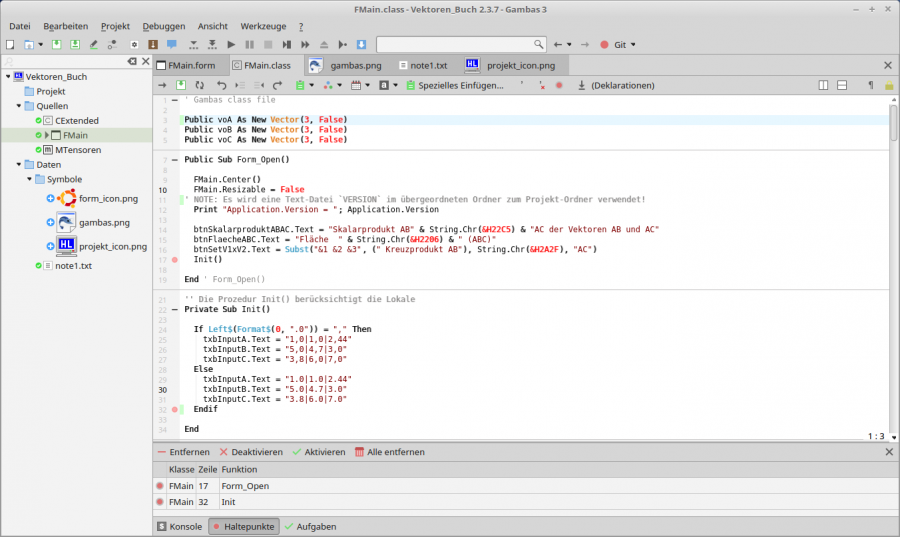
Figure 4.5.1: IDE - source code editor
In addition to the normal editor functions such as create file, open file, close file, save file, save file as …, select text, copy text, paste text, delete text, select text completely, search text, search and replace text, undo action, repeat action and extensive context menu, the source code editor of the IDE offers the following features, among others:
- Basic configuration of the source text editor.
- Syntax highlighting (syntax highlighting)
- maximise/minimise editor window
- Vertical and horizontal splitting of the editor window
- Insert comments - 4 comment types.
- Comment out text line and text block
- Inserting text (CTRL+V, middle mouse button, menu> Edit> Insert)
- Special insertion of text (dialogue)
- Insert colours
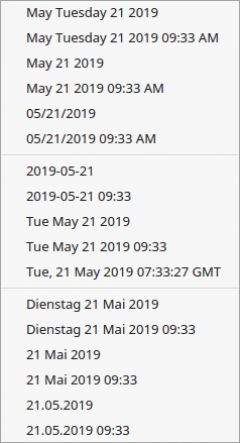
- Insert current date in 17 different formats
- Automatic source text completion
- Source code shortcuts
- Automatically format source text
- Indent and outdent text - increase indentation or decrease indentation
- Define bookmarks, navigate to bookmarks , delete bookmarks or all bookmarks
- Display list of all existing declarations (methods (public, private) and events).
- Edit shortcuts and keyboard shortcuts - use.
- (Online) Help → Gambas documentation.
- Show (online) help on definitions - highlight word and then press F2.
- Use prefixes for controls and variables - optional.
Open the source editor
- with a double click on a control in the form editor,
- with the function key F12 when the shape editor is open. Note: After another click on F12, the shape editor opens again (switch function) or
- with a click on a class or module file in the project window.
4.5.1 Notes on the basic configuration of the source code editor
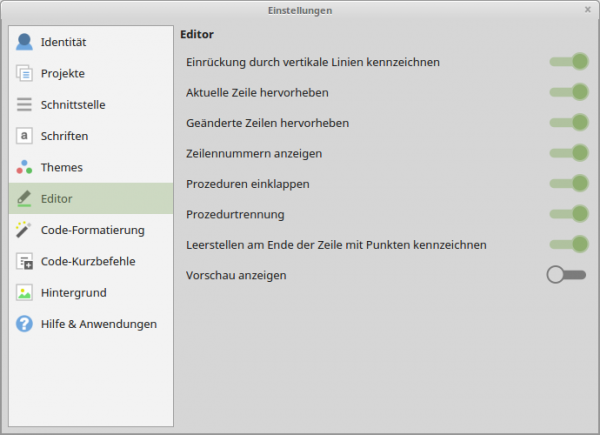
The basic configuration of the source text editor has already been described in Chapter 4.1.1 Configuration 1. Included is the specification of the fonts, syntax highlighting via the themes, code formatting and code shortcuts. In the configuration, you can configure the syntax highlighting under Tools> Settings.
4.5.2 Change source editor window
You can maximise the editor window with the function keys F10 and F11 or return it to its original size. You can divide the editor window into two adjacent windows with the key combination CTRL+H. Use CTRL+J to divide the editor window into two windows on top of each other. The contents of the two windows are automatically synchronised.
The two key combinations CTRL+H and CTRL+J and the function keys F10 and F11 each act as a toggle switch.
4.5.3 Comments
In Gambas you can insert four types of comments in the source text:
- Simple comments
- Simple comments - with keyword - as tasks.
- Class-level help comments.
- Help comments on symbol level
4.5.3.1 Simple comments
Simple comments in the source text start with an apostrophe and go to the end of the line. A comment is ignored by the interpreter.
Public Sub TBGroup_KeyPress() ' Applies to the *TextBox group* ↦ TBGroup!
  If Left$(Format$(0, ".0")) = "," Then
     CheckInput("+-,|0123456789")
  Else
     CheckInput("+-.|0123456789")
  Endif
End

' NOT used internally as the group event has a higher priority.
'
' Public Sub txbInputA_KeyPress()
'   CheckInput("+-,|0123456789")
' End
...
' Public Sub txbInputC_KeyPress()
'   CheckInput("+-,|0123456789")
' End
In the source text, you can mark a line or block of text and format it as a comment with the key combination CTRL+K or remove it again via the editor menu or with CTRL+U.
An alternative for longer comments is to copy the comment text from another source and then paste it into the source text as a comment using the 'Special Paste' in the dialogue that opens.
4.5.3.2 Comments as tasks
Any comment in the source code that starts with 'TODO:, 'FIXME: or 'NOTE: is automatically listed in a new tab labelled 'Tasks' in the lower debugging panel. The keywords TODO, FIXME and NOTE - after a '-character - must be capitalised and terminated with a colon. The colon before the task text should be followed by a space (optional).
' NOTE: A text file `VERSION` in the parent folder to the project folder is used!
  Print "Application.Version = "; Application.Version
' FIXME: Check the format string `"+0.###"` and change it if necessary.
  lblValue.Text = Format$(Deg(ACos(fCosinusAlpha)), "+0.###") & " °"
' TODO: Use the function IsVector(sInput As String) to use valid data.
Private Function IsVector(sInput As String) As Boolean
These three special comments in the source code produce this output under `tasks`:
4.5.3.3 Symbol-level help comments
A symbol-level help comment starts with two '-characters followed by a space before the comment and comes before the line containing the procedure declaration. In this case, the comment can also be multi-line.
'' Set the path to a Markdown project folder in the dialog.
'' The function value is an empty string -> dialog was aborted.
'' The function value is a path specification for a directory.
Private Function SetMDProjectDir() As String

  Dim sDialogDir As String

  sDialogDir = FNewDir.RunDialog()
  If sDialogDir = "" Then
     bCancelDialog = True
     Return ""
  Else
     sCurrentMDDir = sDialogDir
     Return sDialogDir
  Endif
End
If you then write SetMD… in the source code. in the source code, the auto-completion already jumps in and shows you the help comment of the function in a small window:
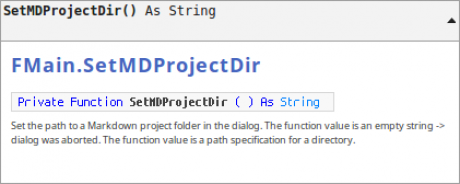
Figure 4.5.3.3.1: Help comment on symbol level
If the comment comes after a declaration, it is always single-line:
Property Name As String '' The Name property shows the name of the client who owns this account.
4.5.3.4 (Help) comments at class level
Class-level help comments must be separated from the first line in the class header `Gambas class file` by one or more blank lines, and separated from any subsequent comments or source code by at least one blank line.
The following example shows a source code section from the file DegTableView.class with all 4 types of comments:
' Gambas class file

''' Deganius DegTableView, delivers a Gambas TableView
''' based on data of an array or db-result or a class DegOrm.
'''
''' Can display a DegComboBox inside and bind it's index to a column.

'TODO: BeforeUpdate - Cancel does not work right

Export
Inherits TableView

' Component Definition
Public Const _Group As String = "Deg"
Public Const _Family As String = "Form"

Public Const _DrawWith As String = "TableView"
Public Const _Properties As String = "*, ComboButtons, Readonly, AllowDelete, AllowInsert, AllowCopyPaste"

' Constants for ShowAs
Public Const AsString As Integer = 0
Public Const AsCheckbox As Integer = 1
Public Const AsRichText As Integer = 2

'' Number of row that has been changed. If nothing changed, it is -1.
Property RowChanged As Integer
...
At https://gitlab.com/christhal/gb.deg.form/blob/master/.src/Comp/DegTableView.class you will find the complete source code of the component developed by Christof Thalhofer.
You can extend help comments on symbol and class level by using text in Markdown syntax.
4.5.4 Bookmark
To set a bookmark, you must first select a source text line and then define the bookmark with CTRL+B (Bookmark). You can recognise a set bookmark in the source text editor by a blue symbol at the beginning of the line .
- You can navigate between the individual bookmarks with the key combinations ALT+Picture▲ or ALT+Picture▼.
- Delete a single bookmark with CTRL+B after the corresponding source text line has been selected.
- Delete all bookmarks only via Menu> Edit> Bookmarks> `Delete all bookmarks` or much faster via the appropriate entry in the context menu of the source text editor.
4.5.5 Show list of all existing declarations
To navigate quickly in the source text, you can display the list of all existing declarations in the categories methods (public, private) and events. The list in the source code editor menu is preceded by this symbol. If you select an entry with a click (MenuButton), the cursor jumps to this selected declaration. You can then read or change the source text. This is a functionality that you will certainly use.
4.5.6 Shortcuts and keyboard shortcuts
The Gambas IDE provides a modifiable set of source code shortcuts that can ease the writing burden in the source code editor. The default source code shortcuts shipped with the IDE can be found under Menu> Tools> Settings> Code Shortcuts. To use the predefined source code shortcuts, the check box (switch button) 'Enable code shortcuts' must be activated. With the button 'New…' you can create your own short commands in the dialogue, the so-called trigger strings, also with multi-line source text sections in the extension macros. Notes on the trigger strings and the syntax of the extension macros can be found at http://gambaswiki.org/wiki/ide/idesnippets.
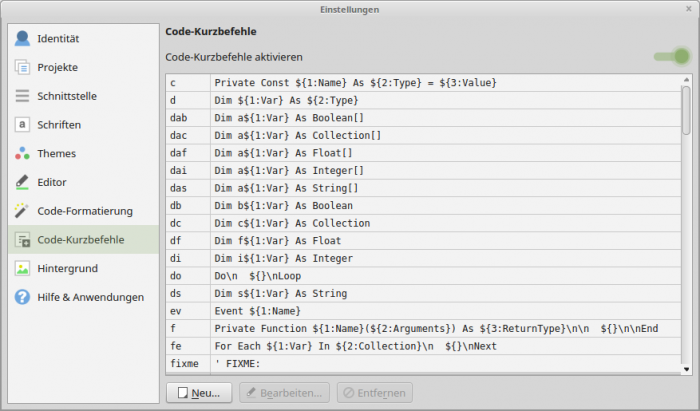
Figure 4.5.6.1: (Predefined) source code shortcuts.
If you enter a source code shortcut at the beginning of a line and then press the tab key, the source code shortcut automatically expands to a defined source code section. For example, there is the short command “_c” for the _compare method. You enter “_c” and then press the tab key. This activates the source text section stored in the extension macro.
Example: From the source text short command
if
becomes after pressing the tabulator key
  If Test Then

  Endif
In any case, you should try out the source code shortcuts gpl, f and pf and then look at the syntax of the extension macro in each case.
Note that under Menu> Tools> there is also the entry `Shortcuts…`, but these refer to the menus in the IDE.
For example, you can use the shortcut CTRL+H to switch to a split view with two source text editors. A differentiated display of the currently defined shortcuts can be found under Menu> ?> Shortcuts… .
4.5.7 Notes on Tooltips
Since a tooltip text also supports HTML tags, you can, among other things, freely define the tooltip width by inserting an HTML table and then defining the table size with the Width property. For example, the ToolTip text is specified in the properties window of the control 'Button' with the name btnFlaecheABCV2 under the property 'ToolTip':
<table width=400>
<tr>
<td>
Lorem ipsum dolor sit amet, consetetur sadipscing elitr, sed diam nonumy eirmod tempor
invidunt ut labore et dolore magna aliquyam erat, sed diam voluptua.
</td>
</tr>
</table>
or in the source code for the selected button:
btnFlaecheABCV2.ToolTip = "<table width=400><tr><td>Lorem ipsum dolor sit amet, consetetur sadipscing elitr,
sed diam nonumy eirmod tempor invidunt ut labore et dolore magna aliquyam erat, sed diam voluptua.</td></tr></table>"
The result looks identical in both cases:
4.5.8 Help
In general, you can display the complete Gambas documentation in the IDE with the function key F1 - provided you have network access.
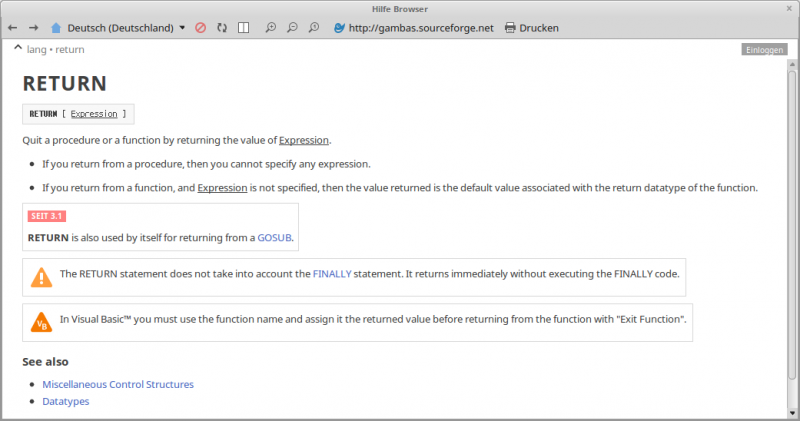
Help on definitions is displayed if you highlight a (key) word in the source text and then press the function key F2. It is sufficient if the cursor is in the (key) word or at its end. A help browser opens with the help text for the selected (key) word as a section of the Gambas documentation. The English text is displayed if no German translation exists:
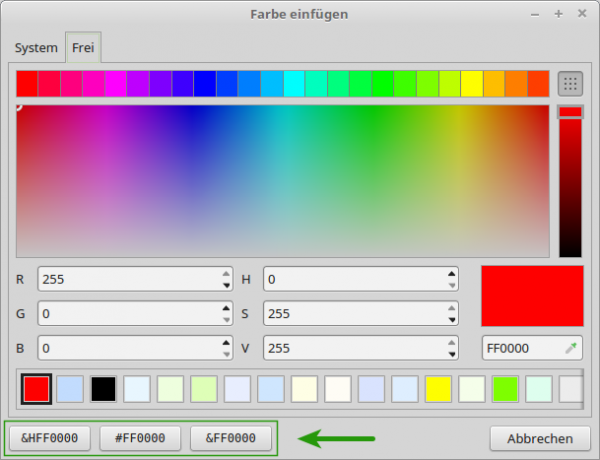
4.5.9 Insert colour values
You can select a colour value in the dialogue via the menu item ![]() and assign it to a colour property in three different formats, for example, like this:
and assign it to a colour property in three different formats, for example, like this:
lblValue.Foreground = &HFF0000
4.5.10 Insert current date
In this list of current date values under the symbol ![]() you are guaranteed to find a format you need and insert it into the source text at the cursor position with one click:
you are guaranteed to find a format you need and insert it into the source text at the cursor position with one click:
4.5.11 Insert special characters
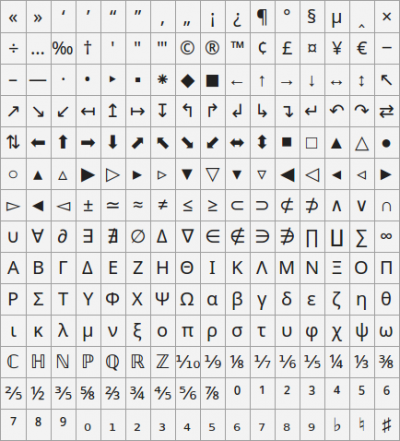
Just one more click away on ![]() in the source editor menu, this selection of special characters is available for insertion, as in Figure 4.5.1.1!
in the source editor menu, this selection of special characters is available for insertion, as in Figure 4.5.1.1!
4.5.12 Inserting text and 'Special insertion of text'
Inserting text via a click on ![]() is done quickly with the three options given:
is done quickly with the three options given:
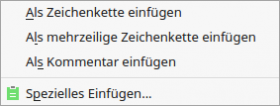
Figure 4.5.12.1: Inserting text
The last item in the menu also has its own menu and provides you with several options for the form in which the text is inserted. The mime type of the clipboard content is automatically detected:
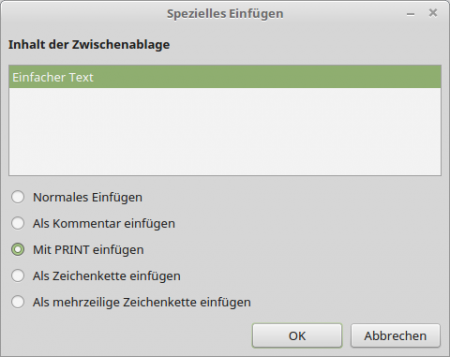
Figure 4.5.12.2: Special Paste
If you copied a file, for example, you will be offered 'URI list' as recognised content. If you select this option and then 'Paste with PRINT', the absolute path to the file will be inserted like this:
Print "file:///home/hans/BildTon/apple-red.png\r"
4.5.13 Format source text
You can have text sections in the source text formatted automatically if you activate the option `Format on Load & Save` in the settings under the heading Code Formatting. After that, a CTRL+SHIFT+F is enough to format the complete source text according to the IDE's defaults - which you cannot change.
4.5.14 Lock source text
You can set the entire text in the source text editor to `write-protected` via Menu> Edit> Locked or unlock it again.
4.5.15 Use of prefixes
The Gambas book follows the guidelines at http://gambaswiki.org/wiki/doc/namingconvention for prefixes for controls and variables in an adapted form. Source texts for the numerous projects for the individual chapters thus have a uniform diction and are above all easier to read.
4.5.15.1 Prefix for controls:
DateChooser: 	dach, dac
DirChooser: 	dich, dic
FileChooser: 	fich, fic
ColorChooser:	coch, coc
FontChooser 	foch, foc
---------------------------------------
ButtonBox: 	bubox, bub
CheckBox: 	ckbox, ckb
ComboBox: 	cobox, cmb
MovieBox: 	mobox, mbox
PictureBox: 	pibox, pib
SliderBox: 	slbox
SpinBox: 	sbox
TextBox: 	txbox
ValueBox: 	vabox, vbox
MaskBox: 	mabox
DateBox: 	dabox
DirBox: 	dibox
FontBox: 	fobox
ListBox: 	libox
---------------------------------------
Button: 	btn
ColorButton: 	cobtn
MenuButton: 	mebtn, mbtn
RadioButton:	opt, rabtn, rbtn, opb
SwitchButton:	swbtn, sbtn
ToggleButton:	tglbtn, tbtn
ToolButton: 	tobtn
---------------------------------------
ProgressBar: 		pbar
ScrollBar: 		sbar
Separator: 		sep
Slider: 		sld
Spinner: 		spi
ColorPalette:		cop
TextArea: 		txa
TextEdit: 		txe
Dial: 			dial
Editor: 		edi
FileProperties:	        fip
IconPane:l 		icp
ListEditor: 		lie
Form:			frm
---------------------------------------
Label: 	        lbl
TextLabel: 	txl
URLLabel: 	ulbl, urll
LCDLabel 	lcdlbl, lcdl
---------------------------------------
ColumnView: 	cov
DirView: 	div
DocumentView:	dov
FileView: 	fiv
GridView: 	grv
IconView: 	icv
ListView: 	liv
ImageView:	imv
TableView: 	tav
TreeView: 	trv
WebView: 	wev
MessageView:	mev
MapView: 	mav
4.5.15.2 Prefix for variables (data type)
Boolean:	b
Integer: 	i
Byte: 		ib
Short: 	        is
Long: 		il
Single: 	si
Float: 	        f
Date: 		d, date
String: 	s
Variant: 	v
Array: 	        a
Collection:	c
Struct: 	str, struc
Pointer: 	p
Objekt: 	o, h
Example source code:
Public Sub TCPIP_Socket_Read()

  Dim sResult, sDate, sTime As String
  Dim s1900 As String = "01/01/1900"
  Dim s1935 As String = "01/01/1935"
  Dim s1970 As String = "01/01/1970"
  Dim i, iCurrentSeconds As Integer
  Dim ilNTPSeconds, ilSeconds19001970 As Long
  Dim dDate1970, dCurrentDateUTC As Date

' The timestamp in the NTP is 64 bits long.
' 32 bits encode the (past) seconds since January 1st 1900 00:00:00 (!)

  If TCPIP_Socket.Status = Net.Connected Then
    Read #TCPIP_Socket, sResult, Lof(TCPIP_Socket)
  ' Conversion of the transmitted 32-bit data word into an integer number (typ long)
    For i = 1 To Len(sResult)
      ilNTPSeconds = ilNTPSeconds * 256 + Asc(Mid$(sResult, i, 1))
    Next
  Endif
' Alternative: Number of seconds = b3*256³ + b2*256² + b1*256 + b0

  lTimeResult = ilNTPSeconds
  ilSeconds19001970 = DateDiff(s1900, s1935, gb.Second) + DateDiff(s1935, s1970, gb.Second)
  iCurrentSeconds = ilNTPSeconds - ilSeconds19001970
  dDate1970 = Date(1970, 01, 01, 0, 0, 0)
  dCurrentDateUTC = DateAdd(dDate1970, gb.Second, iCurrentSeconds)
  sDate = Format$(dCurrentDateUTC, "dddd") & ", " & Format$(dCurrentDateUTC, "d. mmmm yyyy")
  sTime = Format$(Time(dCurrentDateUTC), "hh:nn:ss") & " Uhr"
' txbDateTime.Text = "Date  " & String.Chr(187) & "  " & sDate & " - " & sTime
  txbDateTime.Alignment = Align.Center
  txbDateTime.Text = sDate & " - " & sTime

End ' TCPIP_Socket_Read

