Sidebar
Table of Contents
18.7.1 HSplit and VSplit
The HSplit component is a container that arranges the inserted components horizontally; in the case of 2 components into a left and a right area. The VSplit component, on the other hand, is a container that arranges the inserted components vertically; for example, into an upper and a lower area. If, for example, you insert not only two but three components into the container component VSplit, then at runtime you will see 3 areas below each other, each of which can be resized by 2 horizontal dividers. The containers HSplit and VSplit are not visible at runtime.
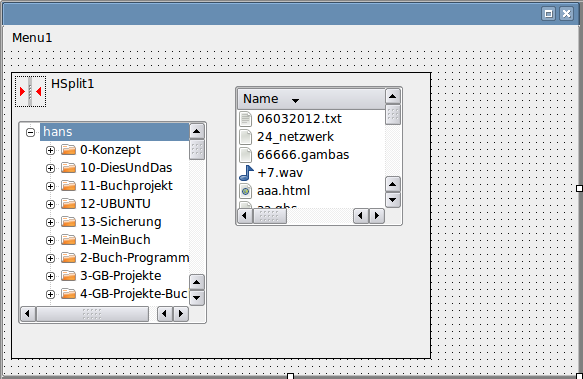
The horizontal or vertical arrangement of the inserted components is only determined by the positioning of the components on the form at design time! There is no method that performs this arrangement at runtime. However, you can change the division of horizontal areas at runtime by moving a vertical divider to the left or right with the mouse or change the size of vertical areas when you move a horizontal divider. The size of the inserted components in the container - which includes the Form container - are determined only by the properties set at runtime, so you only need to position the components as shown in Figure 18.7.1.1.
The use of containers such as HSplit and VSplit requires more detailed preliminary considerations about the form than if you only want to arrange some components freely on a form. Once you have decided which containers you want to use and which components should be inserted into them, it is a good plan to record the arrangement with paper and pencil - yes, even a fountain pen does a good job. This is recommended if you are developing a multiply nested form design with containers, as presented in Example 2.
18.7.1.1 Example 1 - HSplit
The following example is well suited to familiarise you with the use of the HSplit container. Create a new project HSplit. Enlarge the form to a width of about 570 and a height of 350. Insert a menu into the form with CTRL+E. After pressing Insert, leave the dialogue immediately with OK. Then include the container HSplit as HSplit1 in the form and subsequently place the two components DirView1 and FileView1 in the container HSplit1. Set the property FileView1.ShowDetailed to True.
Use the following illustration as a guide for the arrangement of the 2 components in the HSplit1 container so that the DirView1 component actually occupies the left-hand area:
Figure 18.7.1.1: Arrangement of the components DirView1 and FileView1 in the container HSplit1 (draft)
Then check whether the following properties of the components below are set or change the values accordingly:
- FMain.Arrangement = Arrange.Fill
- HSplit1.Ignore = False
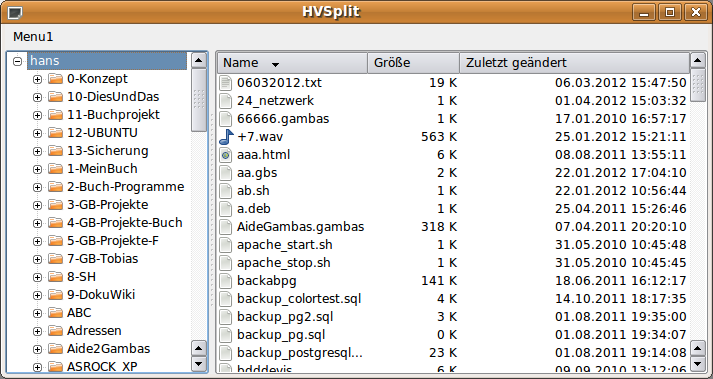
Only with these values is it guaranteed that the HSplit1 component will completely fill the remaining space on the form; without taking its place from the menu. Try it out by starting the programme:
Figure 18.7.1.2: Two components in the container HSplit1 (runtime)
18.7.1.2 Example project VSplit
You should try out the use of the VSplit component in another project.


