Sidebar
Table of Contents
24.15 Excursus: FTP server - installation, configuration and test
If you need an FTP server on your computer, it is worth installing the FTP server vsFTPd, for example.
You should observe the following notes and suggestions:
- This description describes the installation of the FTP server vsFTPd ('Very Secure FTP Daemon').
- For the first tests, the FTP client `ftp` is used in a console.
- The syntax of the individual FTP commands for the programme ftp (console) differs from the FTP commands according to RFC 959!
- The documentation for the selected FTP server is only referred to.
- The procedure described in this digression is well suited for the use of the FTP server vsFTPd within a home network.
24.15.2 Installing FTP server vsFTPd
This will tell you which FTP packages are already installed. An output might look like this:
$ dpkg --list | grep ftp
ii  ftp 0.17-34.1 amd64 classical file transfer client
ii  openssh-sftp-server 1:8.2p1-4ubuntu0.4 amd64 secure shell (SSH) sftp server module, ...
The FTP client `ftp` is already installed on this system, which is the default on Linux.
An FTP server is not installed by default on Ubuntu and Mint. It can be installed via the application management, whereby preference should be given to the small, efficient and security-optimised FTP server vsFTPd, or you can enter the following lines in succession in a terminal:
$ sudo apt-get update
$ sudo apt-get upgrade
$ sudo apt-get sudo apt install vsftpd
24.15.3 Controlling the FTP server server
Caution. The FTP server is started automatically at every system start (default). You can change this with these two commands:
$ sudo systemctl disable vsftpd 	-- Remove FTP server from the autostart list
$ sudo systemctl enable vsftpd 	  -- Add FTP server to the autostart list again
If the FTP server was not allowed at system start-up, then you can start it yourself. The following calls in a terminal will safely control the FTP server with the parameters in the list:
$ sudo systemctl parameter vsftpd 	{start|stop|restart|status}
$ sudo service vsftpd parameter   	{start|stop|restart|status}
Examples:
$ sudo service vsftpd stop
$ sudo systemctl stop vsftpd		-- Alternatively for a ubuntu-based system
The FTP server service should already be active after the installation is complete. Here's how you can check:
$ systemctl status vsftpd			-- Only for the status query without increased authority
● vsftpd.service - vsftpd FTP server
     Loaded: loaded (/lib/systemd/system/vsftpd.service; enabled; vendor preset: enabled)
     Active: active (running) since Thu 2022-02-03 15:13:01 CET; 1h 17min ago
    Process: 696 ExecStartPre=/bin/mkdir -p /var/run/vsftpd/empty (code=exited, status=0/SUCCESS)
   Main PID: 710 (vsftpd)
      Tasks: 1 (limit: 18934)
     Memory: 2.3M
     CGroup: /system.slice/vsftpd.service
             └─710 /usr/sbin/vsftpd /etc/vsftpd.conf

Feb 03 15:13:01 pc-mint20 systemd[1]: Starting vsftpd FTP server...
Feb 03 15:13:01 pc-mint20 systemd[1]: Started vsftpd FTP server.
24.15.4 Adjusting the FTP server configuration
First save the original configuration file /etc/vsftpd.conf:
$ sudo mv /etc/vsftpd.conf /etc/vsftpd.conf_original
Then add the following tried and tested content to the (empty) configuration file /etc/vsftpd.conf:
listen=NO
listen_ipv6=YES
anonymous_enable=NO
ftpd_banner="Welcome to LEHMANN-FTP-Service!"
local_enable=YES
write_enable=YES
utf8_filesystem=YES
local_umask=022
dirmessage_enable=YES
use_localtime=YES
xferlog_enable=YES
connect_from_port_20=YES
chroot_local_user=YES
secure_chroot_dir=/var/run/vsftpd/empty
allow_writeable_chroot=YES
pam_service_name=vsftpd
pasv_enable=Yes
pasv_min_port=55536
pasv_max_port=55599
Note: The default port range of 55536:55599 for passive FTP is used.
Do not forget - after saving the changed FTP server configuration - to restart the FTP server!
24.15.4.1 Configuration Firewall
Then optionally activate and configure the firewall 'ufw':
$ sudo ufw enable
$ sudo ufw allow from any to any port 20,21 proto tcp
$ sudo ufw allow 55536:55599/tcp
$ sudo ufw allow 990/tcp
$ sudo ufw allow openssh
$ sudo ufw reload
$ sudo ufw status
Configuration:
hans@pc-mint20:~$ sudo ufw enable
[sudo] Passwort für hans:
Die Firewall ist beim System-Start aktiv und aktiviert
hans@pc-mint20:~$ sudo ufw allow from any to any port 20,21 proto tcp
Regel hinzugefügt
Regel hinzugefügt (v6)
hans@pc-mint20:~$ sudo ufw allow 55536:55599/tcp
Regel hinzugefügt
Regel hinzugefügt (v6)
hans@pc-mint20:~$ sudo ufw allow 990/tcp
Regel hinzugefügt
Regel hinzugefügt (v6)
hans@pc-mint20:~$ sudo ufw allow openssh
Regel hinzugefügt
Regel hinzugefügt (v6)
hans@pc-mint20:~$ sudo ufw reload
Firewall neu gestartet
hans@pc-mint20:~$ sudo ufw status
Status: Aktiv

Zu                         Aktion      Von
--                         ------      ---
20,21/tcp                  ALLOW       Anywhere
55536:55599/tcp            ALLOW       Anywhere
990/tcp                    ALLOW       Anywhere
OpenSSH                    ALLOW       Anywhere
20,21/tcp (v6)             ALLOW       Anywhere (v6)
55536:55599/tcp (v6)       ALLOW       Anywhere (v6)
990/tcp (v6)               ALLOW       Anywhere (v6)
OpenSSH (v6)               ALLOW       Anywhere (v6)
24.15.4.2 Configuration UTF8
You can configure the FTP server vsFTPd with regard to UTF8 in the configuration file /etc/vsftpd.conf via the option
utf8_filesystem=YES
option. In the source code in a (Gambas) FTP client program, the following FTP command 'OPTS UTF8 ON' ensures that the FTP server uses UTF8:
hFTPClient.Exec(["OPTS UTF8 ON"])
The output of the following FTP command
hFTPClient.Exec(["FEAT"])
in debug mode (hFTPClient.Debug = True) gives this (abbreviated) output in the console in the Gambas IDE:
> FEAT
* ftp_perform ends with SECONDARY: 0
< 211-Features:
<  UTF8
...
<  TVFS
< 211 End
Note that the output 'UTF8' of the FTP server used - for example, in the case of a NAS FTP server - does not mean that it also outputs strings in UTF8. It is also not enough that you configure the FTP server to enable UTF8. You obviously have to configure it so that it should always use UTF8 and not automatically, which can be set with other FTP servers.
A way out would be to convert the character sets directly in the FTP client, for example when displaying the file names on the FTP server, but this presupposes that one knows both character sets for sure:
grvServerFiles[iRow, iColumn].Text = Conv$(avFileName[iColumn], "ISO-8859-15", "UTF-8")
24.15.5 Documentation
Extensive documentation on the installation and configuration of the FTP server can be found at:
https://wiki.ubuntuusers.de/vsftpd/
https://www.howtoforge.de/anleitung/installation-und-konfiguration-des-vsftpd-servers-auf-ubuntu-1804-lts/
https://think.unblog.ch/ftp-server-installation-mit-vsftpd/
https://www.howtoforge.de/anleitung/wie-installiert-und-konfiguriert-man-einen-ftp-server-vsftpd-mit-ssl-tls-unter-ubuntu-2004/
https://linuxconfig.org/how-to-setup-and-use-ftp-server-in-ubuntu-linux
https://www.ionos.de/digitalguide/server/konfiguration/ubuntu-ftp-server-installation-und-konfiguration/
24.15.6 Connection data
If you want to establish a connection with an FTP client to the FTP server server, then it is mandatory that you have the following data:
- IP address of the FTP server or, in a DHCP environment with DNS server, its host name or just 127.0.0.1 or localhost, if the FTP server is running on the same system as an FTP client for test purposes, and
- the FTP account data (FTP-UserName, FTP-Password) of a user on the FTP server.
24.15.7 Create FTP account
Now it is time to create an FTP account for an FTP user on the installed FTP server so that the first tests can be completed:
$ sudo useradd -m ftpuser
$ sudo passwd ftpuser
Bitte ein neues Passwort eingeben:
Bitte das neue Passwort erneut eingeben:
passwd: Passwort erfolgreich geändert
24.15.8 FTP connection with password authentication
To connect from the FTP client 'ftp' to the FTP server vsFTPd, you need the IP address of the server and an FTP account:
$ ftp 192.168.0.245
$ ftp pc-mint20
$ ftp localhost
$ ftp 127.0.0.1
Connected to 127.0.0.1.
220 "Welcome to LEHMANN-FTP-Service!"
Name (127.0.0.1:hans): ftpuser
331 Please specify the password.
Password:
230 Login successful.
Remote system type is UNIX.
Using binary mode to transfer files.
ftp> close
221 Goodbye.
ftp> exit
$
24.15.9 FTP connection - FTP commands
The following task is to be completed:
- First, establish a connection from the FTP client 'ftp' to the FTP server,
- then the content of the base directory /html is read→ dir and
- the directory is changed with cd html.
- Then the existing file /html/k28_plan.txt in the directory /html is renamed to /html/k28_konzept.txt → rename and
- finally, the connection is closed → close and the FTP client is terminated → exit.
$ ftp 192.168.0.245
Connected to 192.168.0.245.
220 "Welcome to LEHMANN-FTP-Service!"
Name (192.168.0.245:hans): ftpuser
331 Please specify the password.
Password:
230 Login successful.
Remote system type is UNIX.
Using binary mode to transfer files.
ftp> dir
200 PORT command successful. Consider using PASV.
150 Here comes the directory listing.
drwxr-xr-x    2 1001     1001         4096 Feb 19 16:11 backup
drwxr-xr-x   38 1001     1001         4096 Mar 09 10:28 html
drwxr-xr-x    2 1001     1001         4096 Feb 19 16:11 log
226 Directory send OK.
ftp> cd html
250 Directory successfully changed.
ftp> rename /html/k28_plan.txt /html/k28_konzept.txt
350 Ready for RNTO.
250 Rename successful.
ftp> close
221 Goodbye.
ftp> exit
$
24.15.10 Connecting to the FTP server in the file manager
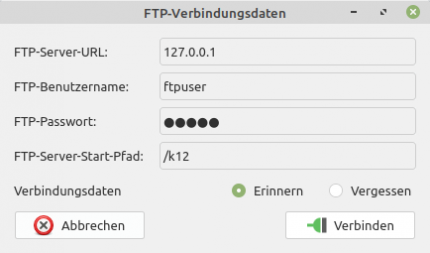
In the file manager, under 'File/Connect to Server', start the dialogue below and enter all relevant data, whereby you can enter its IP address or host name for 'Server:':

Figure 24.15.10.1: Dialogue - Connect to FTP server
After successfully connecting to the FTP server, you will see the (remote) directory mounted via the network in the file manager. Now you can work in this directory under the account rights. After the administrative work, unmount the data carrier again or bookmark this FTP server connection.
24.15.11 Using the FTP server
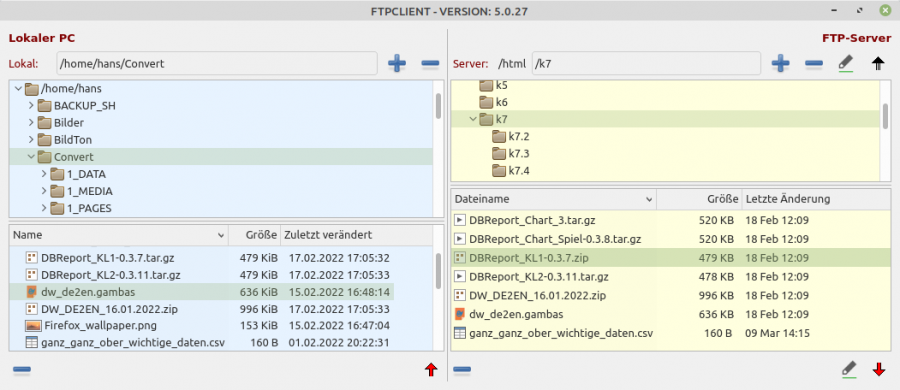
The FTP server vsFTPd was installed by the author to explore the FTPClient class. This ensured that all projects in Chapter 24.3.1 FTPClient could be extensively tested. The class FTPClient provides an FTP client that allows downloading files from an FTP server, uploading files to an FTP server and sending FTP commands to an FTP server. The following example shows the use of this class for a project that focused on file transfer to and from an FTP server.

Figure 24.15.11.1: FTP client based on the class FTPClient
The complete source code for the FTP client can be found in chapter '24.2.3 FtpClient'.
24.15.12 Web browser and support for FTP
FTP has been the means of choice for file downloads for decades. Because both the credentials and the file contents are transmitted unencrypted, web browsers such as Google Chrome and Firefox have stopped supporting insecure FTP.

