Table of Contents
4.4 IDE - Form Editor
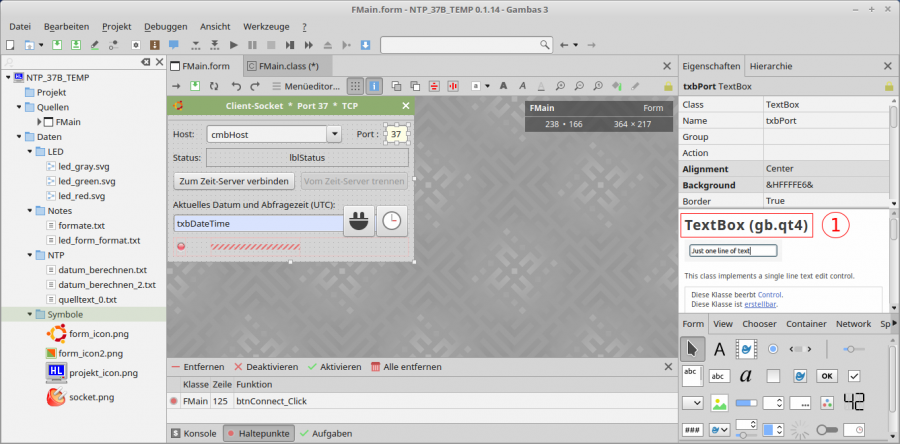
For the development of graphical user interfaces (→ Graphical User Interface or GUI), the IDE provides you with a form editor and, via it, access to the GUI toolkits GTK+ and Qt in different versions. These program libraries are used for programming graphical user interfaces in desktop applications and provide a selection of controls. Depending on the toolkit selected, the toolbox contains different numbers of controls. Note that for the Gambas book all projects with GUI are developed with QT4 ①.

Figure 4.4.1: IDE - Form Editor
Note: If you have selected gb.gui.qt, use gb.qt4.* or gb.qt5.* components equally in the IDE. The gb.qt*.ext components are not considered by gb.gui.qt - you do not have a gb.gui.qt.ext component. Consequence: If you need a text editor, use gb.form.editor. If, on the other hand, you need a rich text editor, then you need gb.qt4.ext or gb.qt5.ext explicitly, and so you need gb.qt4 or gb.qt5.
4.4.1 Start
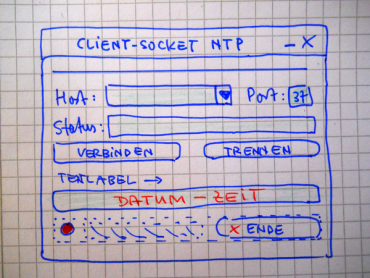
There should be a concept for the layout and design of the graphical user interface (GUI) for a new project - preferably in the form of a tangible sketch:

Figure 4.4.1.1: GUI - Concept for the layout of controls.
The concept should include the following for the controls, among others:
- Type (container - native control)
- Name (prefix (optional))
- Sizes (width, height, xy-position)
- Colours (design)
- Arrangement on the form or in the special container
- Start values for controls to enter data or display status values
In the Gambas IDE, you will find the (standard) controls in the toolbox under several headings (Form, View, Chooser, Container and Special). If special controls are needed, then you have to activate the components in the project properties that provide these controls.With the controls, a distinction must be made between containers (the form is also a (global) container) and native controls. A container (parent) - first and foremost the shape itself - can contain further controls (children). Some of the containers, such as VSplit, specify a certain arrangement of the inserted controls and thus support the layout of the GUI.
In addition to the global configuration, you always edit the project-related configuration under IDE> Menu> Project> Properties. This configuration file .project is located in the project folder.
4.4.2 Populate form with controls
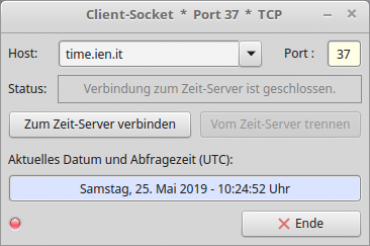
Double-clicking on a control in the toolbox inserts it into the form. You can also select the symbol of the control and then drag it onto the form with Drop&Down and drop it there at the intended position. If you have marked a control or are standing over a control with the mouse, then a click on the right mouse button opens the help browser for the control - but only if you are online or the offline help is active. In the shape editor, all controls are displayed on the shape:

Figure 4.4.2.1: Arrangement of controls on the shape
Note that the control labelled 'x end' as in Figure 4.4.1.1 has not been dragged and dropped onto the shape. This control is not created, inserted into the HBox and displayed until the programme runs!
With the following source code, insert a button into the container HBox on the shape and set its properties (width, height, icon and caption). With the Show() method, the button is displayed when the programme window opens. Afterwards, you define the required functionality via the click event btnClose_Click(): The programme window is closed. As you can see, further instructions are given before the programme window is closed:
Public NewButton1 As Button

Public Sub Form_Open()

  FMain.Center()
  ...
  NewButton1 = New Button(HBox1) As "btnClose" ' Observer-Name
  NewButton1.W = 120
  NewButton1.H = 28
  NewButton1.Picture = Picture["icon:/16/cancel"]
  NewButton1.Caption = "Ende"
  NewButton1.Show()

End

Public Sub btnClose_Click()
  FMain.Close()
End

Public Sub Form_Close()
  If TCPIP_Socket.Status > 0 Then Close #TCPIP_Socket
  If TimeOut.Enabled = True Then TimeOut.Stop()
End
4.4.3 Fine-tune controls
Arranging or moving or resizing controls is always preceded by selecting the controls! Selecting a control is done with a simple click on the control. By keeping the CTRL key pressed, you can freely select further controls. In another variant you select several controls lying together while holding down the Shift key (lasso function). Single-click on the shape or press the ESC key to cancel the selection. Note that if at least two controls are selected, the corresponding toolbar changes to the shape editor. After selecting, you can move or resize the controls. With CTRL+Z you can undo the action.
Normally, the control elements are moved on the form in the given grid (default = 7). If it is necessary to fine-tune or resize the control elements only by a few pixels vertically or horizontally, do it like this:
(1) Select one control element or several control elements with the lasso function and then move control element(s) with the mouse (carefully) in the grid (± 7).
(2) Mark control element(s) and then move them finely:
- SHIFT + right arrow key → shift 1 pixel to the right at a time
- SHIFT + arrow key left → shift 1 pixel to the left at a time
- SHIFT + down arrow key → shift down 1 pixel at a time
- SHIFT + arrow key up → shift up 1 pixel at a time
(3)Select control element(s) and then change width or height of a control element:
- CTRL + right arrow key → increase width by 7 pixels
- CTRL + arrow key left → decrease width by 7 pixels
- CTRL + arrow key down → increase height by 7 pixels
- CTRL + arrow key up → decrease height by 7 pixels
You can also change the width, height and position of a selected control using the corresponding properties Control.W, Control.H, Control.X and Control.Y in the Properties window.
4.4.4 Notes
4.4.4.1 Form template
If you have followed the concept of the GUI as shown in Figure 4.4.1 and inserted all the controls into the form and saved the project, then the file FMain.form is created in your project in the (hidden) folder .src, in which the layout of the GUI is saved. This file is always needed when you open a form in the form editor. Here is an extract from the FMain.form file for the GUI:
# Gambas Form File 3.0

{ Form Form
  MoveScaled(34,23.7143,52,31)
  Text = ("Client-Socket  *  Port 37  *  TCP ")
  Icon = Picture["Symbole/form_icon.png"]
  Resizable = False
  { btnConnect Button
    MoveScaled(1,12,26,4)
    Text = ("Connect to the time server")
  }
  { btnDisconnect Button
    MoveScaled(28,12,23,4)
    Enabled = False
    Text = ("Disconnect from time server")
  }
  ...
  { HBox1 HBox
    MoveScaled(1,26,50,4)
    Spacing = True
    { cPanel Panel
      MoveScaled(0.7143,0,2,4)
      { pboxStatus PictureBox
        MoveScaled(0,1,2,2)
        Picture = Picture["LED/led_red.svg"]
        Stretch = True
        Alignment = Align.Center
      }
    }
    { panSpace Panel
      MoveScaled(8,0,19,4)
      Expand = True
    }
  }
}
4.4.4.2 Insert form into project
You insert further forms into the sources by creating a new form using the context menu in the project window (→ Chapter 12.2.0.2). Click on a form symbol in the sources to open the form in another form editor.
4.4.4.3 Hierarchy of controls
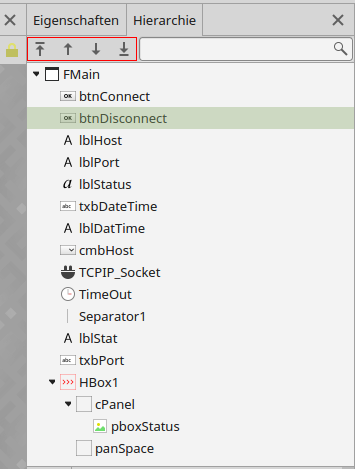
In the Object Inspector you can switch to the 'Hierarchy' tab. In addition to the symbols, you will also see the assigned names for the controls and their hierarchy on the form. All controls from the button with the name 'btnConnect' to the horizontal box 'HBox1' are on the shape. There are two panels in the container HBox1. The panel with the name 'cPanel' is a container for a picture box.
Only in this hierarchy dialogue is it possible to define the tab order. This is not possible in the source text. This order determines the sequence in which the controls are scrolled through when the TAB key is pressed. With the 4 arrow keys marked in red, you can move the controls in the container to set the tab order.

Figure 4.4.4.3.1: Hierarchy of controls
The Control.SetFocus method allows you to set the focus on the selected control at any time - regardless of the set hierarchy.
4.4.4.4 Duplicate control
You can duplicate a selected control by pressing CTRL+CV and paste it into the form. Note that the insertion position is always X=0 and Y=0. All properties of the original control are taken over - except for the name. The original name is supplemented by a consecutive number starting with 2.
Note: If you want to insert a duplicated control - which is on the form - into a container, you first have to cut the control with CTRL+X, then select the container and insert the control with CTRL+V. Finally, you have to copy the control to the container. Finally, you must finally position the control inserted at the container position X=0 and Y=0. Often it will be necessary to change the name and selected properties.