14.2.4 Class Cursor
The Cursor class implements custom mouse pointers. Please note that a mouse pointer is always bound to a specific component. The mouse pointer is the image that indicates the position of the mouse on the screen. For example, if you want to use your own mouse pointer, you must first specify that you want to replace the mouse pointer for a particular component with a user-defined mouse pointer. A new cursor object is then created, to which a small image is assigned as the appropriate mouse pointer. As an option, the coordinates of the mouse tip can also be specified if necessary.
You can select appropriate mouse pointers from these sources:
- Use the image editor in the Gambas IDE to design and design your own mouse pointers.
- You use an icon (16 pixels) from the collection of gambas as mouse pointer. You will find interesting information on this in chapter 20.8 of the description of the 'Stock' class.
- You use existing small pictures in appropriate size as mouse pointers.
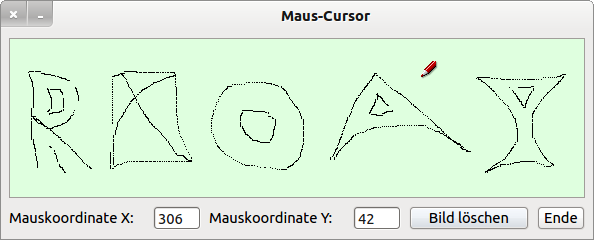
In the presented project 'Cursor' special mouse pointers are used for selected components, which originate from the three sources mentioned above. You will also learn how to use the mouse to draw in a DrawArea while holding down the left mouse button.

Figure 14.2.4.1: User-defined mouse pointer - drawing pencil - in the 'Cursor' project
The source text is completely specified and then commented on:
[1] ' Gambas class file
[2]
[3] Public bStart As Boolean
[4]
[5] Public Sub Form_Open()
[6]
[7]   FMain.Center
[8]   FMain.Resizable = False
[9]   DrawingArea1.Cached = True
[10]   txtMouseX.Mouse = Mouse.Blank ' TextBox without mouse pointer
[11]   txtMouseY.Mouse = Mouse.Blank
[12]   btnClose.Mouse = Mouse.Pointing ' Mouse constant (hand)
[13]
[14]   btnClear.Mouse = Mouse.Custom
[15]   btnClear.Cursor = New Cursor(Picture["Mouse pointer/erase.png"])
[16]
[17] ' Standard mouse tip is the upper left corner of the mouse image
[18] ' With x=0 and y=15 the mouse tip lies on the pencil lead
[19]   DrawingArea1.Mouse = Mouse.Custom
[20]   DrawingArea1.Cursor = New Cursor(Picture["icon:/16/pen"], 0, 15)
[21]
[22]   Draw.Begin(DrawingArea1)
[23]     Draw.Foreground = Color.Red
[24]     Draw.Font.Size = 30
[25]     Draw.Font.Bold = True
[26]   ' Text centered on the drawing sheet in the specified rectangle
[27]     Draw.Text("Are you afraid of mice?", 0, 0, DrawingArea1.ClientW, DrawingArea1.ClientH, Align.Center)
[28]   Draw.End
[29]   bStart = True
[30]
[31] End ' Form_Open()
[32]
[33] Public Sub DrawingArea1_MouseMove()
[34]
[35]   If bStart = True Then
[36]      Wait 0.2
[37]      bStart = False
[38]      DrawingArea1.Clear
[39]   Endif '  bStart = True?
[40]   txtMouseX.Text = Mouse.X
[41]   txtMouseY.Text = Mouse.Y
[42]   If Mouse.Left = True Then
[43]     Draw.Begin(DrawingArea1)
[44]     If Mouse.X>5 And Mouse.X<DrawingArea1.Width-5 And Mouse.Y>5 And Mouse.Y<DrawingArea1.Height-5 Then
[45]         Draw.Point(Mouse.X, Mouse.Y)
[46]     Endif
[47]     Draw.End
[48]    Endif ' Mouse.Left = True?
[49] End ' DrawingArea1_MouseMove()
[50]
[51] Public Sub btnClear_Click()
[52]
[53]   DrawingArea1.Clear
[54]   txtMouseX.Text = "0"
[55]   txtMouseY.Text = "0"
[56]
[57] End ' btnClear_Click()
[58]
[59] Public Sub btnClose_Click()
[60]   FMain.Close
[61] End ' btnClose_Click()
Comments:
- In lines 11 and 12, the mouse pointers are hidden for both text fields.
- The End button (btnClose) gets a mouse pointer from the set of predefined gambas.
- The component Button/ with the name btnClear gets a user-defined mouse pointer in lines 14 and 15. An existing small image is used, which was saved in the project folder in the sub-folder Mouse pointer. First, it is specified that the default mouse pointer of btnClear is replaced by a user-defined mouse pointer. The image erase.png is used as the new mouse pointer.
- The DrawArea1 component also receives a user-defined mouse pointer. This time an icon from the collection of gambas is assigned as mouse pointer to the new cursor object. The two optional values represent the coordinates of the so-called' hot spot' of the mouse pointer, which is located here on the pen tip - line 20.
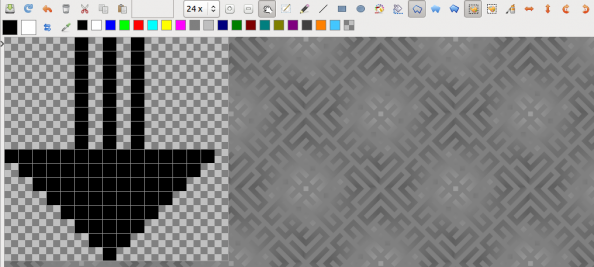
- In the Gambas IDE you can call the Bild-Editor and draw your own mouse pointer. After a right click on the fictitious folder' Data' select New > Image. Then assign an image name and set the width and height to, for example, tried and tested 16 pixels. You can apply the other settings. With OK you accept all settings and the image editor opens → Figure 14.2.4.2.
- It is also possible to change existing images in the image editor. This is no problem if you save the image to the project folder first and then open it in the Gambas IDE by double-clicking on the selected image in the image editor. Changes to the new cursor must be saved in the image editor!

Figure 14.2.4.2: Mouse pointer in the image editor
In the project folder you will find custom mouse pointers that you can use for your own projects.